After making a custom wall sconce for the kitchen, it was time to tackle the ceiling. When I removed the light above the island I learned the hole and circuit box wasn’t centered and there were a lot of screw holes to patch. Nothing is ever easy is it?


I thought I’d build some type of box attached to the stud to cover everything up. Then the light fixture’s mount would attach to the box. It turns out this is actually a thing, called a ceiling medallion.
At its most basic, a ceiling medallion is a decorative element that dresses-up and enhances the area around the ceiling canopy, where the wiring for a chandelier or other fixture enters the ceiling junction box.
Lamps Plus
A quick Google image search shows some examples.

I didn’t have time to wait for an online order to arrive, so I came up with a plan to make my own. It’s purpose would be functional, but I’d add a bit of design. It would be square to cover the holes in my ceiling and match the shape of my light fixture’s mount.
I cut two pieces of plywood. Then I made a bunch of layout marks for the stud, center of the light, section overlaps, etc. I also cut out areas for wiring. Next I drilled holes for lag screws to mount to the ceiling (and recesses in the back of the smaller piece for the heads of those lag screws and washers) and for screws to attach the two pieces together. I also determined where the mounting bracket would go.

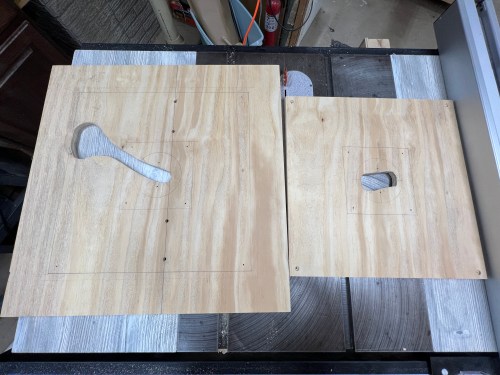
After that I cut a bunch of strips of scrap wood for the outside trim with mitred corners and then glued and pin nailed the pieces to the plywood layers. I used wood filler on any holes and caulked the seams.


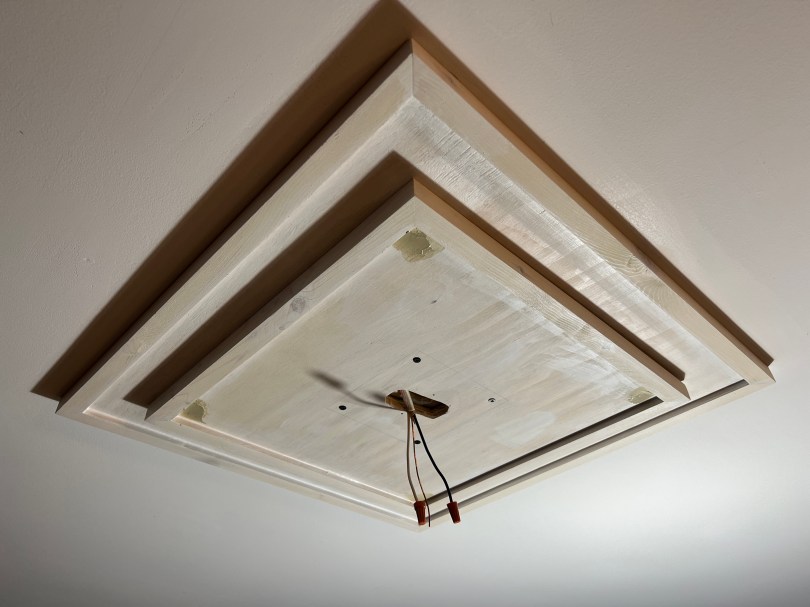
Then I did a rough sanding, applied a coat of primer, and attached to the ceiling. With four lag screws and washers holding it to the ceiling and 8 screws attaching the two layers, this thing won’t be coming down!


I caulked the seams at the ceiling and between the two layers. I also used wood filler on the four screw holes that would be seen. Some light sanding, another coat of primer, and then I painted when I did the ceiling. The final step was installing the new light.

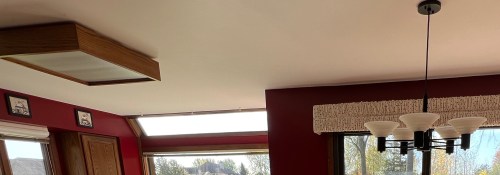
We also replaced the dining table light and have a replacement of the same style for above the sink, but I need to fix the lower ceiling area there and paint first. The 60 watt bulbs that came with these lights were not bright enough and had too much of an amber tint (original bulbs in the picture above). I bought 100W equivalent LED bulbs, which are much better. Note that the walls will be getting painted.


For comparison here are the old lights.

[…] also installed the final of the lights, over the kitchen sink, which really brightens it […]
LikeLike
[…] DIY Square Ceiling Medallion […]
LikeLike
[…] DIY Square Ceiling Medallion […]
LikeLike
[…] taking measurements, I cut up oak pieces from my old kitchen light box. This storage shelf came together pretty quick and has room for even more hammers. Now I can […]
LikeLike
[…] I had some LED tubes from the old kitchen light. […]
LikeLike
How did you square the ceiling meadallion to the room?
LikeLike
I think I measured two places off of one wall, but it’s been two years so don’t remember exactly.
LikeLike