I’ll likely turn this into something that interfaces with my Home Assistant server to control different devices around my house.
The PyPortal has been sitting on a shelf ever since. Way back in February, it caught my eye, and I picked it up, not remembering what it’s capabilities were. Then I started upgrading IKEA air quality monitors and even made my own. Since I’m at the desk in my office a large portion of the week I thought I would make that 2019 prediction come true.
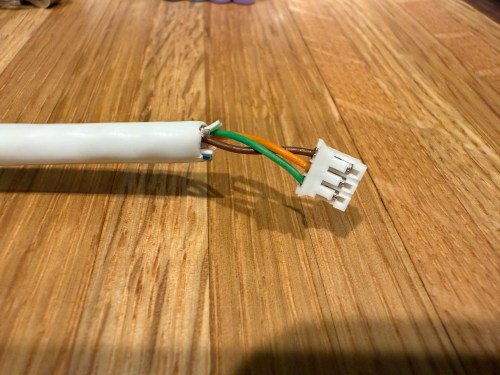
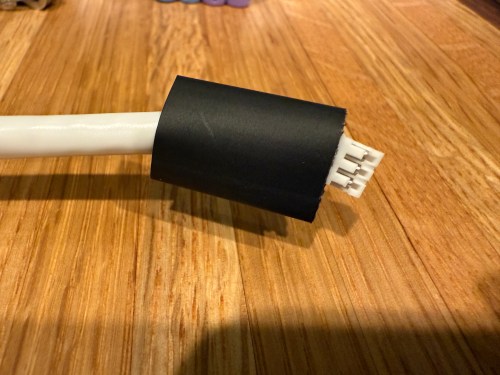
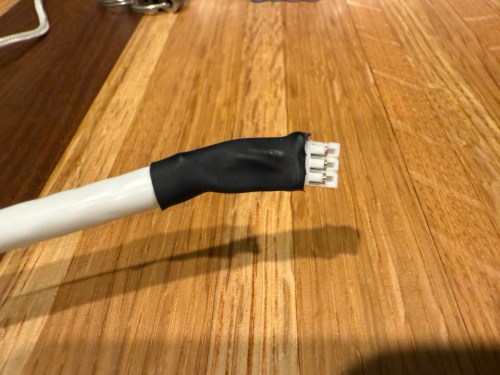
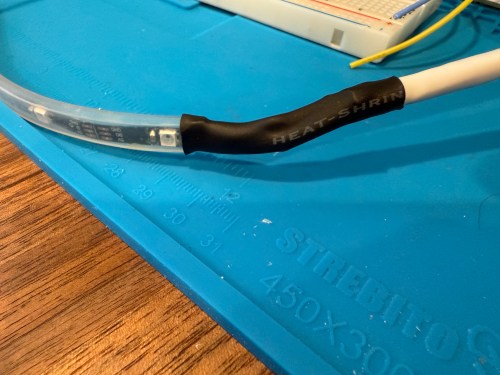
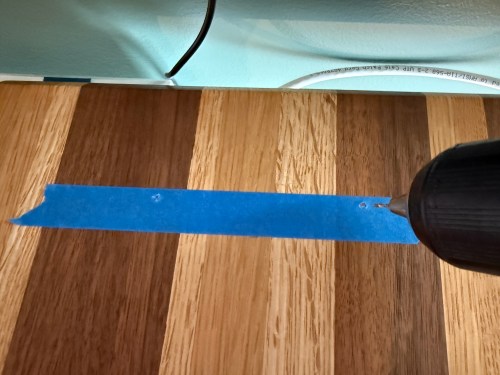
I could show a bunch of data on the screen and the PyPortal has a touchscreen, so I could display buttons for triggering things around the house. The device also has connectors for doing GPIO, so I got the idea of adding an LED strip, which I could use for notifications. I even had a meter long strip of Adafruit Mini Skinny NeoPixels I had bought in 2017 and never touched that would be perfect. I needed to buy a 2.0mm JST PH Connector kit in order to make a wire that would connect to the pack of the PyPortal. I ended up using a piece of Cat6 cable, even though I only needed 3 of the 8 wires inside.
All of this was done back in March. I quickly began having issues with the ethernet cable and the small JST connectors, so I put this post on pause. Figured it was time to finally fix this before the end of the year. While testing, I determined the LED strip got fried up at some point. It was probably some kind of short from the janky wire.
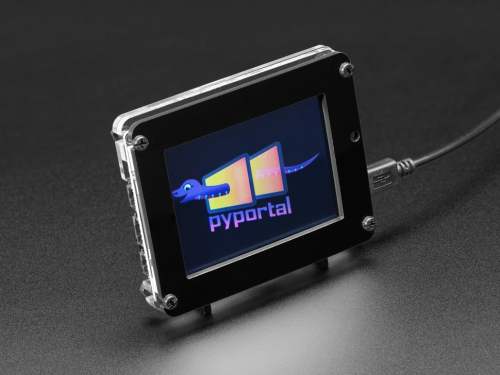
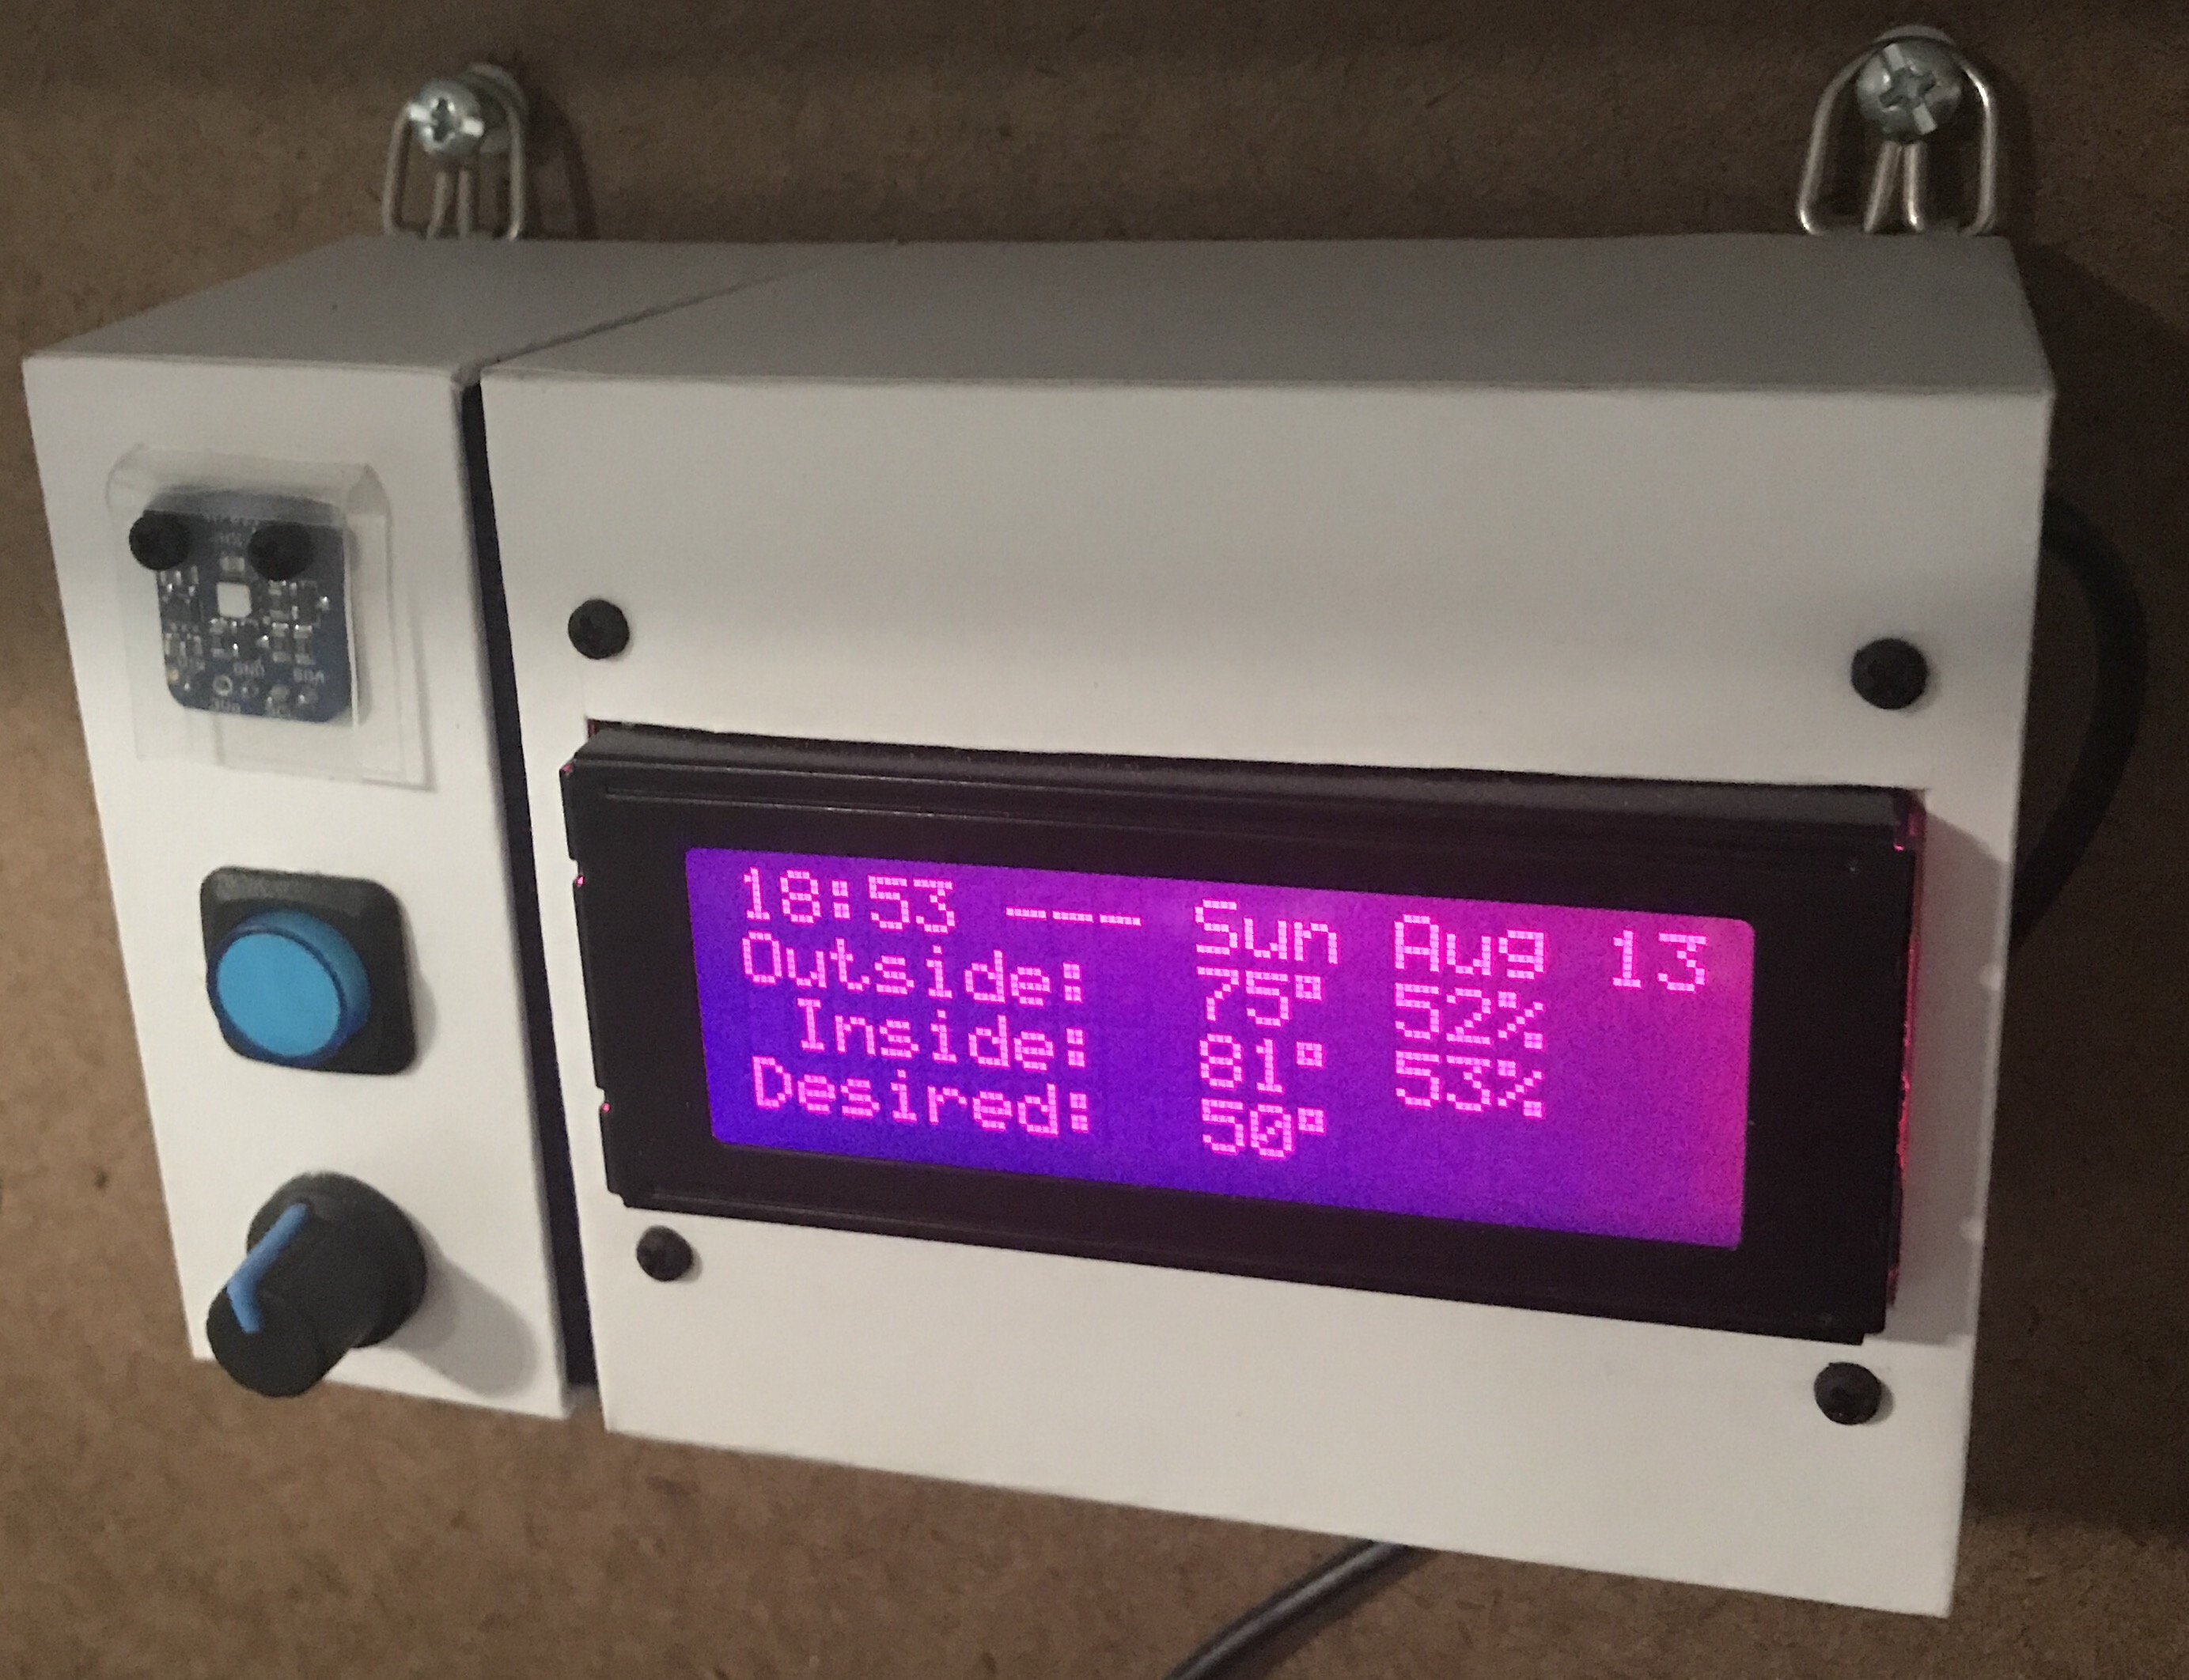
Here’s what my display looks like.
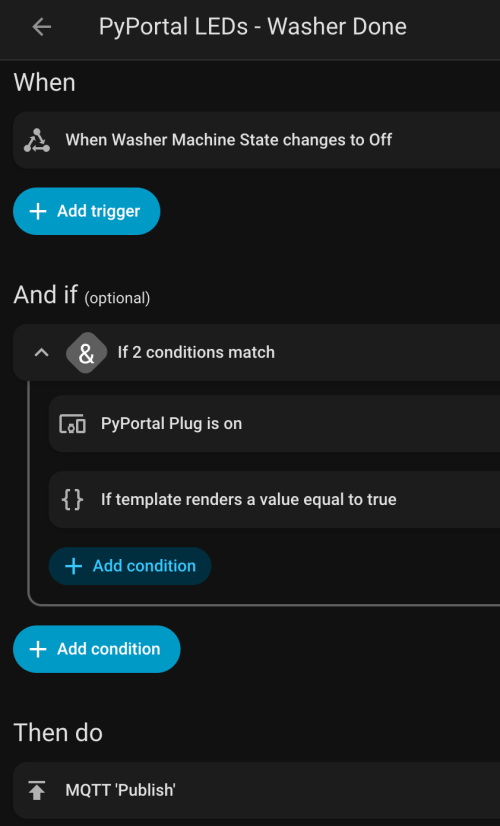
My favorite aspect of the project and code is being able to publish MQTT messages from Home Assistant, which the PyPortal listens for and reacts to. I can send various commands, such as fill:blue, which turns all of the LEDs blue, or whatever color I set. I have commands to chase a color from one side to the other, bounce a color from left to right and back to the left, pulse the entire strip, animate a rainbow, or set the brightness. Since I don’t have another strip of Neopixels, in order to create a demo video, I wired up a 24 LED circle. You’ll have to imagine the effects on the back of my desk, lighting up the wall.
I can manually send these MQTT messages as shown in the demo, but the real power comes from automations. For example, the LEDs automatically pulse blue when the washing machine is done and pink when the dryer is done.
With the different effects and color combinations, the possibilities are endless. What kind of automations would you run?
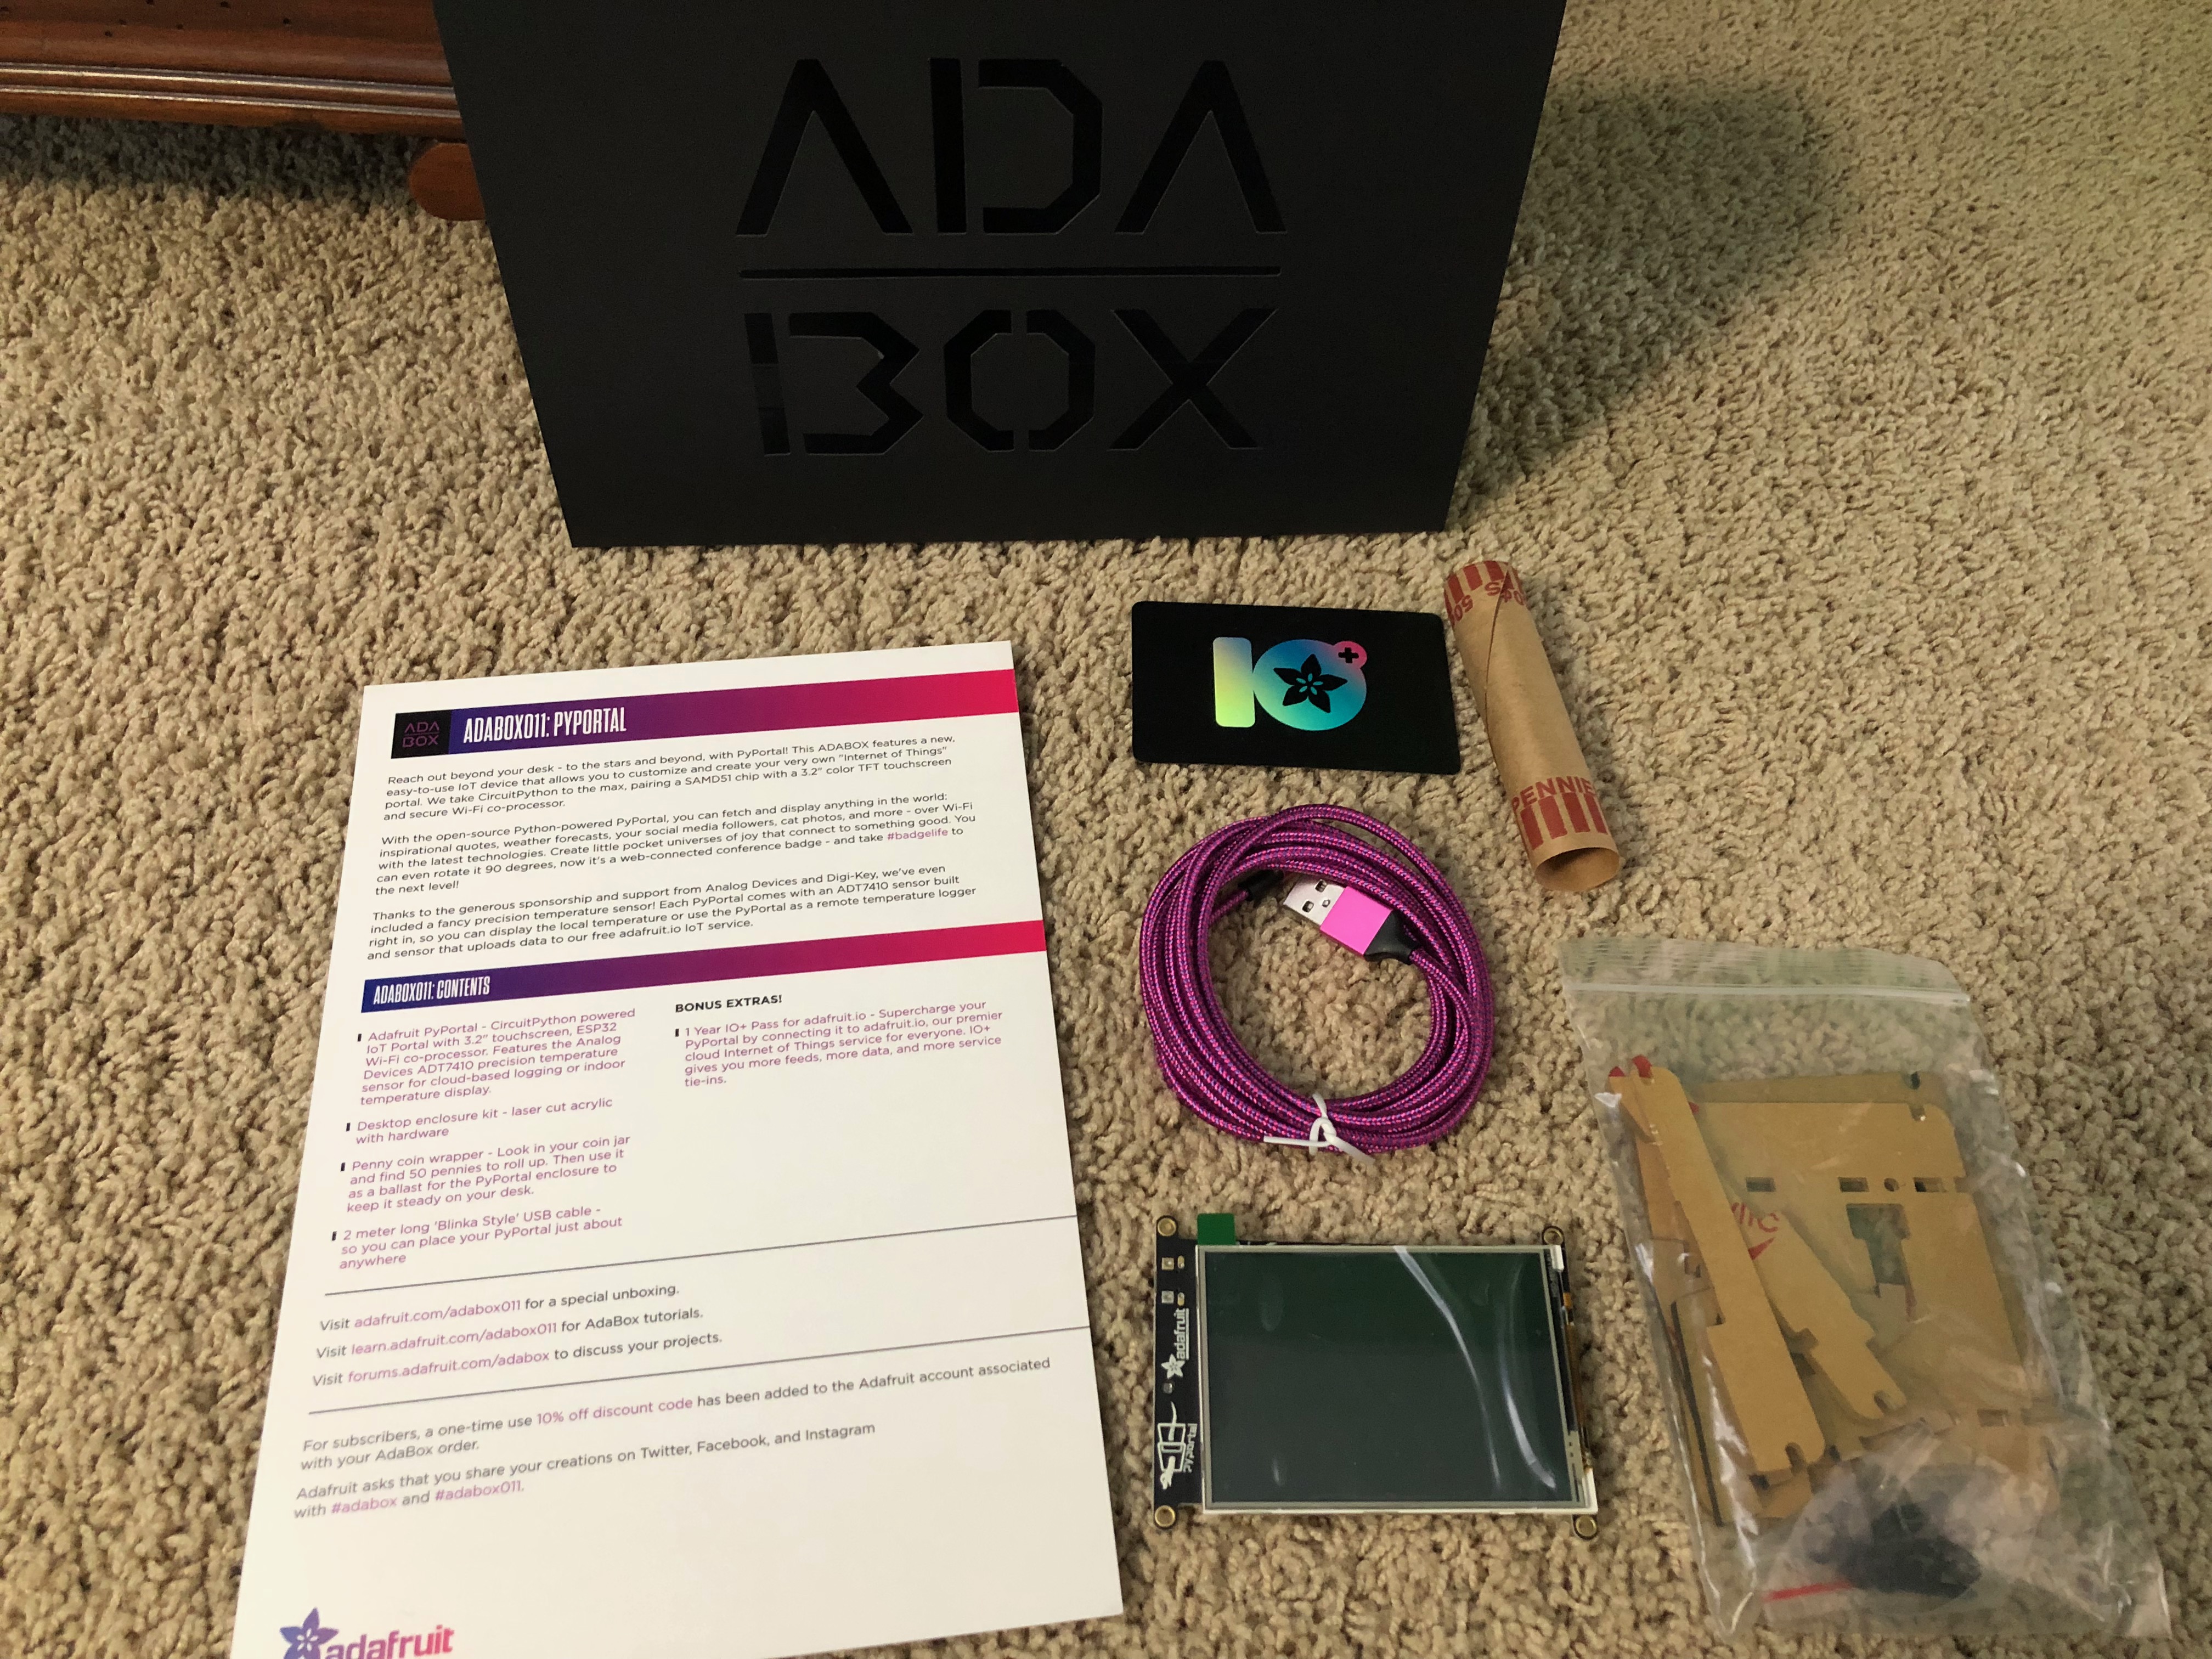
Similar to AdaBox 010, there isn’t much here in terms of assembly or physical experimentation using different parts, but the PyPortal is a really cool new device from Adafruit. It’s built for IoT projects, with:
3.2″ touchscreen to display info and interact with the device
ESP32 co-processor to handle Wi-Fi connections
Analog Devices ADT7410 temperature sensor
SAMD51 to handle all of the processing, compatible with CircuitPython, which makes it fun and easy to program
Laser cut acrylic enclosure/stand
They’ve also included a 1 year pass to adafruit.io. I’ll likely turn this into something that interfaces with my Home Assistant server to control different devices around my house.
Took 5-10 minutes to remove the protective paper from the acrylic pieces and assemble the stand
I haven’t done much in terms of electronics, woodworking, or making in general for the last couple of months. I think I burned out a bit when I caught up on so many projects over November, December, and January. I’ll get back to making soon!
When resetting your Meijer password you get this on the form.
I assume they meant “between” instead of “at least” because those two words don’t make any sense with a range. After putting in my randomly generated password I got an error because I had used symbols that weren’t allowed, yet the instructions don’t say anything about symbols.
If you are developing a system and restricting password lengths to something so small with odd character restrictions, you’re doing it wrong. Allow 64 character passwords everywhere!
A couple of weeks ago I wanted to display emoji country flags from 2 letter country codes. I couldn’t find PHP examples anywhere. Character encodings confuse me, but after looking at some JavaScript examples and other PHP encoding info I was able to get something working.
I’m behind on a bunch of electronics subscription boxes and projects, so I’m just going to list out a bunch of stuff. None of its worthy of its own post anyway.
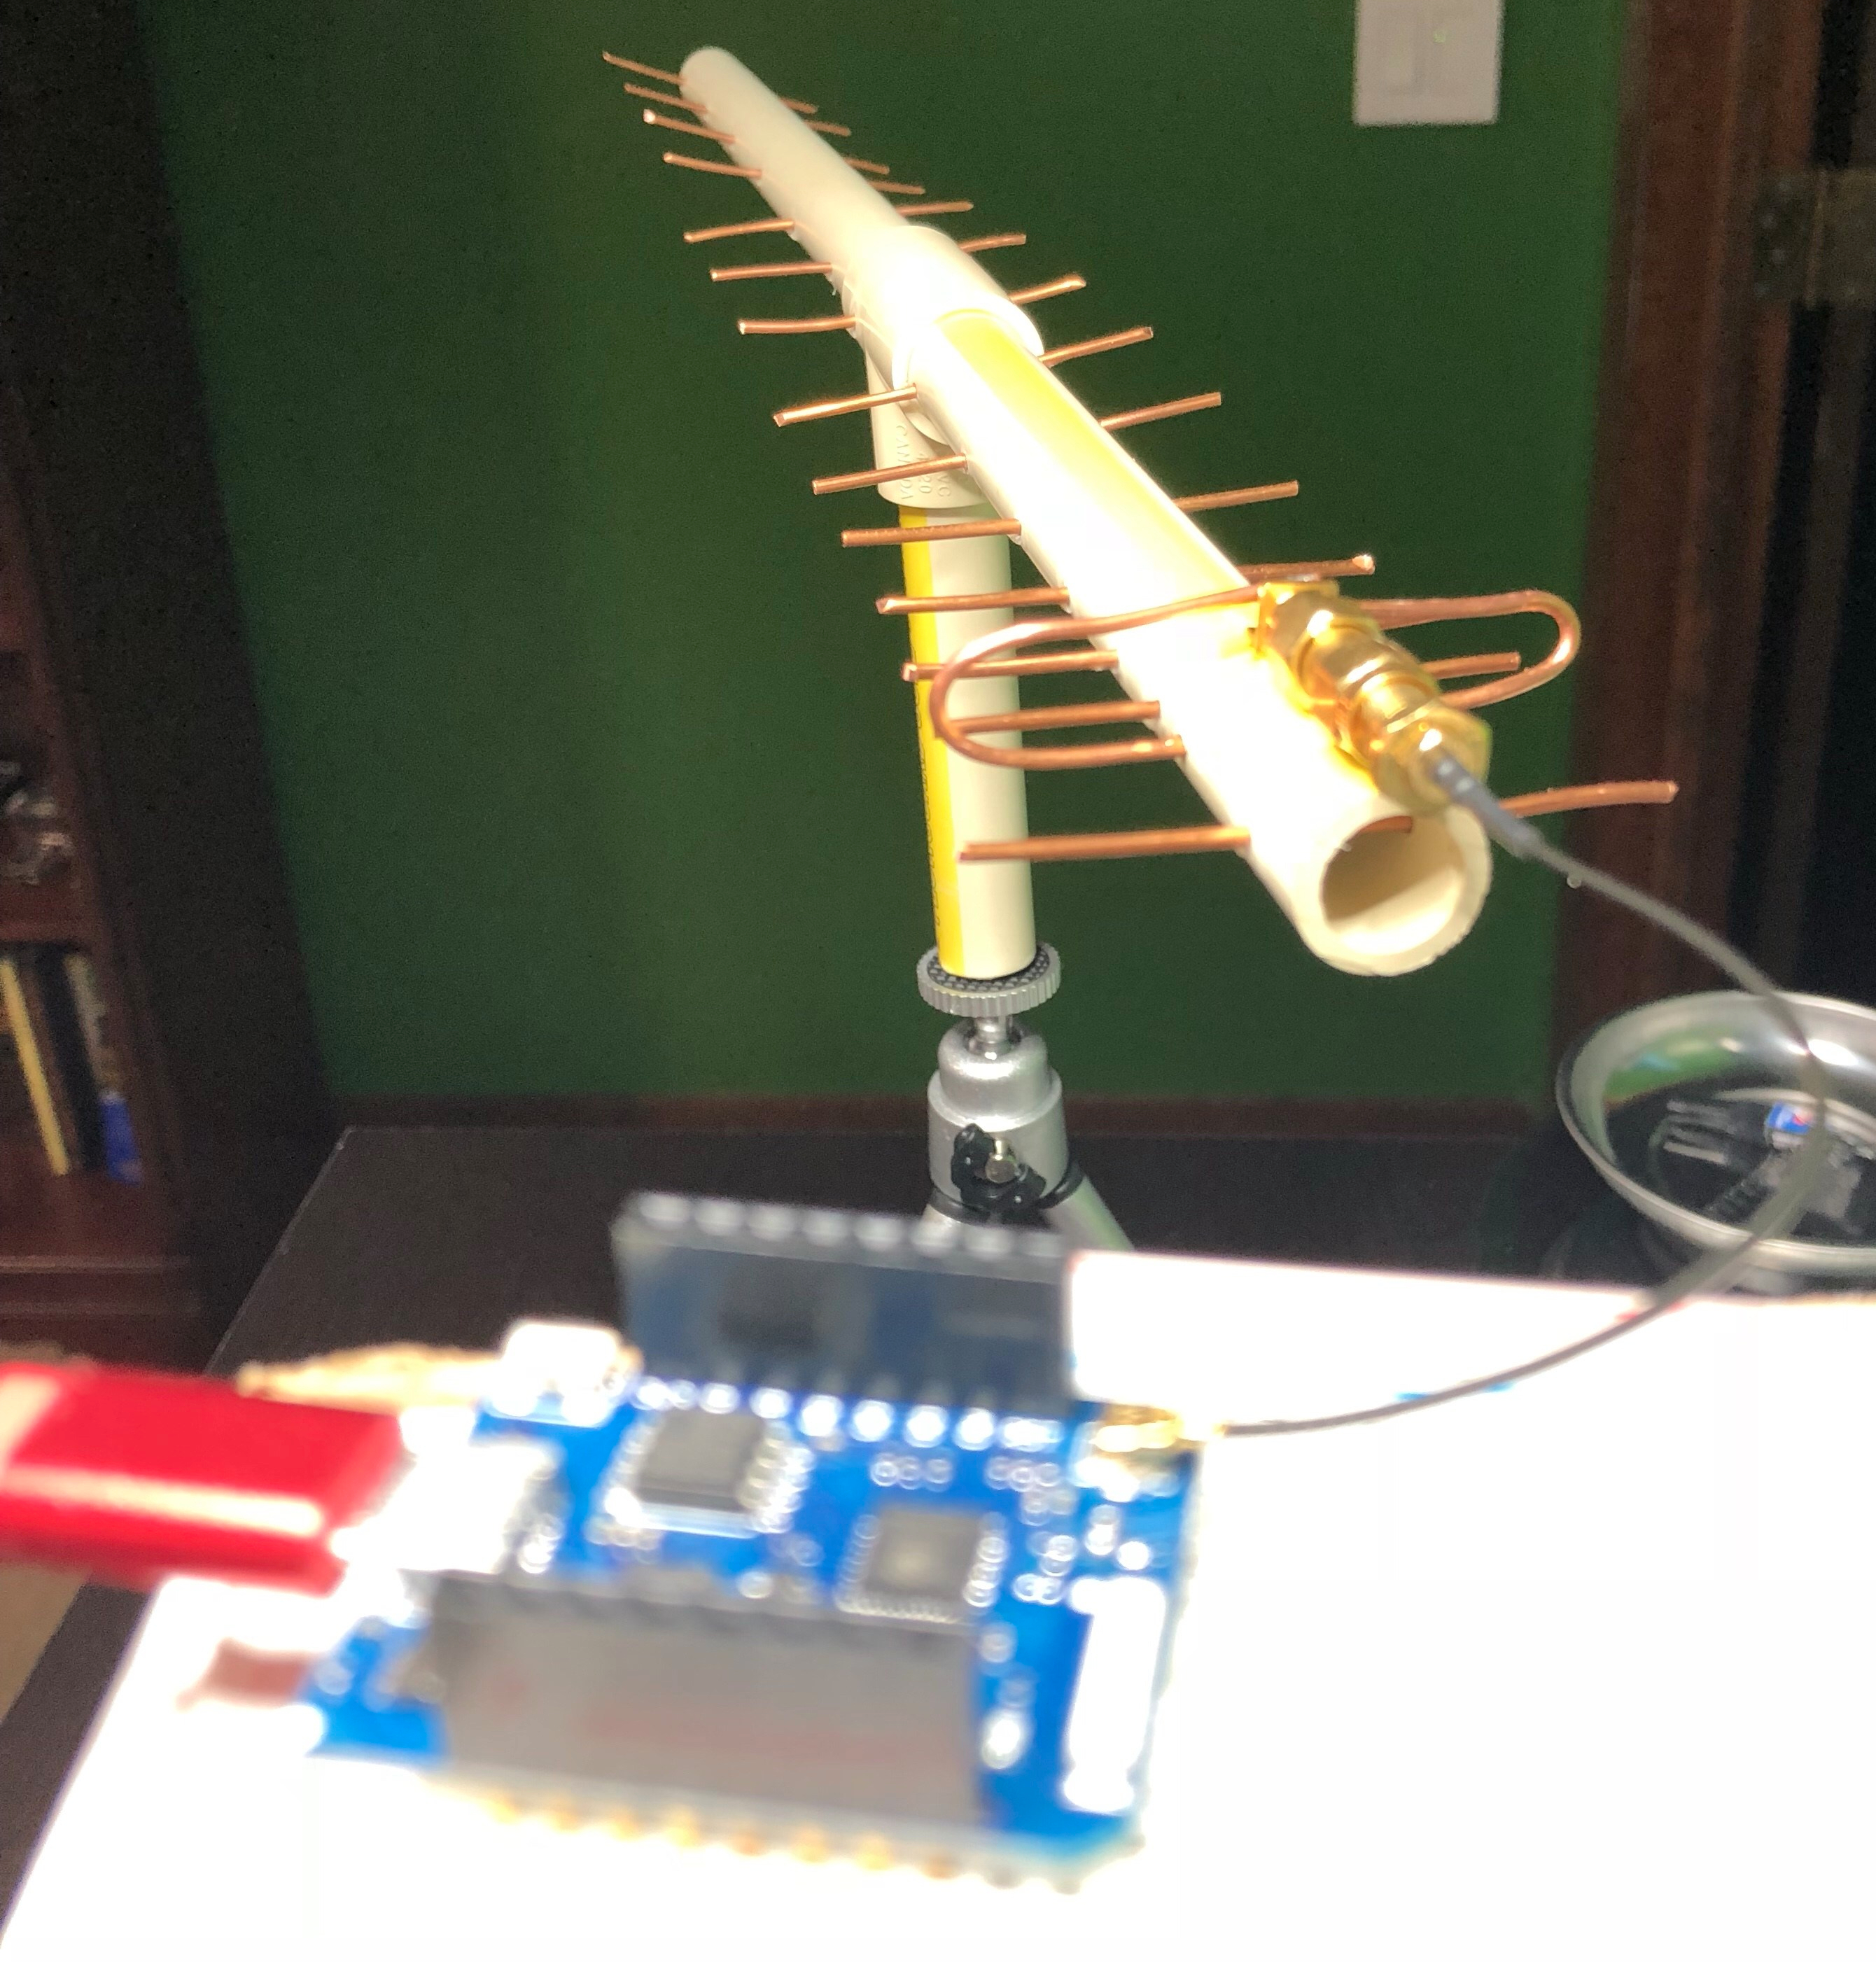
One of the projects for HackerBox #0023 was to build a custom antenna out of PVC, copper wire, and glue. I did a pretty piss poor job of drilling my holes in a straight line (as you can see in the picture), but I connected it to a microcontroller and was able to scan for Wi-Fi networks in the area. Success?
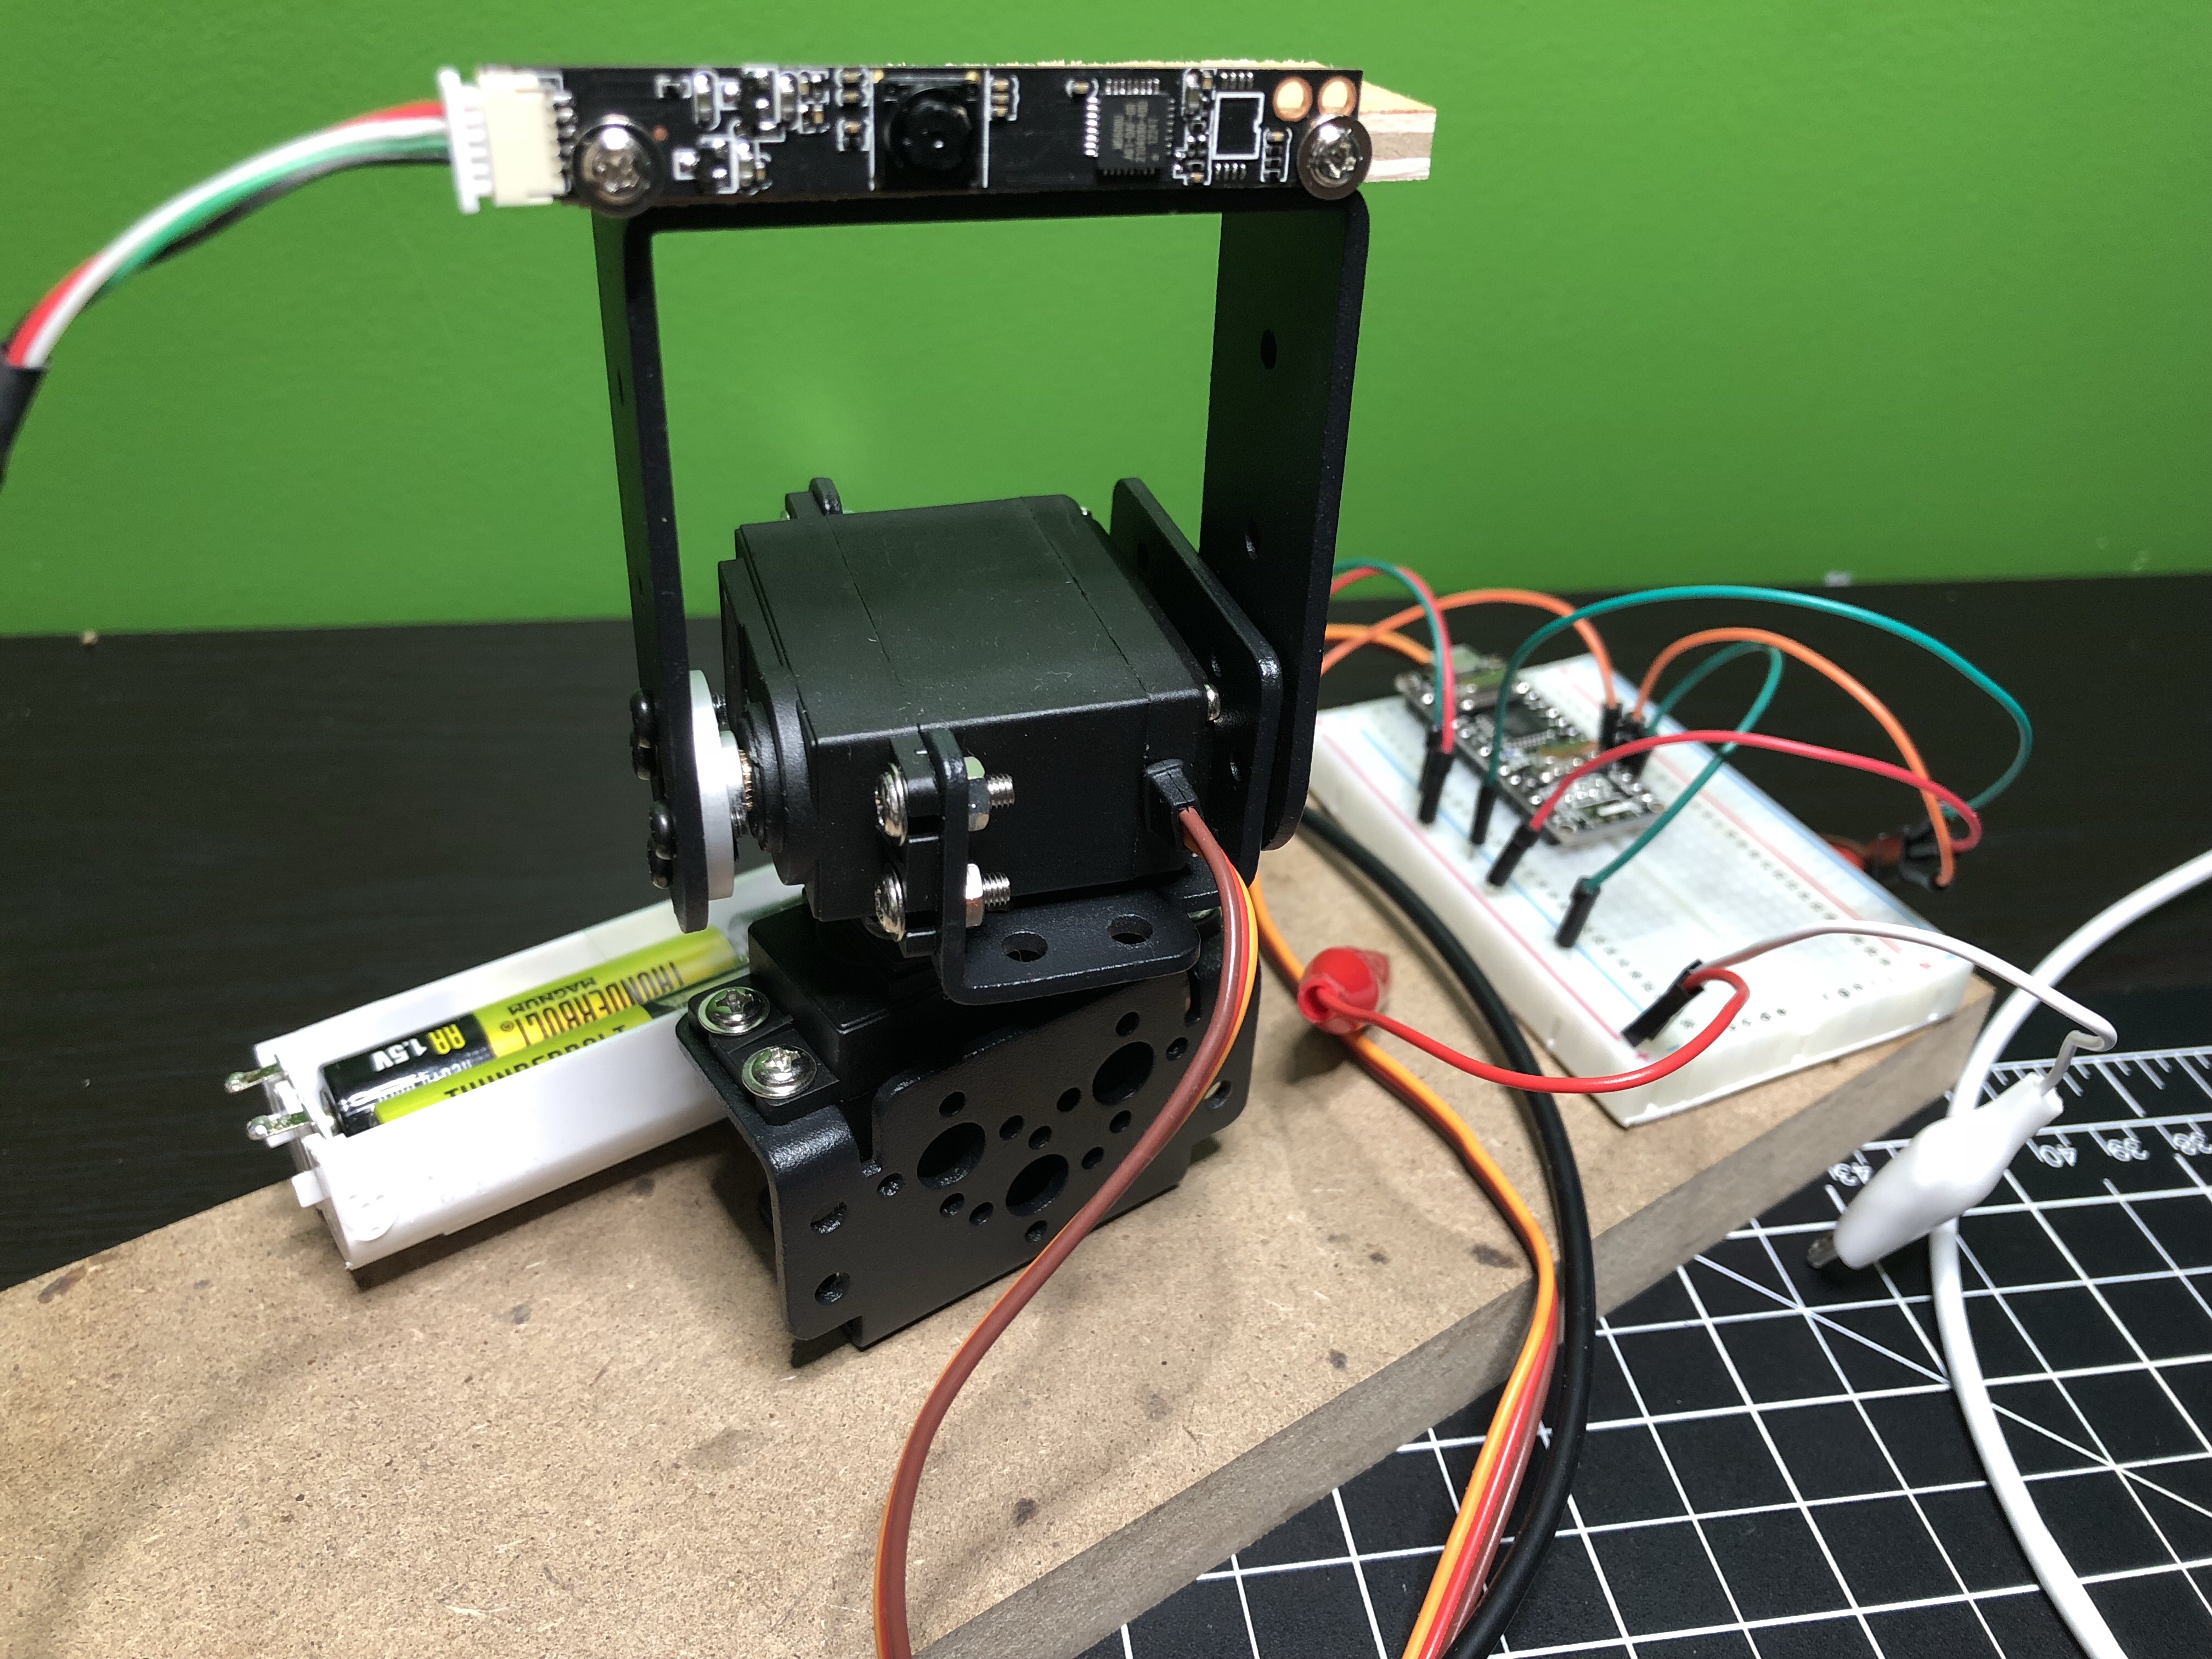
I need to make more time to work with the pan and tilt system built with HackerBox #0024.
The camera that came with the project can only do 640×480, which sucks. One of these days I’ll connect the system to a Raspberry Pi and use one of my unused Pi cameras instead. Would be neat to mount at the front door to track anyone who comes to the house when I’m not home. The face tracking stuff is pretty awesome, even with the shitty camera. Here’s a really rough video of it.
I had to modify the code a lot to get everything working and I put it all on GitHub. If I work on this project more I’ll update that repo.
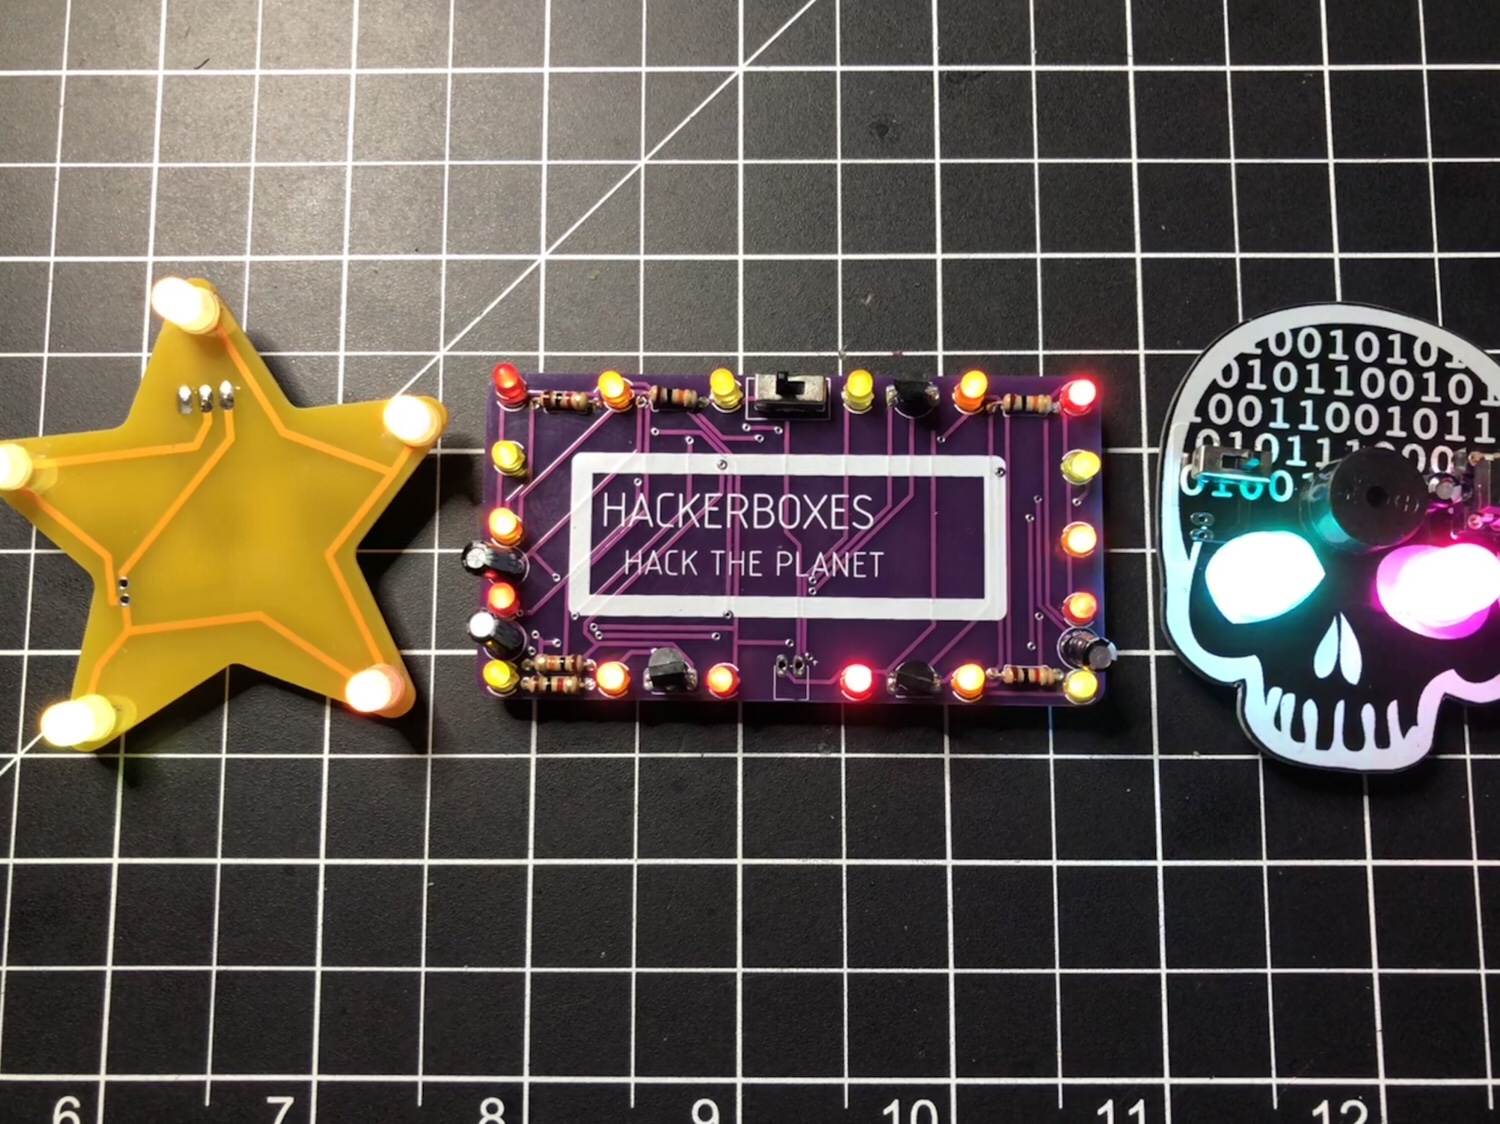
There wasn’t a lot to do with HackerBox #0025. It was mostly a soldering and look at the blinky lights project. Here are the 3 badges I made. I turned the star and rectangle (with a “Let’s Party” sticker in place) into pins and gave them to my nieces.
The skull badge has a buzzer on it, so I wrote some code (it’s on GitHub) to make it play the Star Wars theme and display some light animations.
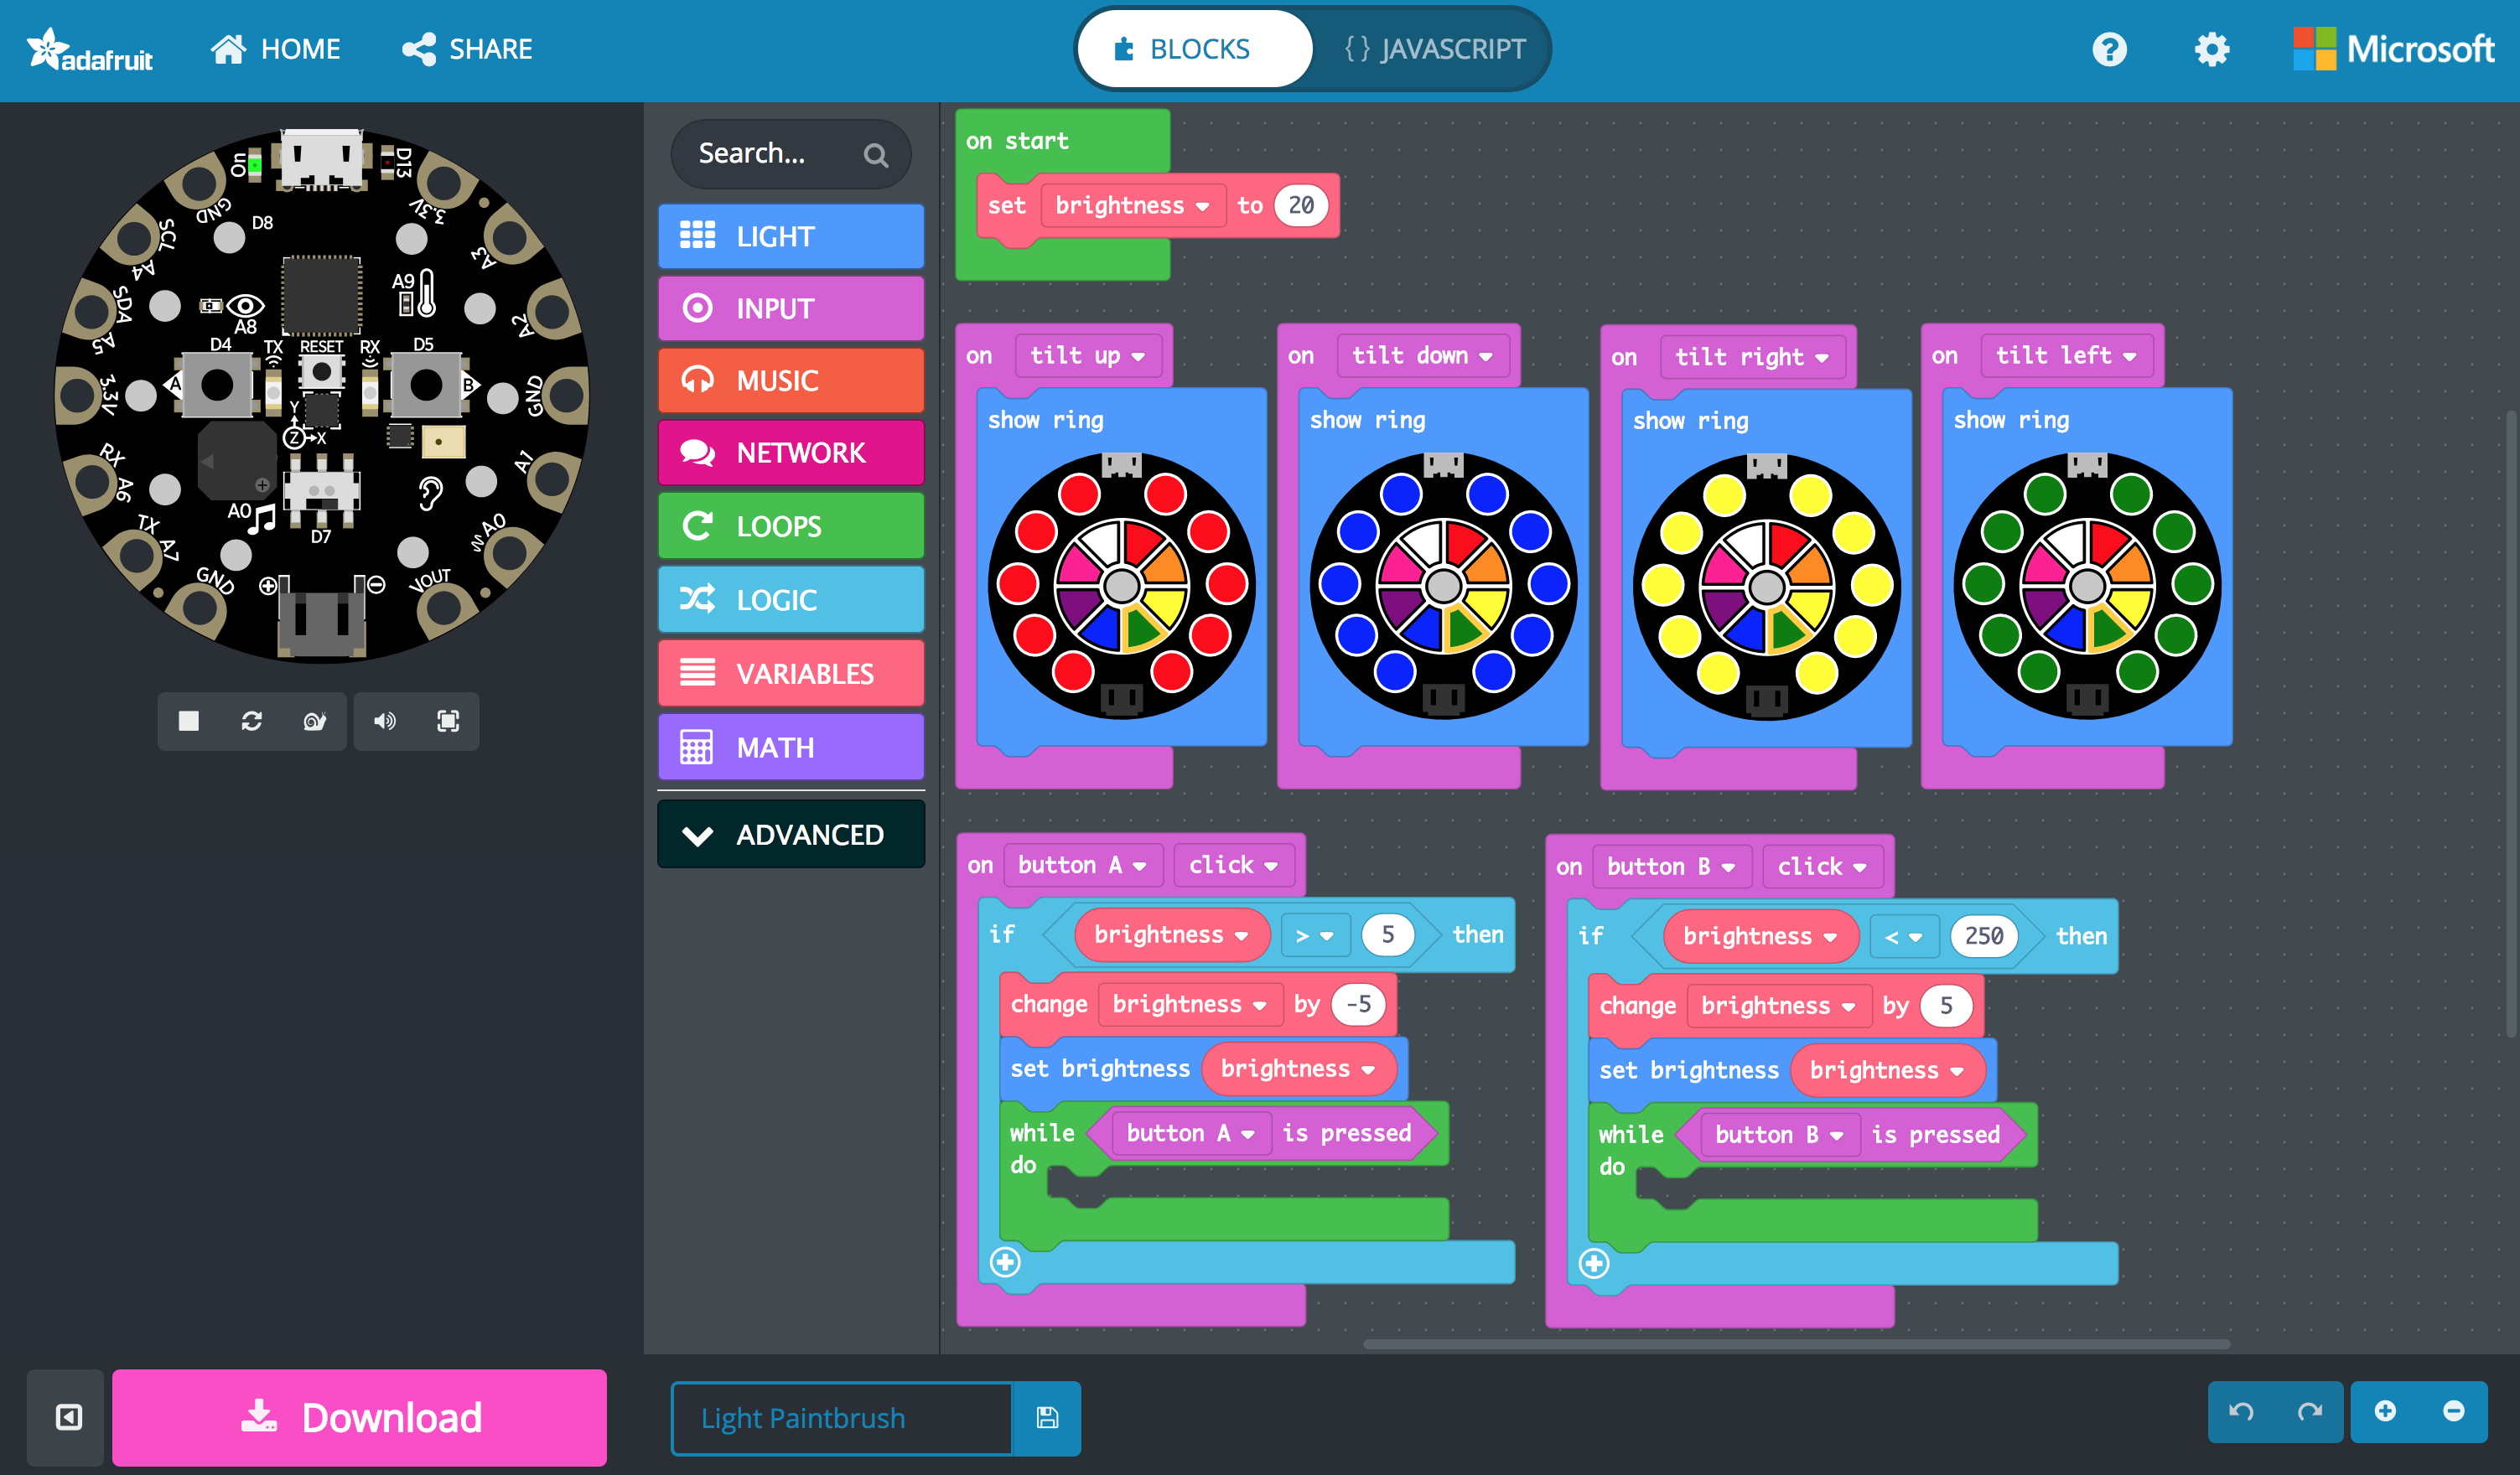
Over the holidays I messed with AdaBox006 a bit. The 38 I posted on my birthday was a light painting taken with the Slow Shutter iOS app. I got it the light paintbrush working on both the Circuit Playground classic via a customized Arduino sketch and on the Circuit Playground Express through MakeCode. Both are available in the adabox-006 repo on GitHub. Using MakeCode is a fun way to program and I think it’s going to change the way people learn. Look at how simple and visual that version of the program is…
I did solder everything for HackerBox #0026 and verified some of the functionality, but haven’t done much with it. It was one of the most fun projects so far from HackerBoxes because of how many components were on this PCB. I find soldering to be so relaxing and satisfying.
Since I work on our HR team at Automattic, sometimes I need to write code dealing with payroll. When someone starts or leaves we have to pay them for a partial period, which is based on the number of week days. Originally I wrote a simple function, but I set out to make it more useable. Here is what I came up with…
/**
 * Counts the days (optionally limited by type of day) between (inclusive) two dates.
 *
 * @param string $start_date First day (Y-m-d format).
 * @param string $end_date   Last day (Y-m-d format).
 * @param array  $types      Optional. Types of days to count. Default to all types
 *
 * @return int Number of days matching the $types.
 */
function get_days_between_dates( $start_date, $end_date, $types = array() ) {
	$count = 0;

	$included_day_type_indexes = array();
	if ( empty( $types ) ) {
		$included_day_type_indexes = range( 1, 7 );
	} else {
		foreach ( $types as $type ) {
			switch ( strtolower( $type ) ) {
				case 'weekday':
					$included_day_type_indexes = array_merge( $included_day_type_indexes, range( 1, 5 ) );
					break;
				case 'weekend':
					$included_day_type_indexes = array_merge( $included_day_type_indexes, range( 6, 7 ) );
					break;
				case 'monday':
				case 'mon':
					$included_day_type_indexes[] = 1;
					break;
				case 'tuesday':
				case 'tues':
				case 'tue':
				case 'tu':
					$included_day_type_indexes[] = 2;
					break;
				case 'wednesday':
				case 'wed':
					$included_day_type_indexes[] = 3;
					break;
				case 'thursday':
				case 'thurs':
				case 'thur':
				case 'thu':
				case 'th':
					$included_day_type_indexes[] = 4;
					break;
				case 'friday':
				case 'fri':
					$included_day_type_indexes[] = 5;
					break;
				case 'saturday':
				case 'caturday':
				case 'sat':
					$included_day_type_indexes[] = 6;
					break;
				case 'sunday':
				case 'sun':
					$included_day_type_indexes[] = 7;
					break;
			}
		}

		$included_day_type_indexes = array_unique( $included_day_type_indexes );
	}

	$date = strtotime( $start_date );
	$end = strtotime( $end_date );
	while ( $date <= $end ) {
		if ( in_array( date( 'N', $date ), $included_day_type_indexes ) ) {
			$count++;
		}

		$date = strtotime( '+1 day', $date );
	}

	return $count;
}

/*** EXAMPLES ***/

echo get_days_between_dates( '2017-08-21', '2017-09-03' ) . "\n";
echo get_days_between_dates( '2017-08-21', '2017-09-03', array( 'weekday', 'weekend' ) ) . "\n";
echo get_days_between_dates( '2017-08-21', '2017-09-03', array( 'mon' ) ) . "\n";
echo get_days_between_dates( '2017-08-21', '2017-09-03', array( 'weekday' ) ) . "\n";
echo get_days_between_dates( '2017-08-21', '2017-09-03', array( 'mon', 'wednesday', 'fri' ) ) . "\n";
My garage temp sensor, running home-assistant-temperature-monitor stopped working several months ago. I didn’t have time to figure it out and then summer hit, when it’s not important since I don’t heat up the garage before I workout. This weekend I finally got around to troubleshooting the problem.
Turned out I needed to install Adafruit_Python_GPIO. I must have updated my code at some point without fully testing, otherwise I’m not sure how any of it worked before. I didn’t investigate that though; I was more concerned with fixing it and doing some improvements. I updated the OS and everything on the Raspberry Pi since it hadn’t been turned on in quite some time.
Earlier this year, another Pi on my network, the one running Home Assistant and Pi-hole, ran out of disk space without warning. I’ve wanted to put in a notification system so it never happens again, so I updated home-assistant-pi to report the disk use % to HA. I added an automation to notify me whenever it’s above 90% for one of my Pis. I also reworked all of the automations in home-assistant-pi to make it easier to configure each time I get a new Pi.
That all took much longer than I expected. Most of the trouble was trying to understand the Jinja template system used in HA and where it can be applied to configurations. I think I’m finally getting the hang of it.
While writing this post, I found an old draft with some other updates to home-assistant-pi I never published. Maybe I never finished and that’s why everything stopped working! Here’s a list of some previous updates:
Fixed errors causing program to crash.
It wasn’t reconnecting very well, especially if Home Assistant went away (ex. for a restart after an upgrade). Rewrote how the MQTT connection works.
Switch from PushBullet to iOS notifications.
Changed show/hide Home Assistant group automations.
Now that this stuff is running again and I have a better understanding of the Home Assistant automation capabilities, I need to continue the series of posts I planned on home automation. It’s been five and a half months since I published Part 1!
It’s been quite some time since I’ve used any Microsoft products. They are really stepping up their game when it comes to makers and creating tools to teach people how to code.
Makecode (by Microsoft) is a site similar to Scratch. Both are great way for kids (or adults) to get started with programming. The powerful part is the drag and drop interface which simplifies coding. Instead of having to remember the syntax of a for statement, in the block editor you drag over a for block and fill in a couple of fields with the values for the variables. You don’t even need to buy a board to get started because the site has an emulator built right in.
They’ve also built a Visual Studio Code extension for Arduino, which is now open sourced. I downloaded VSC and installed the extension. I didn’t play with it very long, but it looks like it’ll be my new editor for Adruino projects. It does things that every programming IDE should do, like code completion, which the Arduino IDE still does not do. I also installed some Python extensions, so I’ll have to see how it compares to the Atom editor, which is what I’ve been using for Python programming.
Following up on my post about Online CrossFit Programming, I wanted to write some thoughts about how affiliates program classes for the general population, like you or I.
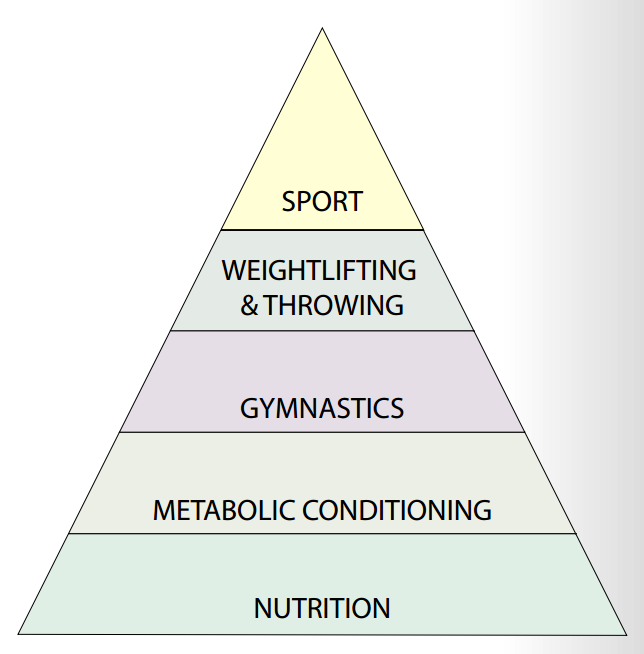
CrossFit is meant to be a conditioning-biased exercise program. Look to this pyramind illustrating a theoretical hierarchy for the development of an athlete. It comes from Greg Glassman’s “What is Fitness”, which was published 15 years ago in the CrossFit Journal.
Nutrition is the most important and then it’s conditioning. Somewhere about 5 years ago CrossFit affiliates started to shift the importance and focus of their programming to be strength-biased. This probably had something to do with the rise in popularity of the CrossFit Games; people wanted to train like the elite Games athletes.
Since day 1 and still today, the WOD posted on CrossFit.com is only one workout. They don’t suggest performing a strength piece, a skill piece, and a conditioning piece every day like you see in almost every CrossFit affiliate around the world. If you attend a Level 1 seminar, during the programming lecture they don’t teach you how to jam pack an hour with as much exercising as you can. Sure some of the Main Site WODs are strength focused, as they should be, but the majority of days the workout is a conditioning based one. Are we causing ourselves to get injured more and limiting our potential as human beings by doing too much?
Here’s a great podcast episode with Ben Bergeron, who is one of the top coaches in the sport. He explains a lot on the topic and makes a lot of great points for conditioning-biased programming.
What do you think?
Once I finish up this Push Only program I’m following (about 4 more weeks), I might experiment with some conditioning-biased programming like CrossFit teaches us.
MicroUSB port for programming and debugging with Arduino IDE
USB port can act like serial port, keyboard, mouse, joystick or MIDI
10 x mini NeoPixels, each one can display any color
1 x Motion sensor (LIS3DH triple-axis accelerometer with tap detection, free-fall detection)
1 x Temperature sensor (thermistor)
1 x Light sensor (phototransistor)
1 x Sound sensor (MEMS microphone)
1 x Mini speaker (magnetic buzzer)
2 x Push buttons, left and right
1 x Slide switch
8 x alligator-clip friendly input/output pins
Includes I2C, UART, and 4 pins that can do analog inputs/PWM output
All 8 pads can act as capacitive touch inputs
Green “ON” LED so you know its powered
Red “#13” LED for basic blinking
Reset button
With so many features, Circuit Playground is a perfect board for someone learning to program. There are endless possibilities for fun projects. I ordered one to support the program. I’m hoping they’ll get some of the new Circuit Playground Express boards in stock and extend this promotion to those because I’ve been tempted to get my hands on one. If they do, I’ll gladly place another order.