
I get confused every time I work on a 3-way switch. After I remember to make a diagram to lay out all of the wires I have it makes sense. This was for a Wi-Fi connected switch and “remote” pairing I installed yesterday.
I get confused every time I work on a 3-way switch. After I remember to make a diagram to lay out all of the wires I have it makes sense. This was for a Wi-Fi connected switch and “remote” pairing I installed yesterday.
Here’s the full list of the box contents from the Instructable.
I haven’t done an assembly video on a HackerBox in months. I have received some comments that they are really helpful for beginners, so I’m going to try to do one each month, which will also push me to complete the kits sooner. With all of the surface mount components this is a really good box to start with.

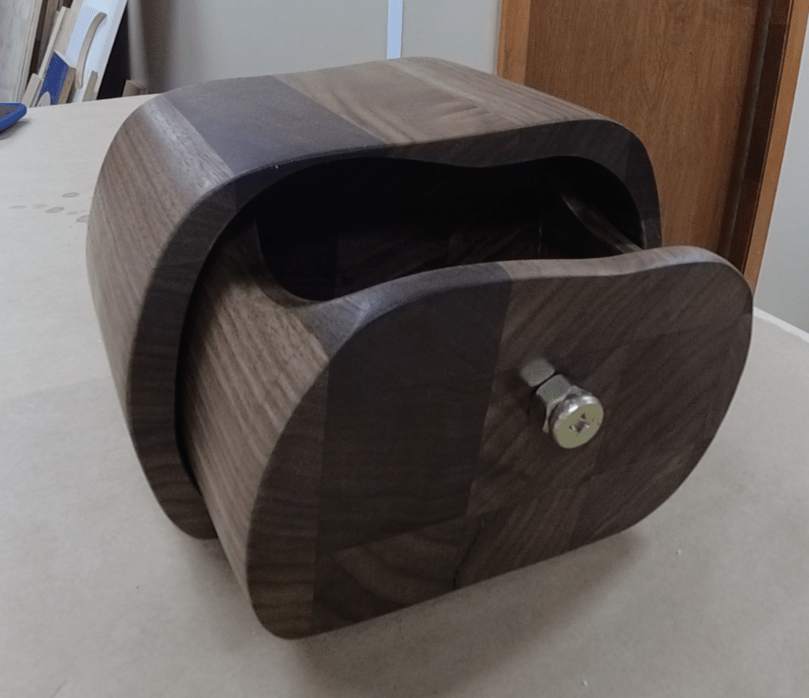
My buddy Kevin told me about a local shop that sells woodworking tools, supplies, and wood so we took a ride out to Barn Door Lumber Company a few weeks ago. While looking through their scrap pile, this butcher block cutoff caught my eye. It was roughly 1.5 x 6 x 23 inches.

I had bought a 10″ bandsaw (RIKON 10-305) not too long before and hadn’t used it yet.

I thought it would be a fun project to chop up this piece on the table saw, glue it into a large block, and then create a bandsaw box. That’s when you create a box out of a block of wood by only making cuts with a bandsaw. Seemed like a good project to get my feet wet. My sister’s birthday was coming up so it would also make a good gift.
The first thing I did was square up the edge.

Then I sliced 5 pieces. I’m still learning a lot and forgot to set a stop block on my sled, which would have helped with getting pieces that were exactly the same size. The order of operations and remembering little tricks like that are what I’m struggling with the most on this woodworking adventure.

I glued each piece.

Quickly realized I only needed glue on 4 pieces. I told myself the last two pieces would just get a really good bond. Then I clamped everything together.

Of course I forgot to flip that last piece around so that 2 glued sides were facing each other. The glue side ended up facing out and I put 3 clamps in place before remembering. So I backed off the clamps and added a piece of parchment paper.
After squaring up an edge on the table saw I was ready for some work on the bandsaw. Or so I thought…

After another trip to the table saw I finally had my block of wood. I was ready for the bandsaw!
I quickly found out the blade that came with the saw wasn’t up for the job because it couldn’t make the turns I wanted. I got everything cut but there were several mistakes. Learned a lot though and had fun with the project.
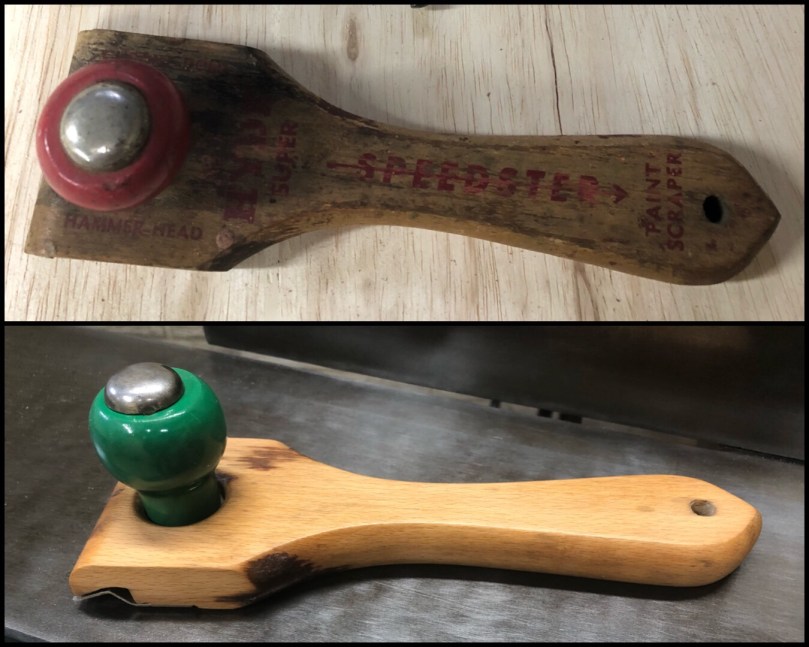
Picked this old paint scraper at an estate sale for $1 with the plan to use it for scraping wood glue.

Progressing beyond the previous project where we assembled a model of Adam’s Cave, the final project of Quarterly Maker Box #MKR08, titled Build Your Own House/Apartment, involved building a model of our own. This was good timing because I’ve been putting together my own workshop in the basement over the last few months. Having a model would help with planning my use of the space and give me a different feel/perspective for the area.
My first step was outlining the entire workshop.

I also created a quick list of things I might want to add to the model after the structure was built.

While the model of Adam’s Cave was in 1:48th scale I decided to build mine in 1:24th because my space is much smaller. Really glad I made this choice because it was still hard getting my big hands into some of the corners.


I wasn’t sure what to expect when I subscribed to Quarterly’s Maker Box and probably wouldn’t have known it existed or even thought about subscribing if I hadn’t seen that Adam Savage was getting involved for a couple of boxes. The projects he selected were much different from what I get from my AdaBox and HackerBox subscriptions, so a nice change of pace. I had a lot of fun and am looking forward to seeing what Adam does for #MKR09.
Little squares are handy to have around the shop. I got a 2-1/2″ one for Christmas and have is used it a lot already. I don’t know how this one lasted until day three of an estate sale, but it was a great find for $1. Only took about ten minutes with a brass wire wheel on the grinder to clean it up.

I use the Mac screenshot utility a lot, but have never thought of using it as a ruler. I’ve always used a browser extension to measure pixels on the screen. If you’re not using this utility, you initiate it by pressing command + shift + 4 on your keyboard.
I learned a few other tricks from the thread. Once you start dragging your mouse to create the rectangle:
shift to lock in an axis as you continue sizing the area.space to move the rectangle to a new location.Do you have any other tips?
