- The Collapse of a $40 Million Nutrition Science Crusade ⇒
CrossFit really pushed Taubes work down people’s throats for a while and is now on a big sugar crusade. This article confirms that nutrition science is extremely difficult and probably why so many people have a hard time losing weight. Who do you believe and what diet should you follow? - CrossFit Is Suing Reebok: Here’s What You Need To Know
Not sure if I should care or not. - btwb is now CrossFit btwb
I love Beyond the Whiteboard for tracking my workouts. Hope things continue to improve. - How to Build a Mini Electric Bike From Plywood and Hobby Electronics
I want one! - Hidden Camera Found in Female Bathroom at Switch CrossFit
Right here in Michigan. What a sicko! - Paul McCartney Carpool Karaoke
This was getting passed around a lot, but if you still haven’t taken the time to watch, do it. - Dave Matthews: Tiny Desk Concert ⇒
Probably the 2nd best of these tiny desk concerts I’ve seen. - Automattic’s First New Board Member: General Ann Dunwoody
Another exciting change for the company. - how to strip a pallet with simple cheap tools (un-powered) in just over 10 minutes
Seems like a great method. I’ll have to try it with the next batch of pallets I get.
22 Hour Mushroom
I cut the lawn yesterday morning and noticed this large mushroom in the back yard when I woke up today. That’s a lot of growth in about 22 hours.

Replacement Feed Rollers for a Craftsman 351.233831 Planer
While cleaning up the feed rollers on my Dad’s Craftsman 351.233831 Planer I noticed there were really beat up.

Unfortunately the part (#8520) is discontinued and I couldn’t find an aftermarket one anywhere online. I stumbled across some forum posts discussing roller resurfacing, so I got some quotes.
Mid American Rubber, which is actually here in Michigan, wanted $137 for each roller!
J. J. Short Associates, Inc. quoted $92.50 for one or $85 each if I did both.
These first two had big forms on their website with diagrams showing how to get all of the measurements they requested.
I had to call Feedrollers.com and provide some info. A day later they got back to me with a price of $57 each.
Western Roller Corporation had an online form but it was very basic so I only provided the model of the planer and the part number. I got an email saying, “most of these small table-top type planers we recover your existing shafts for $65.00 to $100.00 each.” That’s a pretty wide range, so I sent over the measurements provided to the other companies and they quoted $68.88 each.
I went with the cheapest one since these aren’t for a production shop of any kind. I shipped out the rollers and got them back exactly 3 weeks later.

I’m really impressed with these. Hopefully they hold up well for my Dad. After installing the rollers I swapped out and aligned all of the cutter knives. With this and all of the previous work, the planer runs like a brand new machine.
The Road to the 190s
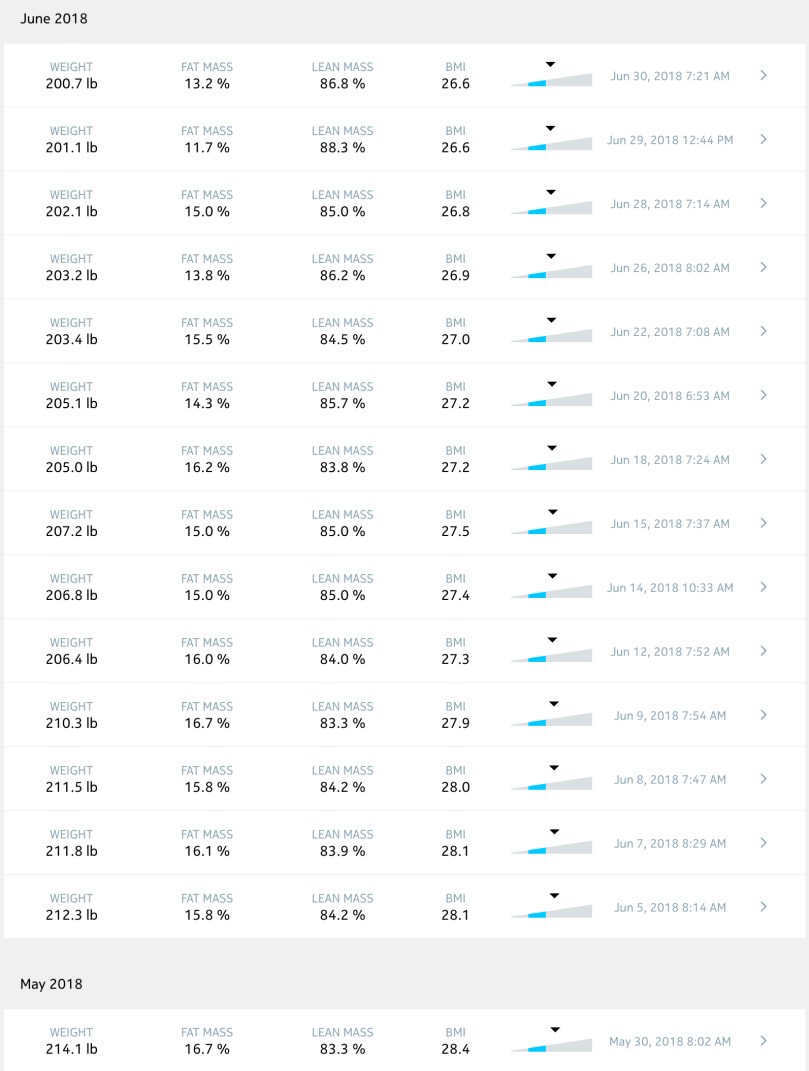
I dropped almost 14 pounds in June by replacing fast food with Factor 75 meals. My weight should start with a 1 again any day now, which will be the first time since November 1, 2015.
Don’t Bahn Mi From the SVRC Marketplace
Got this sandwich from the Saigon Sandwitch Company in the SVRC Marketplace. It was ok, but nothing special.

Start Designing
Look what showed up in my Tesla account last night!

I designed my car and paid the $2,500 deposit. I’m committed now. Since the dual motor all-wheel drive had the same delivery estimate as the single motor it was a pretty easy choice; it’ll be really nice for Michigan winters and the faster acceleration will be fun.
Here are my build details with a delivery window of September – November, which is another delay from the most recent August – October estimate my account showed.

Once I get my car it’ll have been about 2 years since I put in a reservation (October 29, 2016).
Pallet Buster
I wanted to use pallet wood for a project and my brother has been using a lot of it, so I asked for his breakdown method. He said I should make a pallet buster. So I did.
It’s fun making a new tool.
Stud or Dud?
Electronics Backlog
Most of my free time has been spent working on the truck for the last month and I’m starting a wood working project that’ll take me a week or two. Hopefully I can get back to some electronics projects before August, because they’re literally piling up.

1968-72 Chevrolet C10 Horn Button Assembly
When I bought the 1968 Chevy C10, the previous owner had wired up a new horn to a button he installed where the choke was supposed to be in the dash. I wanted to get the horn working on the steering wheel. In the box of parts he gave me, I found an assortment of stuff that seemed to go with a horn button (according to various diagrams I’d found). Here are the parts as well as what I took out of the steering wheel.

I tried many combinations from the limited info I was able to Google and what I now know are incorrect diagrams in the LMC Truck catalog. Eventually I posted on the 67-72chevytrucks.com forum asking for help. Turned out the metal cup was too short! After getting the proper one and making an extra layer of plastic spacers (see video) I was in business.
Since I had so much trouble finding useful information, I created a video that’ll hopefully make it easier for the next person who tries to do this.
