Flashing the HackerBox JamBox with ESPHome for use in Home Assistant

Not long ago the old JamBox sitting in one of my office display case’s caught my eye.

After picking it up I noticed it used an ESP32 development board, so I had to flash it for ESPHome. I downloaded the PixelOperator8 font and uploaded it to my esphome/fonts folder in Home Assistant. Then I figured out the following YAML to get the buttons, potentiometers (knobs), and LED Matrix working.

# Include your standard api, ota, and wifi sections

esphome:
  name: jambox
  friendly_name: JamBox

esp32:
  board: esp32dev
  framework:
    type: esp-idf

bluetooth_proxy:
  active: true

spi:
  clk_pin: GPIO14
  mosi_pin: GPIO12

font:
  - file: "fonts/PixelOperator8.ttf"
    id: pixel_font
    size: 8

display:
  - platform: max7219digit
    id: jambox_display
    cs_pin: GPIO15
    num_chips: 4
    intensity: 1
    rotate_chip: 90
    lambda: |-
      it.print(0, 0, id(pixel_font), "JamBox  ");

binary_sensor:
  - platform: gpio
    name: "Button 1"
    pin:
      number: GPIO4
      mode: INPUT_PULLDOWN
  - platform: gpio
    name: "Button 2"
    pin:
      number: GPIO5
      mode: INPUT_PULLDOWN
  - platform: gpio
    name: "Button 3"
    pin:
      number: GPIO16
      mode: INPUT_PULLDOWN
  - platform: gpio
    name: "Button 4"
    pin:
      number: GPIO17
      mode: INPUT_PULLDOWN
  - platform: gpio
    name: "Button 5"
    pin:
      number: GPIO18
      mode: INPUT_PULLDOWN
  - platform: gpio
    name: "Button 6"
    pin:
      number: GPIO19
      mode: INPUT_PULLDOWN
  - platform: gpio
    name: "Button 7"
    pin:
      number: GPIO21
      mode: INPUT_PULLDOWN
  - platform: gpio
    name: "Button 8"
    pin:
      number: GPIO23
      mode: INPUT_PULLDOWN

sensor:
  - platform: adc
    name: "Knob 1"
    pin: GPIO32
    update_interval: 100ms
    attenuation: auto
    unit_of_measurement: "%"
    accuracy_decimals: 0
    filters: &knob_filters
      - calibrate_linear:
          - 0.15 -> 0.0
          - 3.13 -> 100.0
      - clamp:
          min_value: 0.0
          max_value: 100.0
      - round: 0
      - delta: 1.0
  - platform: adc
    name: "Knob 2"
    pin: GPIO33
    update_interval: 100ms
    attenuation: auto
    unit_of_measurement: "%"
    accuracy_decimals: 0
    filters: *knob_filters
  - platform: adc
    name: "Knob 3"
    pin: GPIO34
    update_interval: 100ms
    attenuation: auto
    unit_of_measurement: "%"
    accuracy_decimals: 0
    filters: *knob_filters
  - platform: adc
    name: "Knob 4"
    pin: GPIO35
    update_interval: 100ms
    attenuation: auto
    unit_of_measurement: "%"
    accuracy_decimals: 0
    filters: *knob_filters
  - platform: adc
    name: "Knob 5"
    pin: GPIO36
    update_interval: 100ms
    attenuation: auto
    unit_of_measurement: "%"
    accuracy_decimals: 0
    filters: *knob_filters

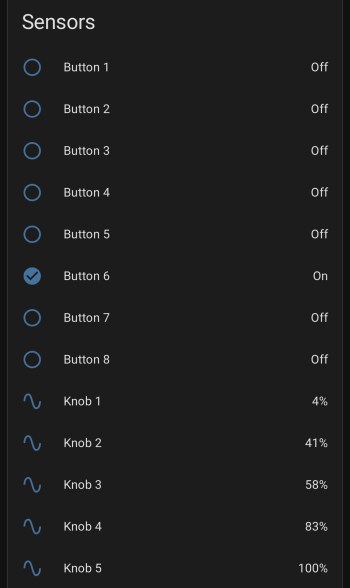
After installing the YAML and installing the device to Home Assistant, here are the sensors in the device UI.

Screenshot

The device has a ton of inputs with the eight buttons and five knobs and the 8×32 LED Matrix can display text or maybe a simple graph. I haven’t thought of a good use for it though. Do you have any ideas?

Using Home Assistant to Balance Humidity for Comfort and Window Condensation Risk

The first winter in our house was a challenge figuring out where to set the house humidifier connected to our furnace. How do you balance comfortable humidity against the risk of window condensation? I really had no idea and it was common to see water or ice on the inside of our windows during the coldest days.

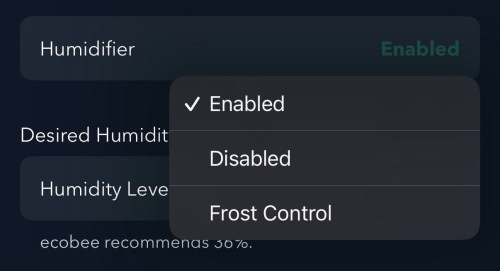
I had wired our house humidifier through the furnace so I could use the Ecobee thermostat to control it. The Ecobee has a setting called “Front Control,” but it does a poor job balancing for comfort.

Screenshot

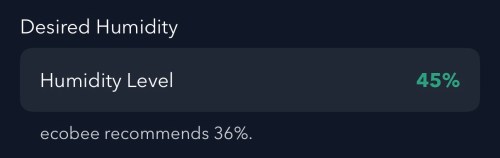
Remember this recommended humidity level for later.

Screenshot

Going from 36% to 45% is a large difference. From my testing, the humidity reported by Ecobee is 4-5 percentage points too high, which is also part of the problem and makes the air even drier. I wanted to do better and let Home Assistant handle everything.

First I bought a device with good reviews to be my source of truth and set it in the living room. It’s the Govee H5075 Bluetooth Digital Hygrometer and connects to Home Assistant via an ESPHome Bluetooth Proxy.

Since we don’t use the humidifier all year, the first step was to create a Toggle (or Input Boolean) helper. I’ll manually change this when I enable/disable the humidifier in the Ecobee settings.

I installed the Thermal Comfort integration to calculate the indoor dew point and the OpenWeatherMap integration with their One Call API 3.0 for fetching weather forecasts. I use a trigger template in templates.yaml to store the forecast every hour and whenever Home Assistant starts.

- trigger:
    - platform: time_pattern
      minutes: "/59"
    - platform: homeassistant
      event: start
  action:
    - service: weather.get_forecasts
      data:
        type: hourly
      target:
        entity_id: weather.openweathermap
      response_variable: hourly_forecast
  sensor:
    - name: "Weather Forecast Storage"
      unique_id: weather_forecast_storage
      icon: mdi:weather-cloudy
      state: "{{ states('weather.openweathermap') }}"
      attributes:
        forecast: "{{ hourly_forecast['weather.openweathermap'].forecast }}"

The forecast is important because I don’t want to set the humidity too high and not have enough time for the house to dry out when a cold front moves in. I added another trigger template in templates.yaml, which grabs the low temperature over the next 12 hours, estimates window glass temperature, calculates an ideal indoor humidity, and determines an offset between the trusted and Ecobee humidity values. It does all of this every 15 minutes, when Home Assistant starts, and whenever there is a change to various temperature or humidity values.

- trigger:
    - platform: time_pattern
      minutes: "/15"
    - platform: homeassistant
      event: start
    - platform: state
      entity_id: 
        - sensor.living_room_govee_temperature
        - sensor.living_room_govee_humidity
        - sensor.openweathermap_temperature
        - sensor.thermostat_current_temperature
        - sensor.thermostat_current_humidity
      for:
        seconds: 10
  sensor:
    - name: "Calculated Ideal Humidity"
      unique_id: calculated_ideal_humidity
      unit_of_measurement: "%"
      variables:
        forecast: "{{ state_attr('sensor.weather_forecast_storage', 'forecast') }}"
        has_data: "{{ forecast is not none }}"
        outdoor: "{{ (forecast[1:12] | map(attribute='temperature') | min | float(50)) if has_data else 50 }}"
        indoor: "{{ states('sensor.living_room_govee_temperature') | float(70) }}"
        glass: "{{ (outdoor + (indoor - outdoor) * 0.6) | round(1) }}" # 0.6 should be adjusted based on window efficiency
        ideal_raw: "{{ (0.8 * glass) | int(35) }}"
        ideal_final: "{{ ([25, ideal_raw, 50] | sort)[1] }}"
        
        govee_h: "{{ states('sensor.living_room_govee_humidity') | float(30) }}"
        ecobee_h: "{{ state_attr('climate.thermostat', 'current_humidity') | float(30) }}"
        offset: "{{ ecobee_h - govee_h }}"
        comp_target: "{{ ([25, (ideal_final + offset) | int(35), 50] | sort)[1] }}"

      state: "{{ ideal_final if has_data else states('sensor.calculated_ideal_humidity') }}"
      
      attributes:
        glass_temp_estimate: "{{ glass }}"
        predicted_outdoor_temp: "{{ outdoor }}"
        forecast_window: "Next 12 Hours"
        ecobee_compensated_target: "{{ comp_target }}"
        last_calculation: "{{ now().strftime('%Y-%m-%d %H:%M:%S') }}"

With this data calculated and saved, an automation takes care of updating the humidity setpoint on the Ecobee thermostat. Whenever I have the Humidifier Enabled toggle on, it’ll update the setpoint every 30 minutes and whenever the Calculated Ideal Humidity changes.

alias: Set Thermostat Humidity
triggers:
  - entity_id: sensor.calculated_ideal_humidity
    trigger: state
  - minutes: /30
    trigger: time_pattern
conditions:
  - condition: and
    conditions:
      - condition: state
        entity_id: input_boolean.humidifier_enabled
        state:
          - "on"
      - condition: template
        value_template: >-
          {{ state_attr('sensor.calculated_ideal_humidity',
          'ecobee_compensated_target') is not none }}
        alias: Ecobee Compensated Target is not None
actions:
  - target:
      entity_id: climate.thermostat
    data:
      humidity: >-
        {{ state_attr('sensor.calculated_ideal_humidity',
        'ecobee_compensated_target') | int(35) }}
    action: climate.set_humidity
mode: restart

I added a card on my dashboard to see the status of everything. This was invaluable when I was testing and tweaking for several weeks.

Remember the Ecobee’s recommended 36%?! If I went by that, the actual humidity in the house at this time would have about 32%, a whole 10 percentage points dryer! Here’s the YAML for the dashboard card.

type: conditional
conditions:
  - condition: state
    entity: input_boolean.humidifier_enabled
    state: "on"
card:
  type: markdown
  content: |2-
      {% set glass_temp = state_attr('sensor.calculated_ideal_humidity', 'glass_temp_estimate') | float(0) | round (0) %}
      {% set dew_point = states('sensor.thermal_comfort_dew_point') | float(0) | round(0) %}
      {% set ideal_hum = states('sensor.calculated_ideal_humidity') | float(0) | round(0) %}
      {% set actual_hum = states('sensor.living_room_govee_humidity') | float(0) | round(0) %}
      {% set thermostat_hum = state_attr( 'climate.thermostat', 'current_humidity' ) | float(0) | round(0) %}
      {% set target_hum = state_attr( 'sensor.calculated_ideal_humidity', 'ecobee_compensated_target' ) | float(0) | round(0) %}
      {% set future_temp = state_attr('sensor.calculated_ideal_humidity', 'predicted_outdoor_temp') | round (0) %}

      ## Window Condensation Status
      {% if ( glass_temp > dew_point ) %}
      #### ✅ No Risk
      {% else %}
      #### ⚠️ Risk
      {% endif %}

      **Glass:** {{ glass_temp }}°
      **Dew Point:** {{ dew_point }}°

      **12hr Forecast Low:** {{ future_temp }}°

      ---

      ### Humidity
      {% if ( actual_hum > ideal_hum ) %}
      ⚠️ Too Humid
      {% elif ( actual_hum < ideal_hum ) %}
      💧 Too Dry
      {% else %}
      ✅ Good
      {% endif %}

      | | Current | Target |
      | :--- | :---: | :---: |
      | **Actual** | {{ actual_hum }}% | {{ ideal_hum }}% |
      | **Ecobee** | {{ thermostat_hum }}% | {{ target_hum }}% |

The windows are so much better this winter and our static shocks are limited. If you have any suggested improvements, leave a comment.

Creating an ESPHome Remote Control Device with Infrared & Radio Frequency

In order to automate the processes of getting the golf sim ready to play and shutting it all down when finished I needed to create a remote control device. I’m using Home Assistant (HA) to run my home smart system (more posts to come), but two things involved with the golf sim aren’t connected to the network:

The projector has an infrared (IR) remote and the light has a radio frequency (RF) remote. I’ve done some things with IR and still had a stash of IR LEDs (for transmitting) and receivers. I’ve never attempted any RF stuff, so I ordered a 5 pack of 433mhz wireless RF transmitter and receiver pairs.

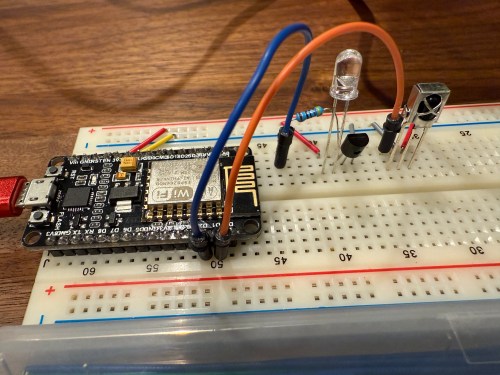
Since I’m using HA, I let ESPHome handle all of the main programming. All I had to do was wire everything properly and get the configuration correct. I made use of an old ESP8266 NodeMCU microcontroller and worked on the IR aspect of the project first.

When I took the picture I was using a 470Ω resistor, which I eventually switched to 100Ω, to increase the strength of the IR signal. The transistor is a PN2222A. Here’s the ESPHome configuration:

esphome:
  name: golf-remote
  friendly_name: Golf Remote

esp8266:
  board: nodemcuv2

logger:

api:
  encryption:
    key: "xxxxxxxxxx"

ota:
  - platform: esphome
    password: "xxxxxxxxxx"

wifi:
  ssid: !secret wifi_ssid
  password: !secret wifi_password
  manual_ip:
    static_ip: x.x.x.x
    gateway: x.x.x.x
    subnet: 255.255.255.0

remote_receiver:
  - id: GOLF_IR_RX
    pin:
      number: D1
      inverted: True
      mode:
        input: True
        pullup: True
    dump: all

remote_transmitter:
  - id: GOLF_IR_TX
    pin: D2
    carrier_duty_percent: 50%

I used the receiver to intercept the codes sent by the projector’s actual remote when pressing the Power, Input, and OK buttons. Then I created some buttons.

button:
  - platform: template
    name: Projector Power
    on_press:
      - remote_transmitter.transmit_nec:
          transmitter_id: GOLF_IR_TX
          address: 0x3000
          command: 0xFD02
  - platform: template
    name: Projector Input
    on_press:
      - remote_transmitter.transmit_nec:
          transmitter_id: GOLF_IR_TX
          address: 0x3000
          command: 0xFB04
  - platform: template
    name: Projector OK
    on_press:
      - remote_transmitter.transmit_nec:
          transmitter_id: GOLF_IR_TX
          address: 0x7788
          command: 0xE619

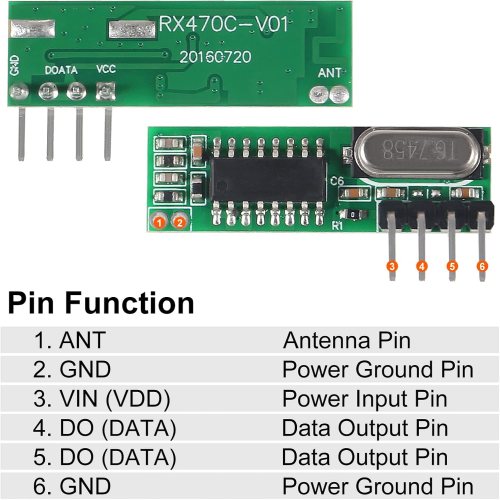
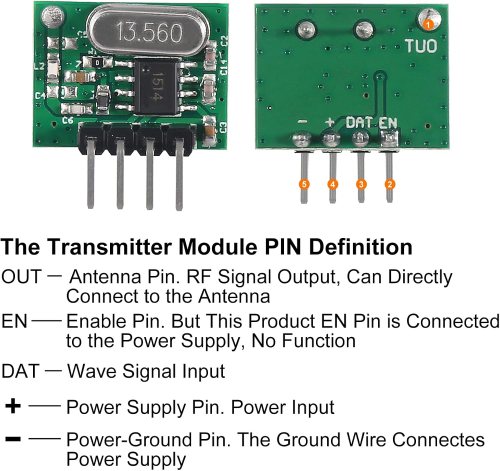
It all went very smooth. Next I connected the circuits for the RF components, which was straightforward. Here are the pinouts from the Amazon product page.

I soldered on the antennas (smaller one to the transmitter) and connected everything on the breadboard.

By using examples from the documentation I was able to intercept RF codes.

When I tried to recreate those codes through the transmitter the results weren’t matching up and the spotlight wasn’t responding. It took some trial and error to configure the various parameters of the receiver. Here’s the end result, with the combined configuration for IR and RF.

esphome:
  name: golf-remote
  friendly_name: Golf Remote

esp8266:
  board: nodemcuv2

logger:

api:
  encryption:
    key: "xxxxxxxxxx"

ota:
  - platform: esphome
    password: "xxxxxxxxxx"

wifi:
  ssid: !secret wifi_ssid
  password: !secret wifi_password
  manual_ip:
    static_ip: x.x.x.x
    gateway: x.x.x.x
    subnet: 255.255.255.0

remote_receiver:
  - id: GOLF_IR_RX
    pin:
      number: D1
      inverted: True
      mode:
        input: True
        pullup: True
    dump: all
  - id: GOLF_RF_RX
    pin:
      number: D6
      mode:
        input: True
        pullup: True
    dump:
      - rc_switch
    tolerance: 50%
    filter: 250us
    idle: 4ms
    buffer_size: 2kb # only for ESP8266

remote_transmitter:
  - id: GOLF_IR_TX
    pin: D2
    carrier_duty_percent: 50%
  - id: GOLF_RF_TX
    pin: D6
    carrier_duty_percent: 100%

After using the remote_receiver instances to get the button press codes I needed, I commented out that section of the code. If I ever need to add more functionality to my remote, I can enable the receivers at that point. Here are the button codes for the spotlight.

  - platform: template
    name: Spotlight On
    on_press:
      - remote_transmitter.transmit_rc_switch_raw:
          transmitter_id: GOLF_RF_TX
          code: '111001000000100100000011'
          protocol: 1
          repeat:
            times: 10
            wait_time: 0s
  - platform: template
    name: Spotlight Off
    on_press:
      - remote_transmitter.transmit_rc_switch_raw:
          transmitter_id: GOLF_RF_TX
          code: '111001000000100100000001'
          protocol: 1
          repeat:
            times: 10
            wait_time: 0s
  - platform: template
    name: Spotlight Green
    on_press:
      - remote_transmitter.transmit_rc_switch_raw:
          transmitter_id: GOLF_RF_TX
          code: '111001000000100100000111'
          protocol: 1
          repeat:
            times: 10
            wait_time: 0s

Then I was able to use both sets of buttons in scripts, which can feed to Alexa for voice commands.

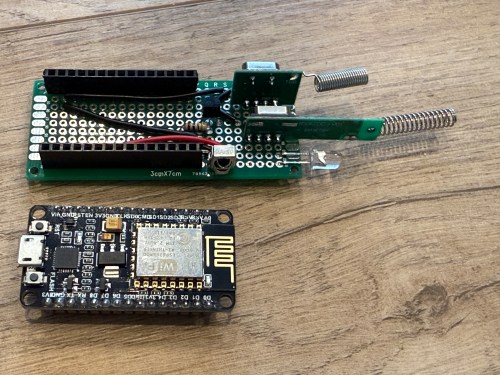
Once everything was tested I wired and soldered a more permanent circuitboard. I included a folded dollar bill for scale.

I was planning to mount it in the ceiling, but the IR was having trouble, because the projector’s receiver faces the ground. Mounting it to the side of the PC cart worked great.

This was a lot of fun!

Update: Less than a week later I’ve already modified it, by adding a DHT22, which reports temperature and humidity. Might as well use that empty D7 pin on the microcontroller.

Updates to Home Assistant Projects

My garage temp sensor, running home-assistant-temperature-monitor stopped working several months ago. I didn’t have time to figure it out and then summer hit, when it’s not important since I don’t heat up the garage before I workout. This weekend I finally got around to troubleshooting the problem.

Turned out I needed to install Adafruit_Python_GPIO. I must have updated my code at some point without fully testing, otherwise I’m not sure how any of it worked before. I didn’t investigate that though; I was more concerned with fixing it and doing some improvements. I updated the OS and everything on the Raspberry Pi since it hadn’t been turned on in quite some time.

Earlier this year, another Pi on my network, the one running Home Assistant and Pi-hole, ran out of disk space without warning. I’ve wanted to put in a notification system so it never happens again, so I updated home-assistant-pi to report the disk use % to HA. I added an automation to notify me whenever it’s above 90% for one of my Pis. I also reworked all of the automations in home-assistant-pi to make it easier to configure each time I get a new Pi.

img_9705

That all took much longer than I expected. Most of the trouble was trying to understand the Jinja template system used in HA and where it can be applied to configurations. I think I’m finally getting the hang of it.

While writing this post, I found an old draft with some other updates to home-assistant-pi I never published. Maybe I never finished and that’s why everything stopped working! Here’s a list of some previous updates:

  • Fixed errors causing program to crash.
  • It wasn’t reconnecting very well, especially if Home Assistant went away (ex. for a restart after an upgrade). Rewrote how the MQTT connection works.
  • Switch from PushBullet to iOS notifications.
  • Changed show/hide Home Assistant group automations.

Now that this stuff is running again and I have a better understanding of the Home Assistant automation capabilities, I need to continue the series of posts I planned on home automation. It’s been five and a half months since I published Part 1!