Folding Miter Saw Wings

I’ve been wanting wings for my miter station since I got the Ryobi saw and built the cart. If I’m cutting anything with 20″ or so on the right side of the saw, the cutoff crashes to the ground after making my cut.

This weekend we’re building something that’ll require a lot of cuts on the miter saw, so it was a good time to tackle this project. I’ve actually had the brackets since this summer, so I could work on it when I got motivated.

Unfortunately I wasn’t thinking about such an upgrade when I built the cart, because neither side was flat.

I created some flat areas by attaching scraps.

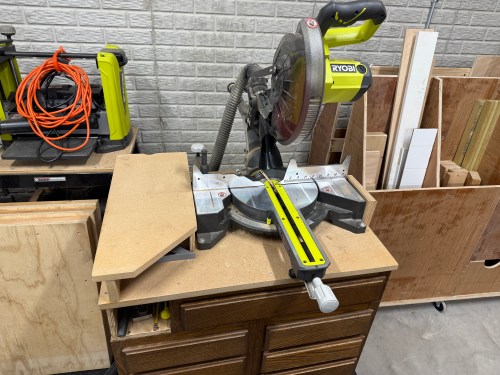
The main objective of this project was to extend the horizontal space on both sides, which this does well.

When I don’t need the surfaces, the wings easily fold out of the way.

The brackets I bought are pretty poor, with a lot of play in them. Maybe it would be better if I used two on each wing. The wings are level with the saw top, which is key, but they move front to back quite a bit. If I want to attach a stop block of some kind I’ll have to stiffen up the wing in some way.

They work for now though. Maybe I’ll improve them down the road. On to the next project!

Improving a Delta Miter Saw: Part 1

I’m starting on some improvements to my miter saw and realized I never posted anything about some of the things I’ve already done. I bought this Delta Sidekick 12″ Compound Miter Saw (Model 36-235) for $75 off someone on Facebook Marketplace last September. It’s not a sliding one, but the 12 inch blade is nice.

delta-36-235-miter-saw

I immediately bought a quality 12″ Diablo blade since there was only a 10″ in the saw. I also took the handle apart and replaced the mangled power cord with a 10′ extension cord I bought at Harbor Freight.

A few months ago I picked up a Masterforce folding miter saw stand from Menards. I think it was less than $80 during a sale. It’s been so nice to have the saw ready to go at all times.

delta-miter-saw-on-stand

I recently cleaned up the sticker residue (was still there in the picture above) on the table and fence. I think that about covers it for what I’d done so far. Check out part 2, where I make new insert plates.

Scroll Sawing

Last night was the first time I’ve done a lot of work with the scroll saw. I used the foot switch I’d made earlier this year and I can’t imagine using this saw without one. If you do any scroll sawing, get yourself one. The wood on the table of the saw is a piece of thin scrap plywood stuck down with tape to act as a zero clearance insert.

Cutting a Cove With a Table Saw

I needed to fit a piece of wood up against the seam of a cylinder I created by rolling a sheet of polycarbonate. Remembered seeing of video of someone cutting coves with a table saw, so I found some simple instructions.

I didn’t need to be very precise for my use so wasn’t concerned with my guides having a little wiggle room. Worked great for what I needed. I love learning new stuff! New skill in the toolbox.