The Breadboard Pi Bridge is a neat way to connect the Raspberry Pi to a breadboard for prototyping. I preordered this kit in March of 2019 from RasP.iO after I’d seen Alex Eames release some cool kits there before. It shipped less than two months later, but it took me until February of 2021 to assemble it. Then it sat on the shelf until now when I finally did the testing and put together the video.
The build was simple with only having to solder some headers to a circuit board. I look forward to using this when I make some projects based on Pis.
On Thursday it was 64° when I ran outside. Then we had a winter storm come through the weekend.
Since it’s rare to get a storm this late in the year, I thought it would be neat to document it.
My makeshift ruler and stand was a complete failure; it blew over, spun around, and wasn’t readable. I’m happy with the rest of the project though. I really like the worms crawling around, seeing the water freeze, and how the lines of the bricks come through.
I used a Raspberry Pi Zero W and the camera module.
In order to get images for the time-lapse I added cron job that ran a bash script every minute, which in turn called raspistill to capture a photo. It was very easy to set up. Here is the bash script.
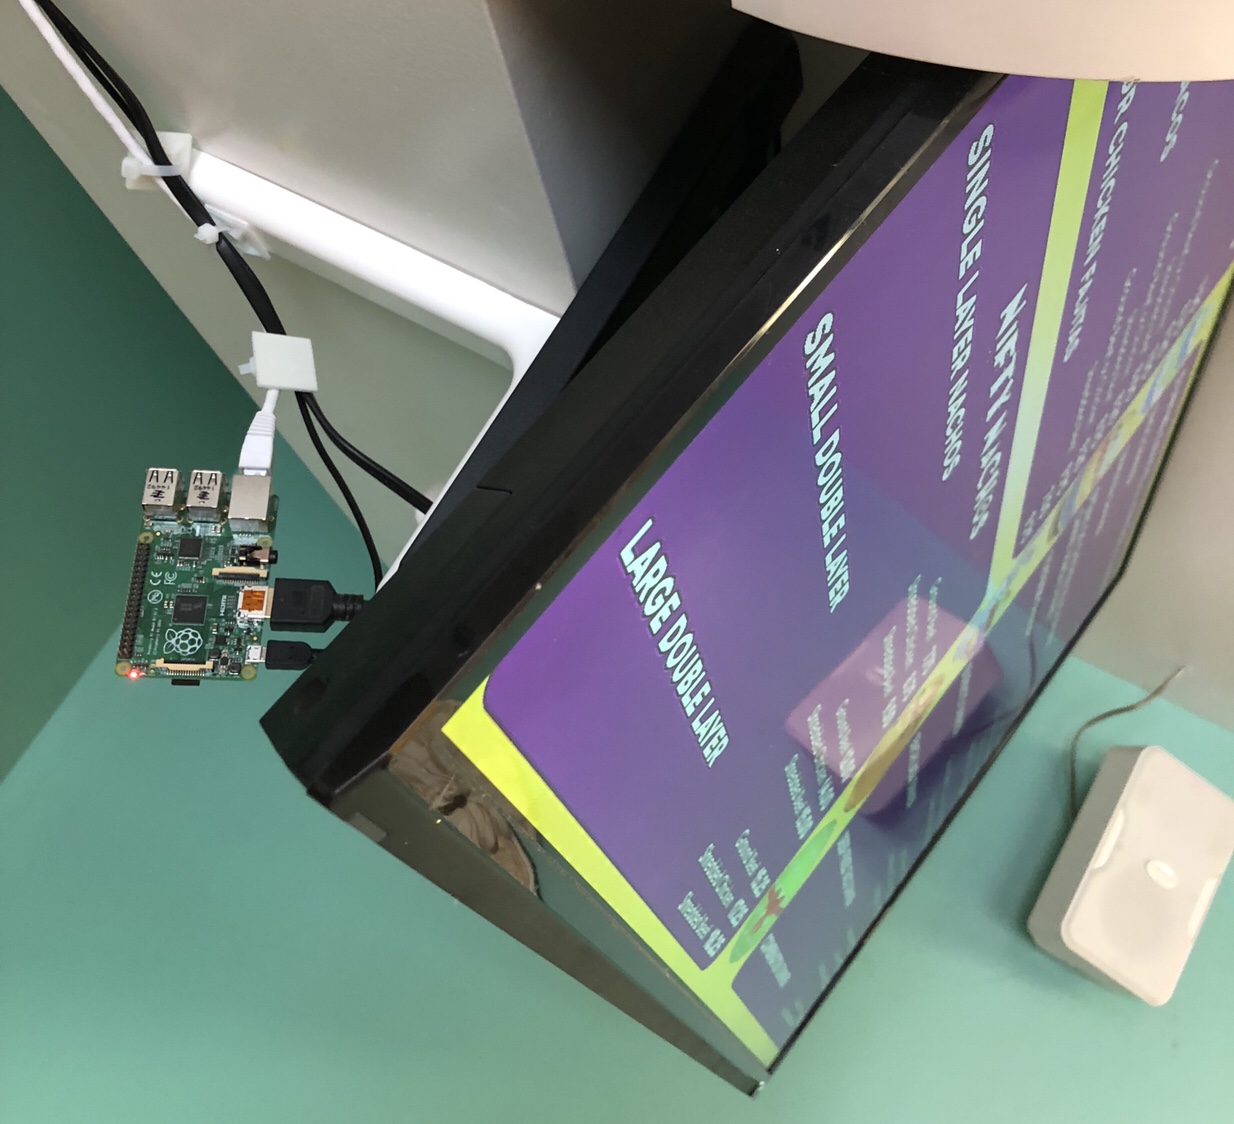
While picking up lunch yesterday from Rico’s Authentic Mexican Takeout I spotted Raspberry Pis being used to control their digital menu displays. Perfect use and I bet they saved a lot of money.
Part 1 covered the devices I’m using for home automation. It’s been over a year and there have been some changes. I added a Leviton switch and got rid of the Wink hub.
This post will be about the software that brings things together, making it easy for me to manage and allows the devices to “talk” to each other. Maybe it’s a good thing it’s taken me almost a year to write this part 2 because there have been some dramatic improvements to how everything runs. I was using homebridge for a period of time, but found I never really used HomeKit/Siri. Home Assistant has been updating a new HomeKit component, so I’ll have to give it a try.
I’ve talked about Home Assistant in a lot of posts; it’s the software running on the Raspberry Pi 3 Model B to handle everything. It’s very powerful software and has been a lot of fun for me to configure everything. Being on a Linux box and having to configure everything through YAML files makes it a tough entry for the average homeowner though. It’s improved a lot in the year I’ve been using it with better documentation and some UI configuration tools, so it’ll be interesting to watch for the next 12 months.
Being Open Source was a big draw of HA for me. Open Sourcecraft has a good article about the creator. The project operates on an aggressive schedule you don’t see much; every 2 weeks a new version oh Home Assistant is released. These aren’t small updates either. Each update fixes a ton of bugs and adds support for new devices.
I did install HA using Hass.io, which simplifies the process and makes it easy to do upgrades and install add-ons. Here are the add-ons I’m using.
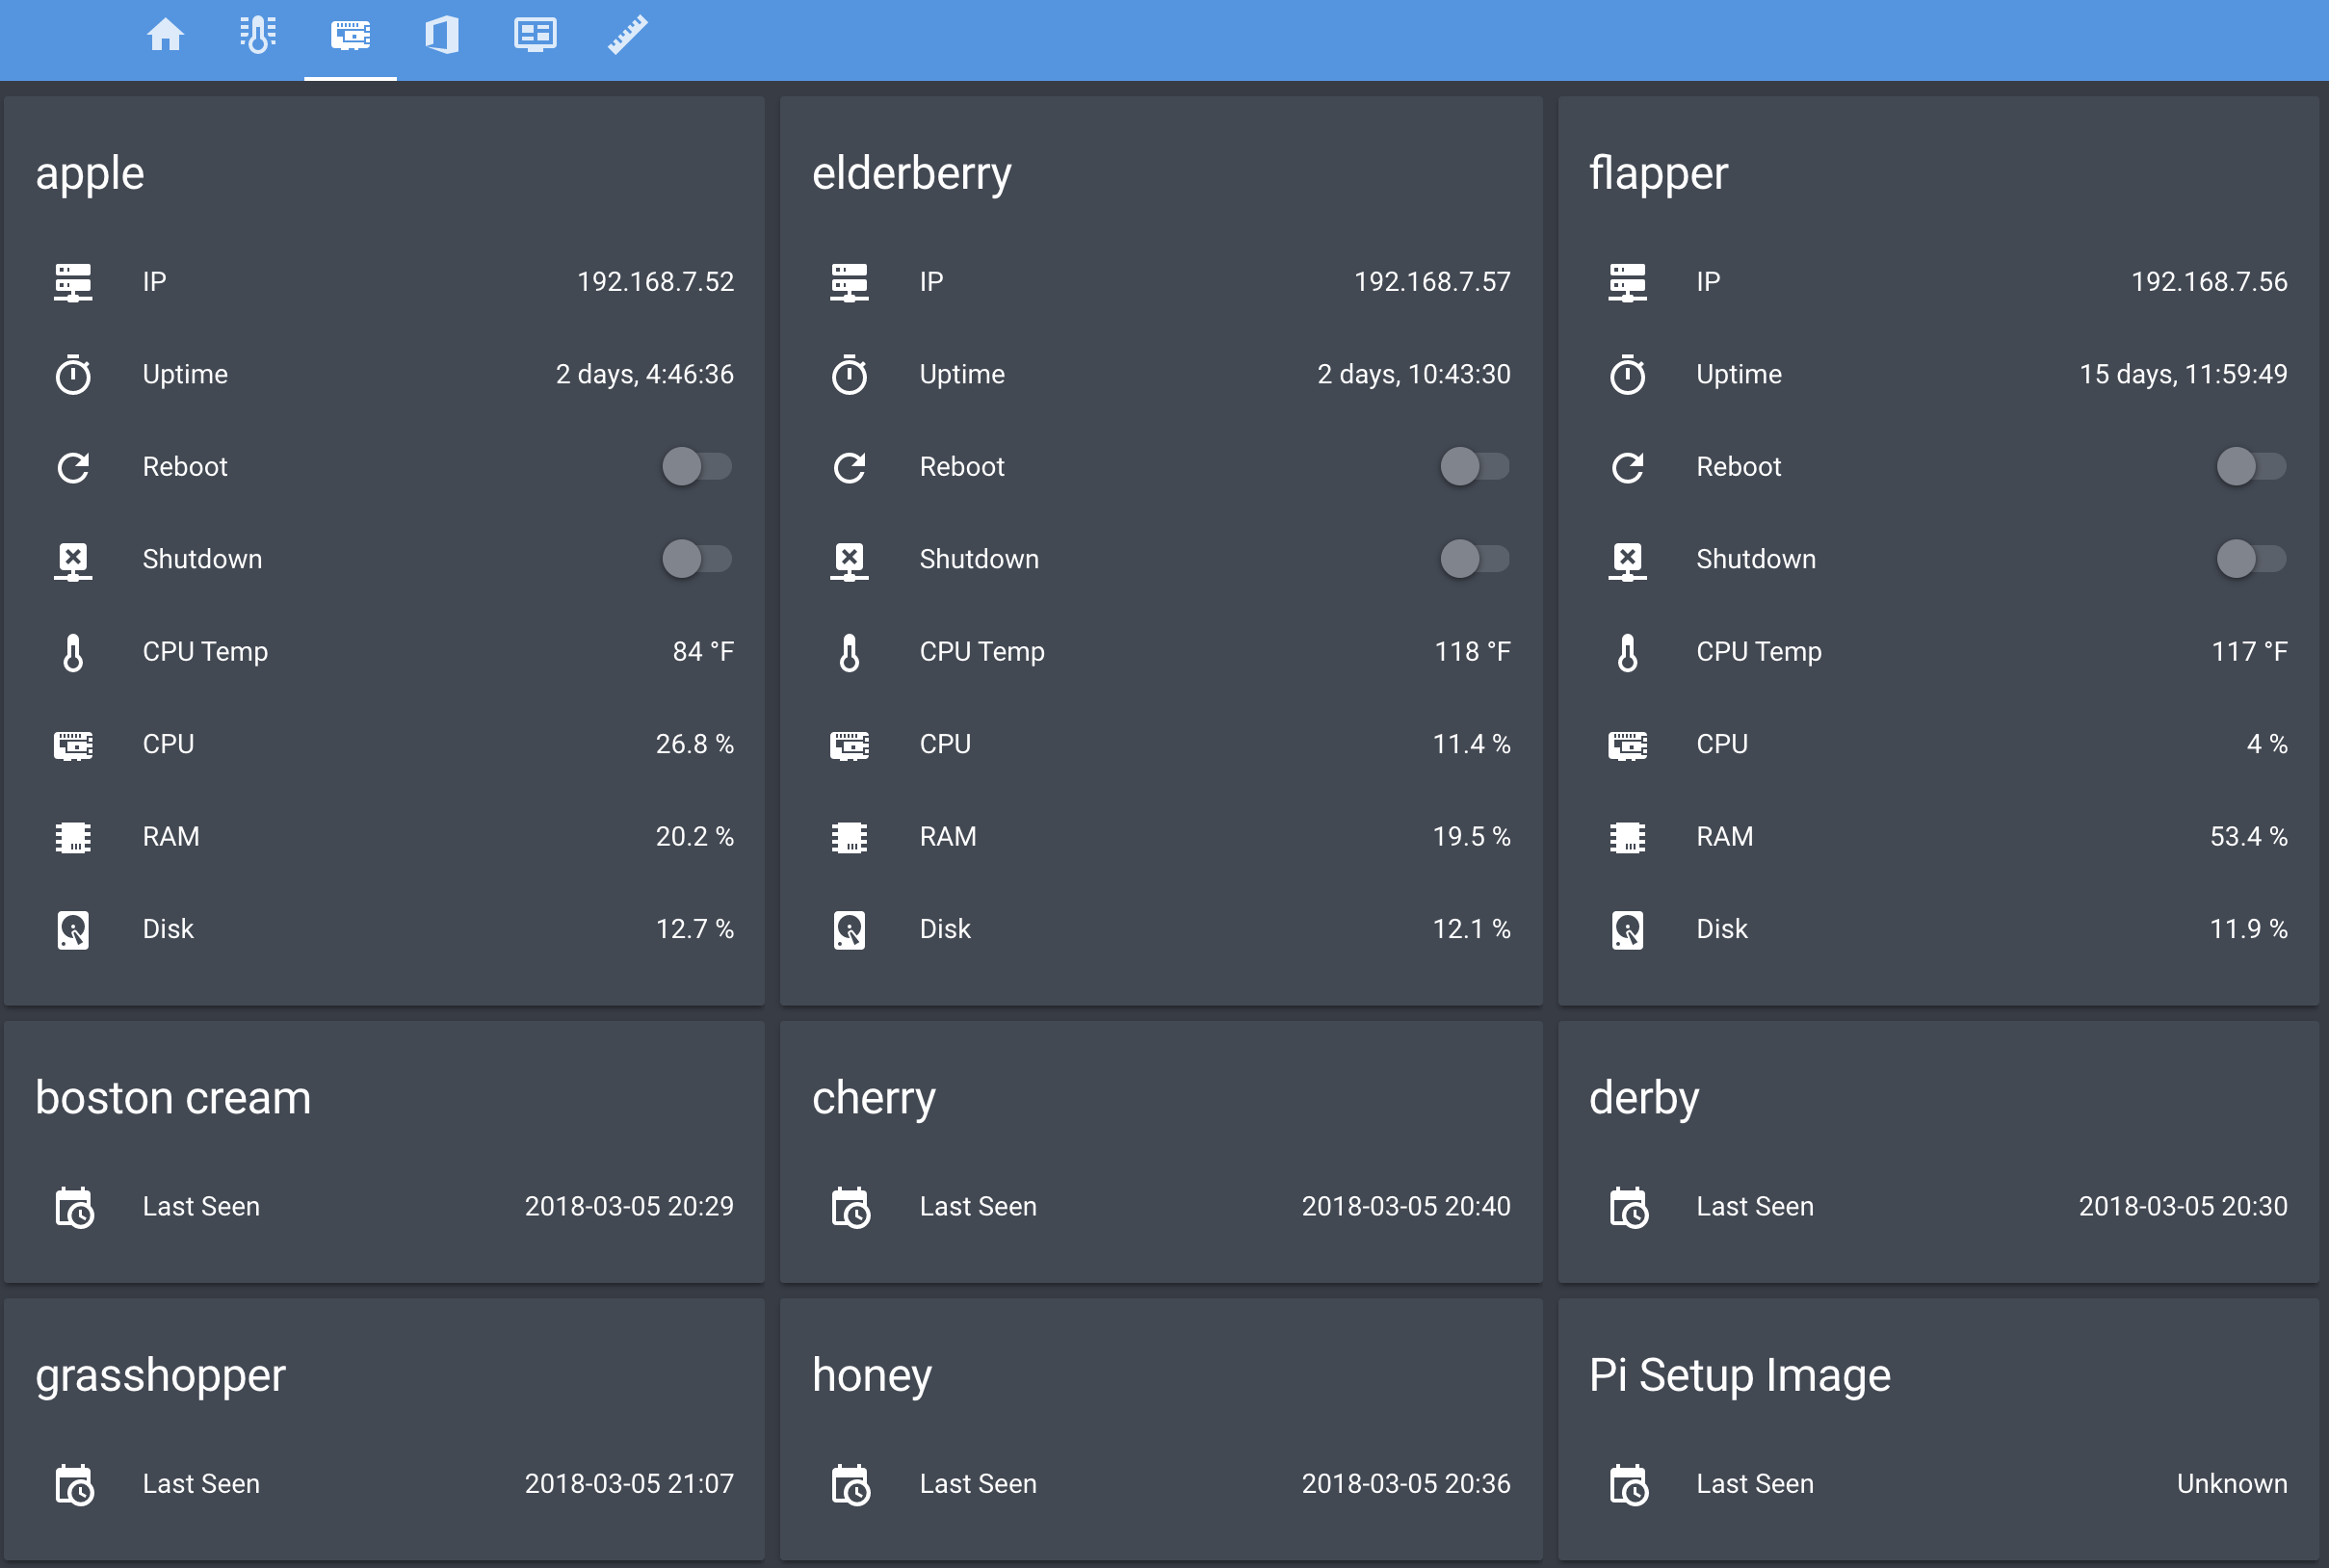
In addition to running Home Assistant, I wrote a couple of small services I run on Pis. The first is the temperature sensor/monitor I use in my garage. I’ve improved it a lot in the last year. The second service is home-assistant-pi, which reports a bunch of data about each Raspberry Pi on my network back to Home Assistant, which you’ll see in the screenshot below.
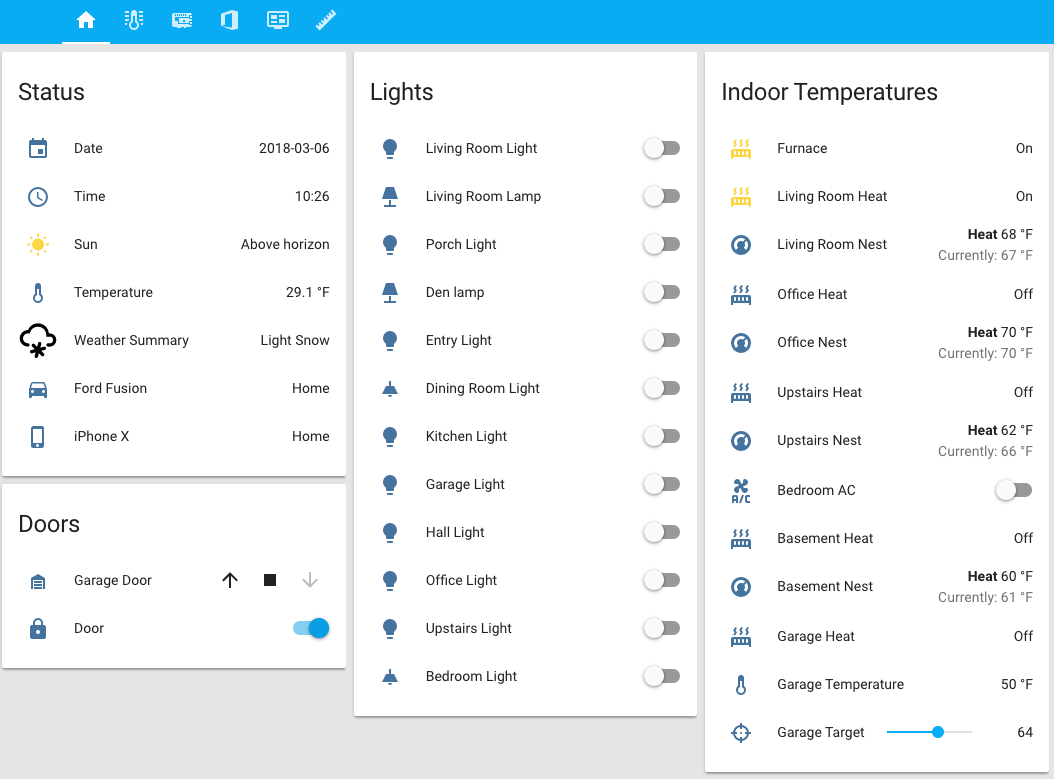
The beauty of Home Assistant is you can set everything up the way you want. Your limitation is your imagination and your comfort level with configuration files and code. I took a bunch of screenshots of my setup.
The main screen, with a daytime theme active.
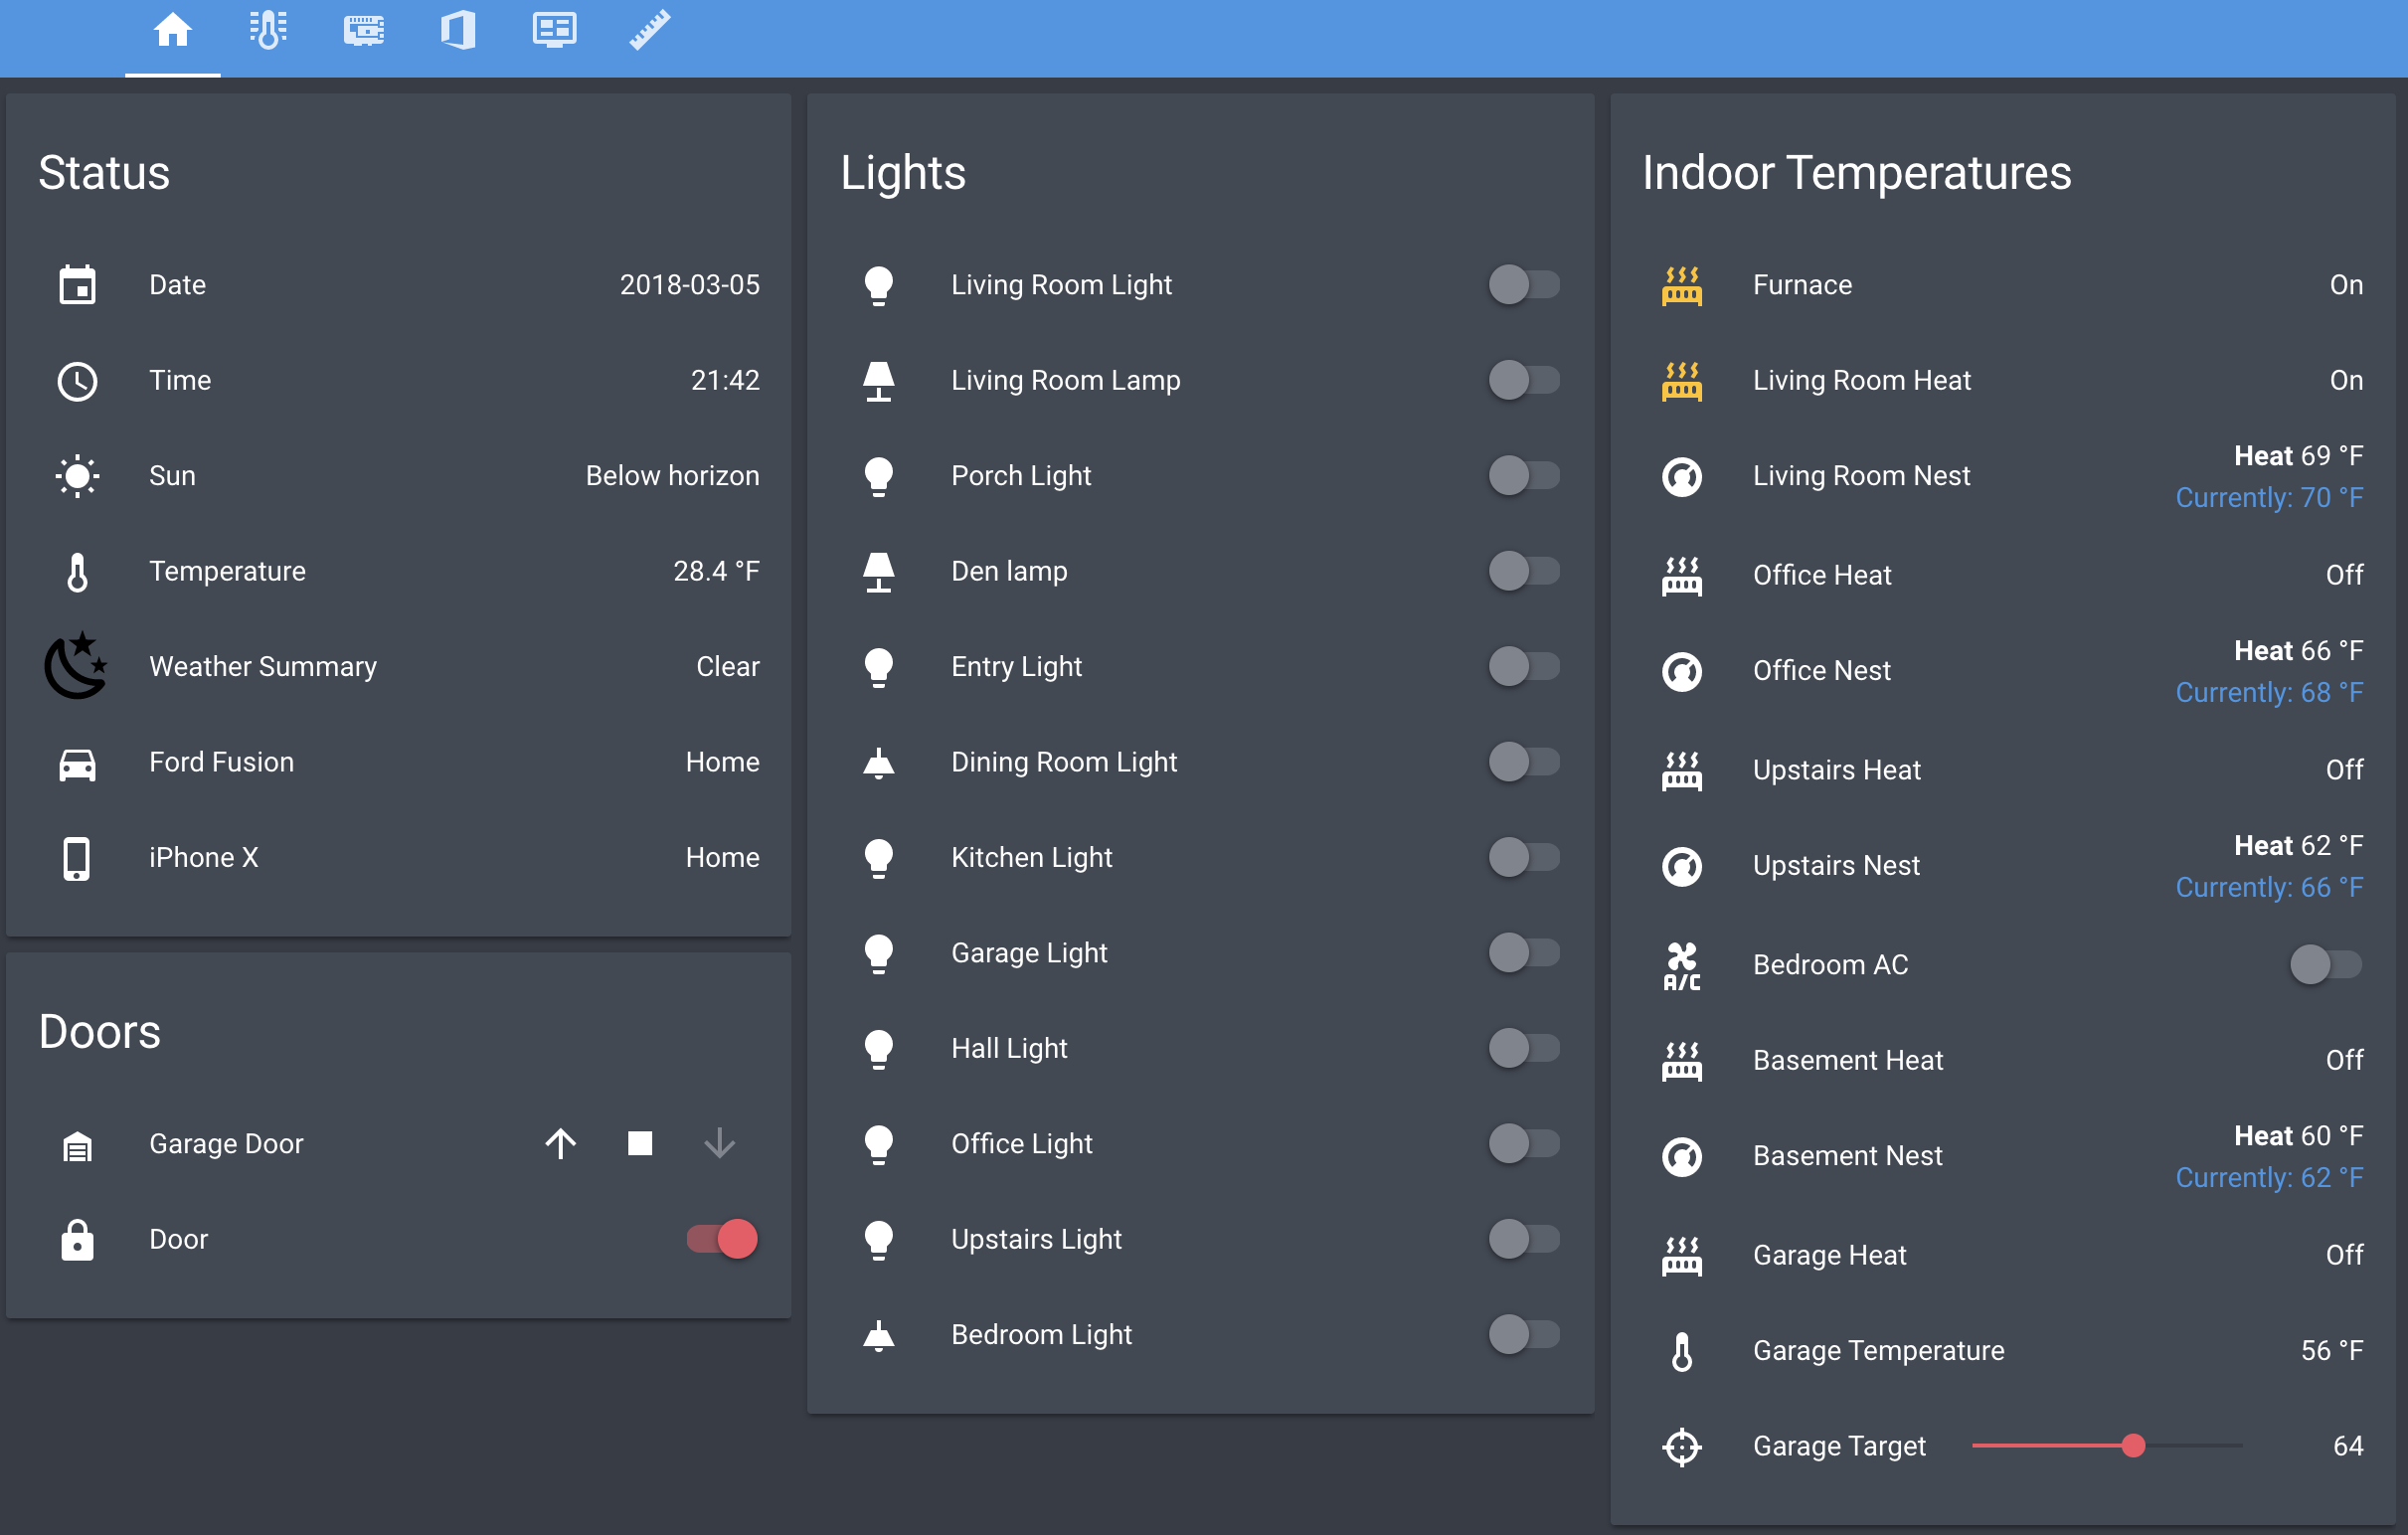
The same screen, but at night.
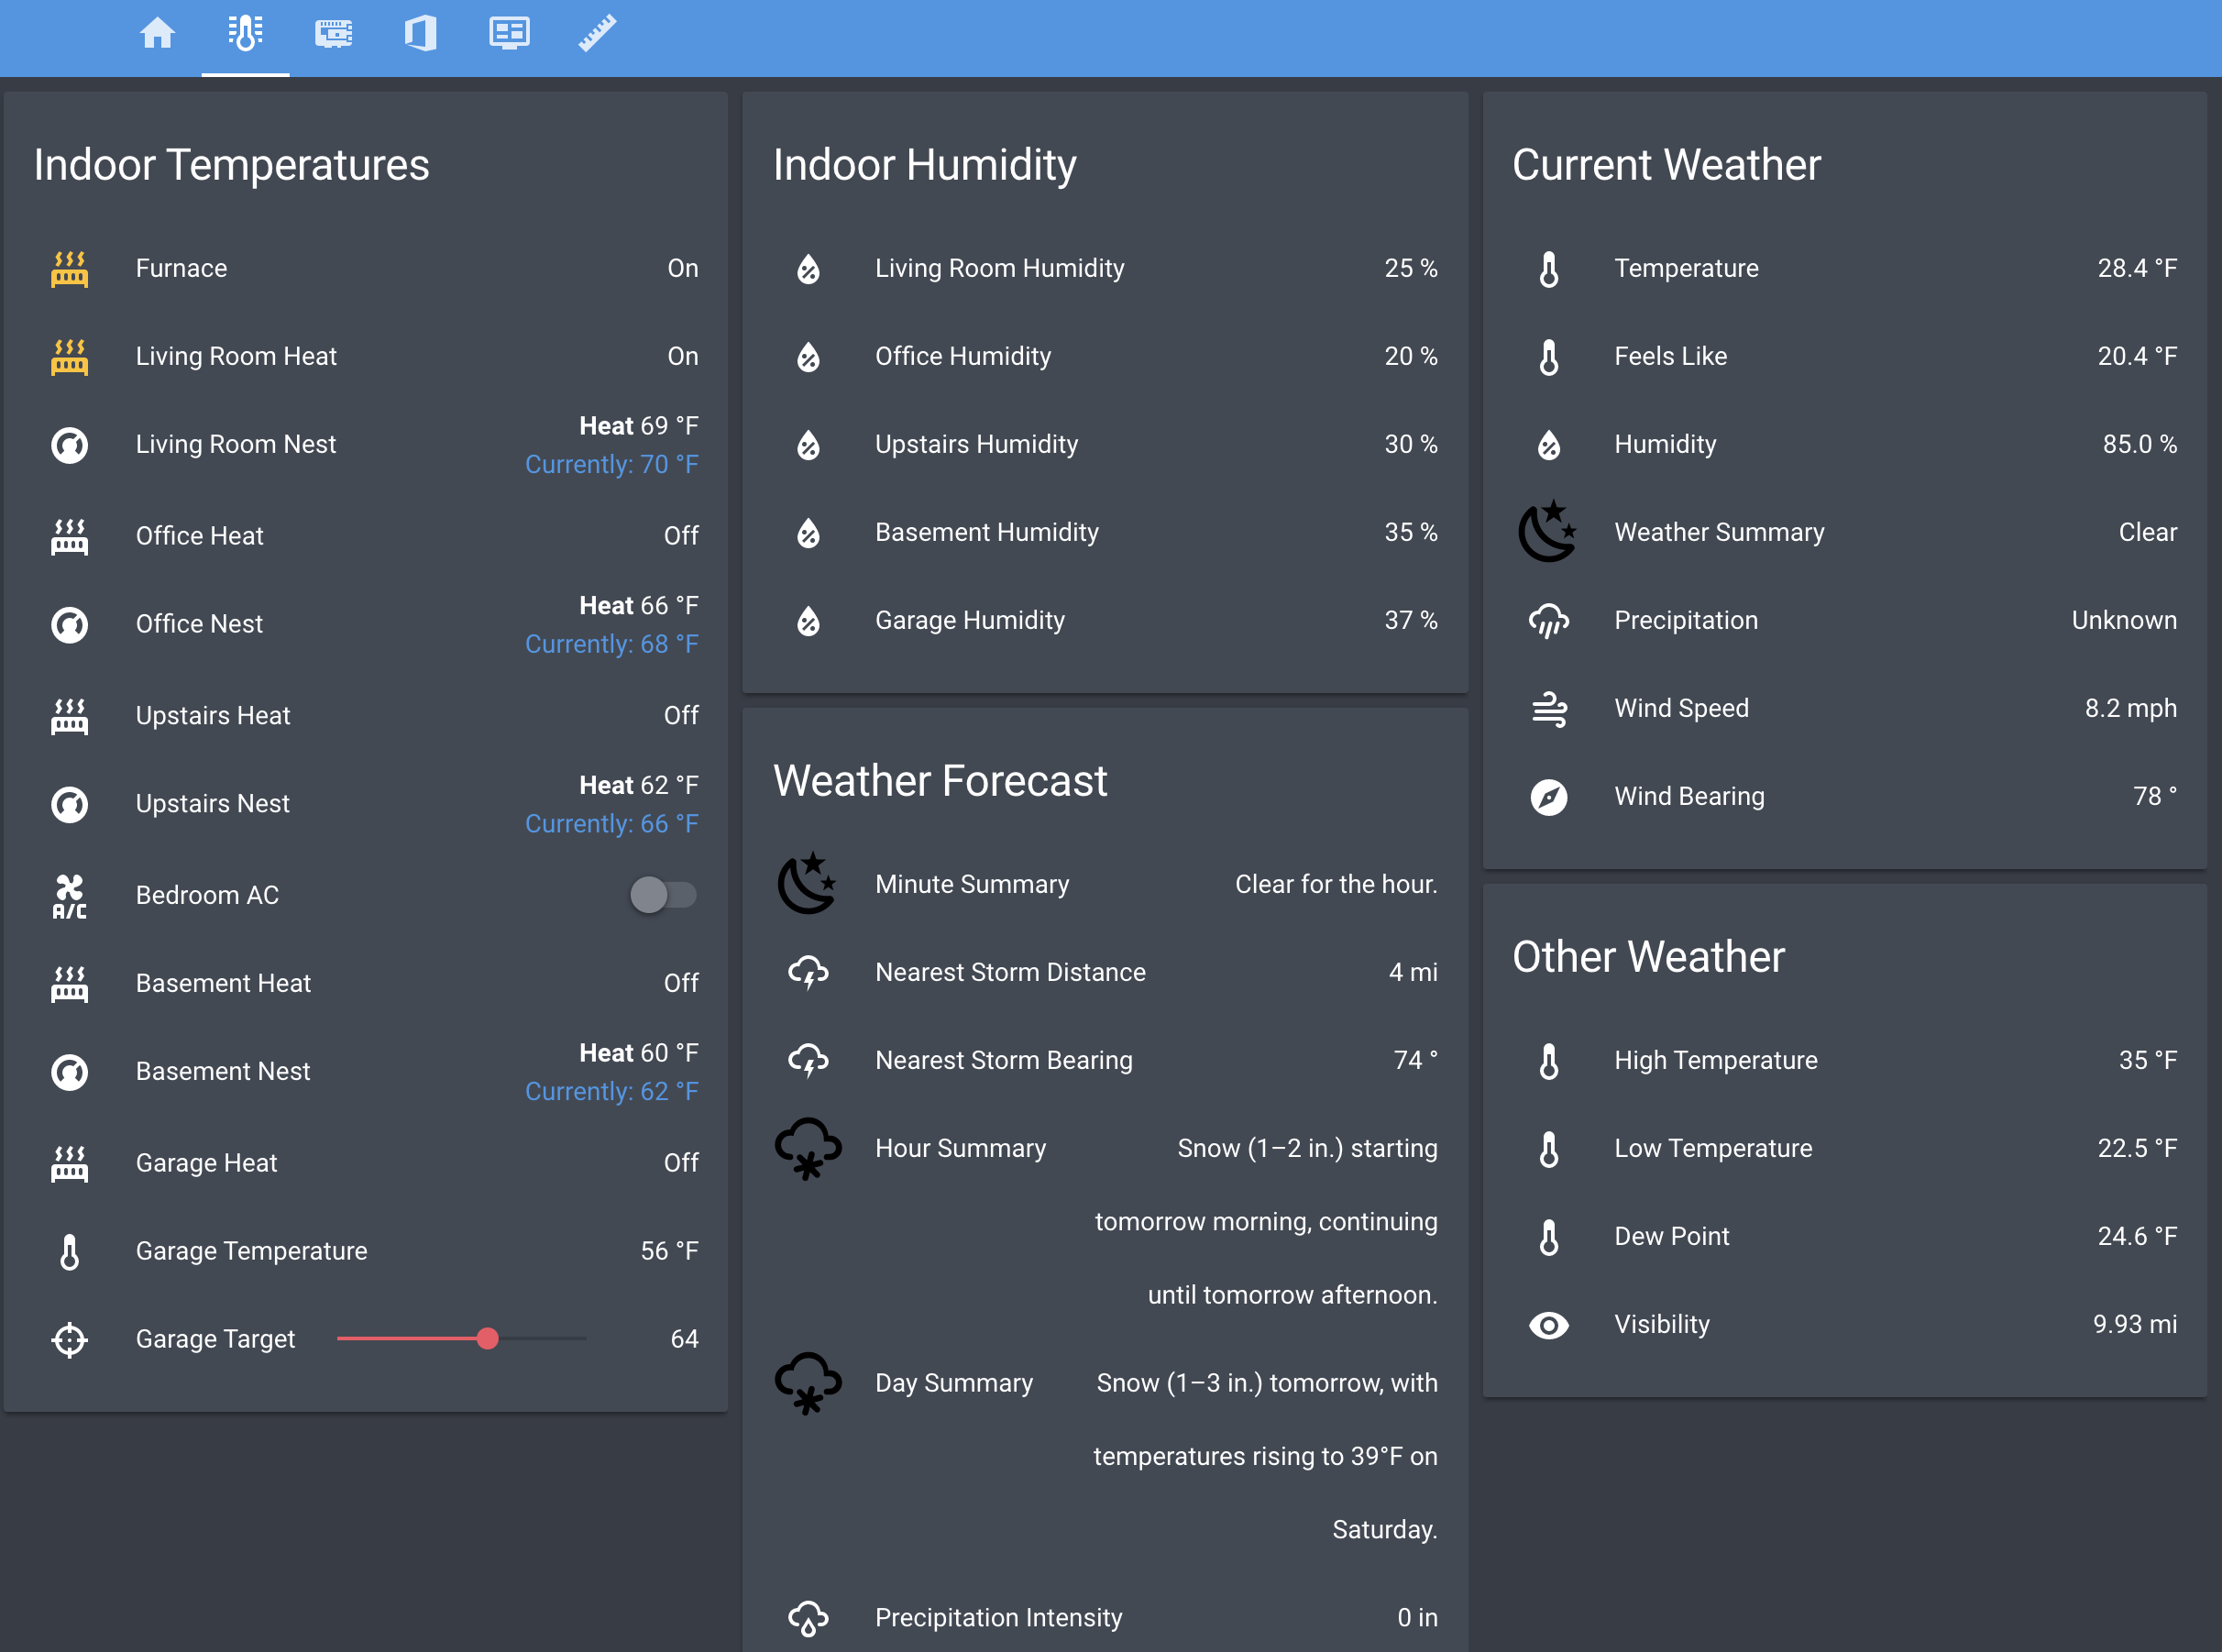
All of the weather and indoor climate data.
Status of my Raspberry Pis.
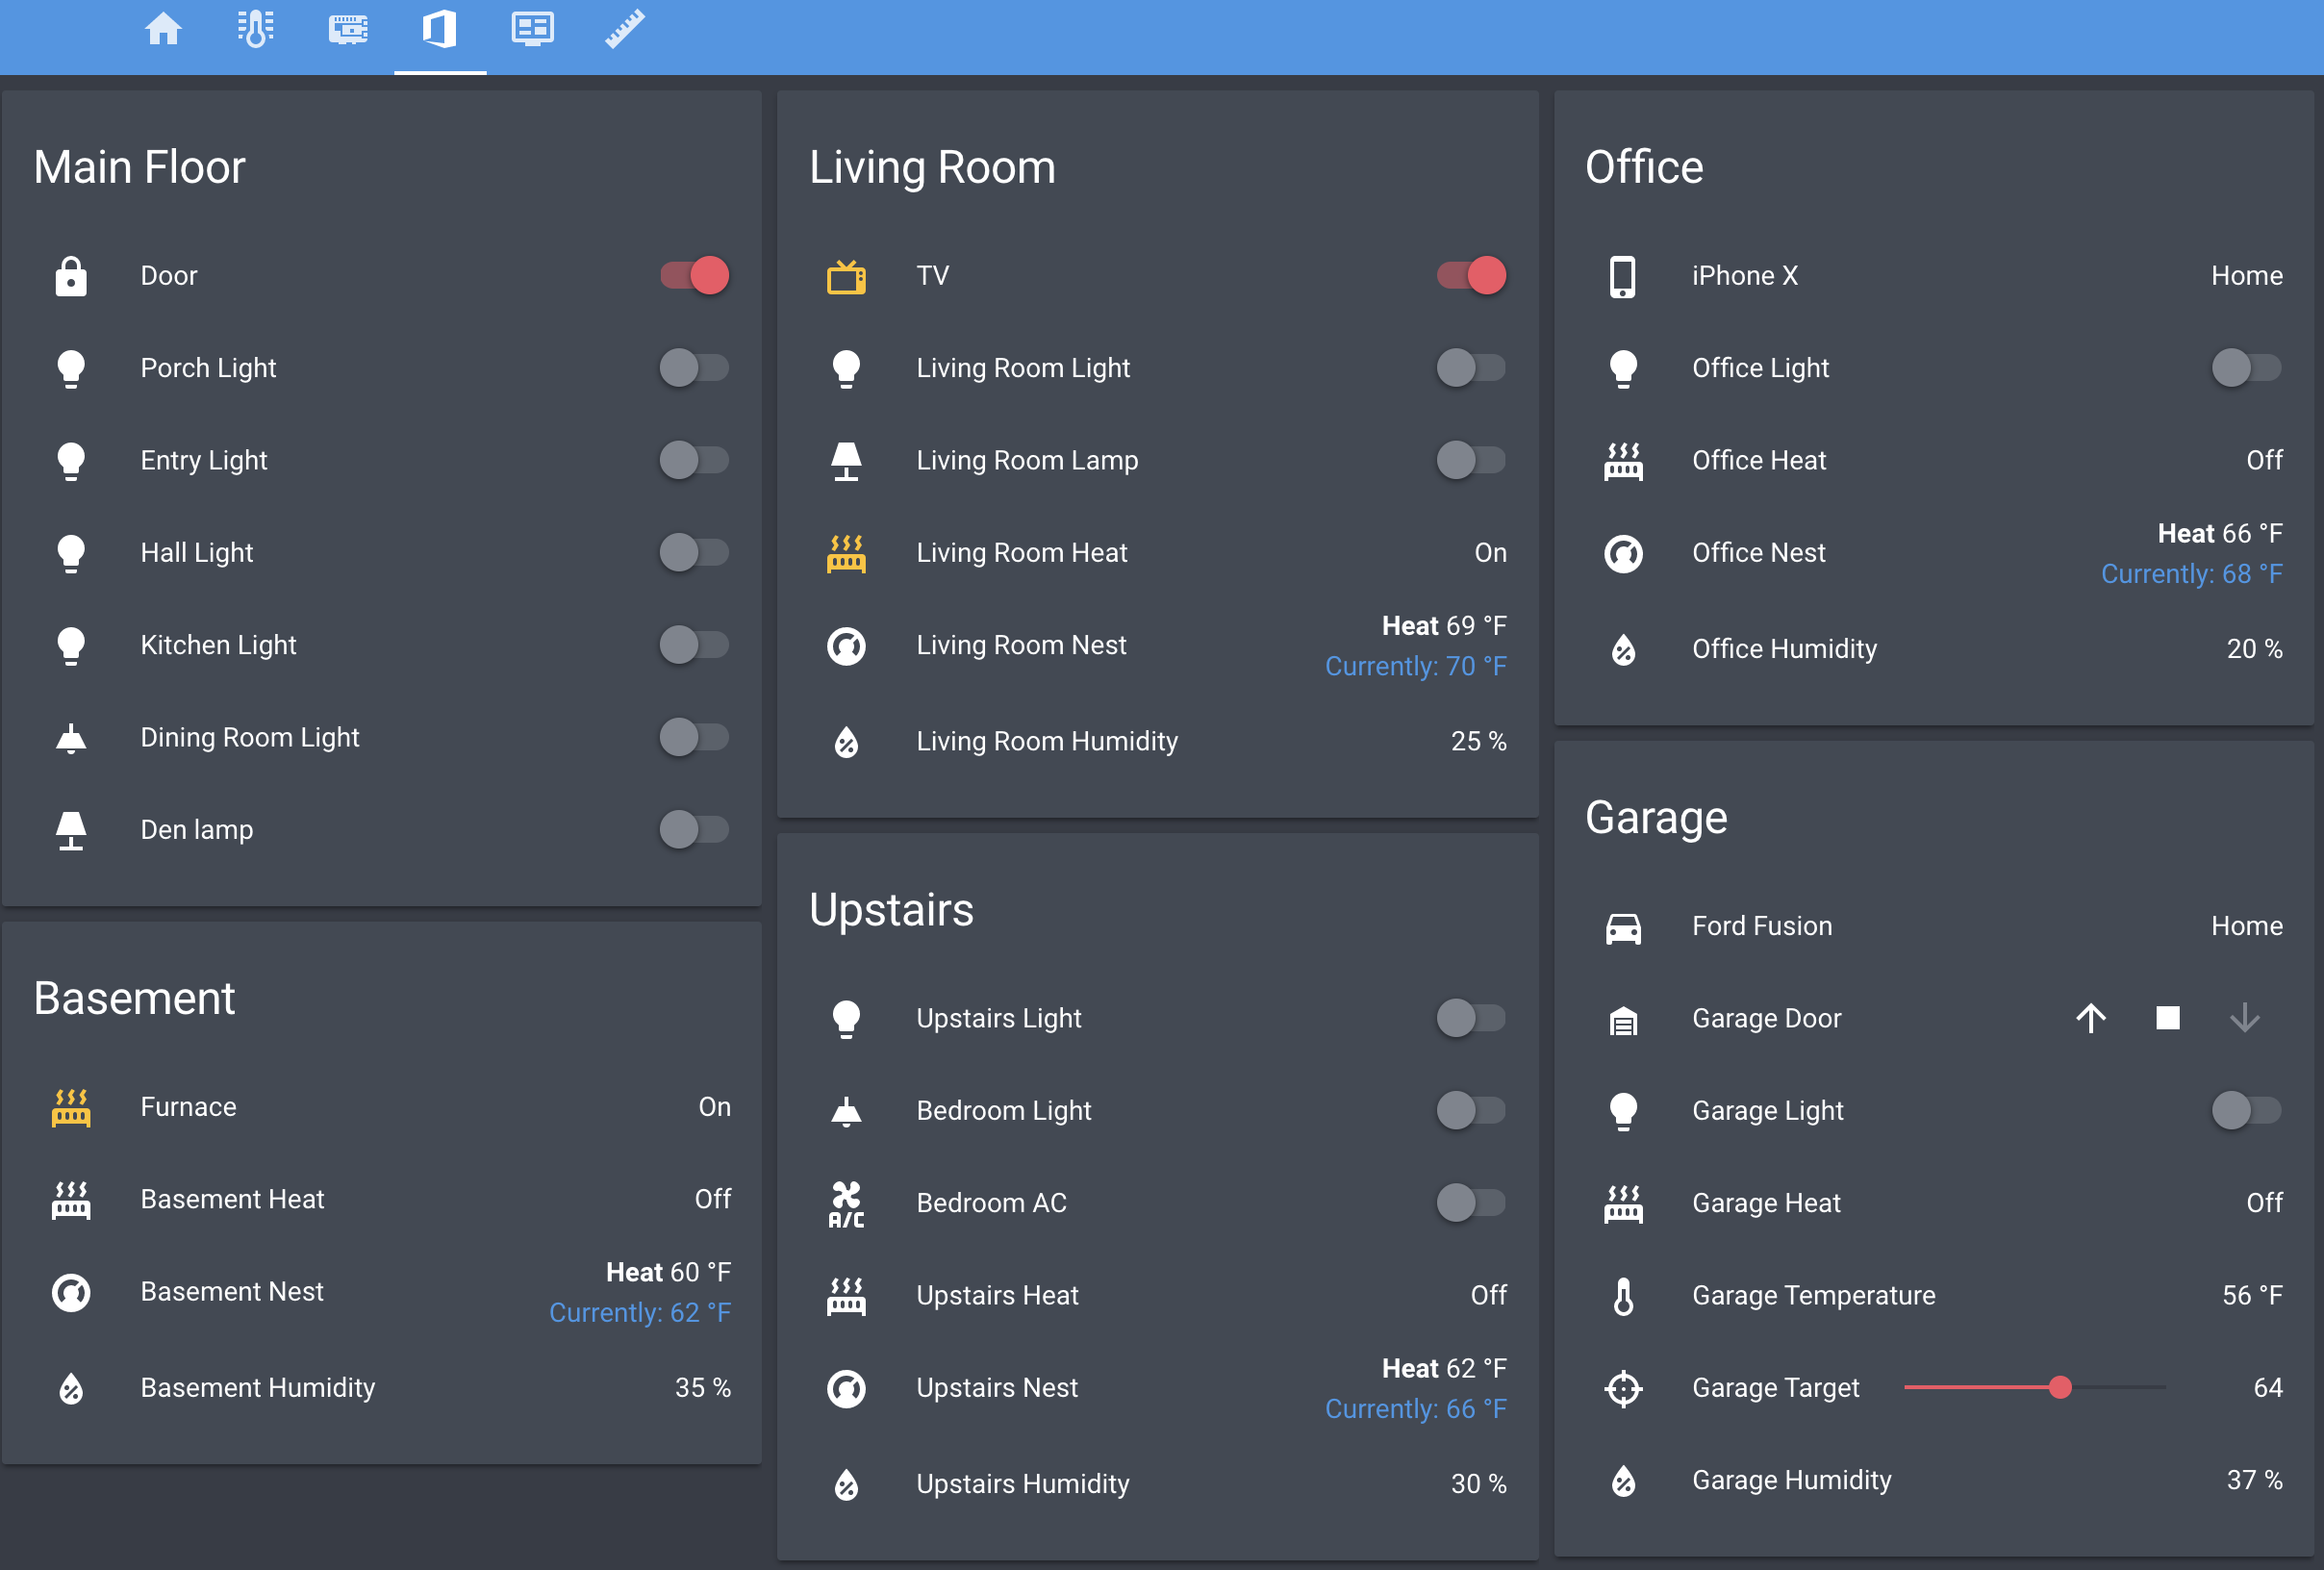
Groupings by room.
Sort of a multimedia group, showing my TVs and cameras.
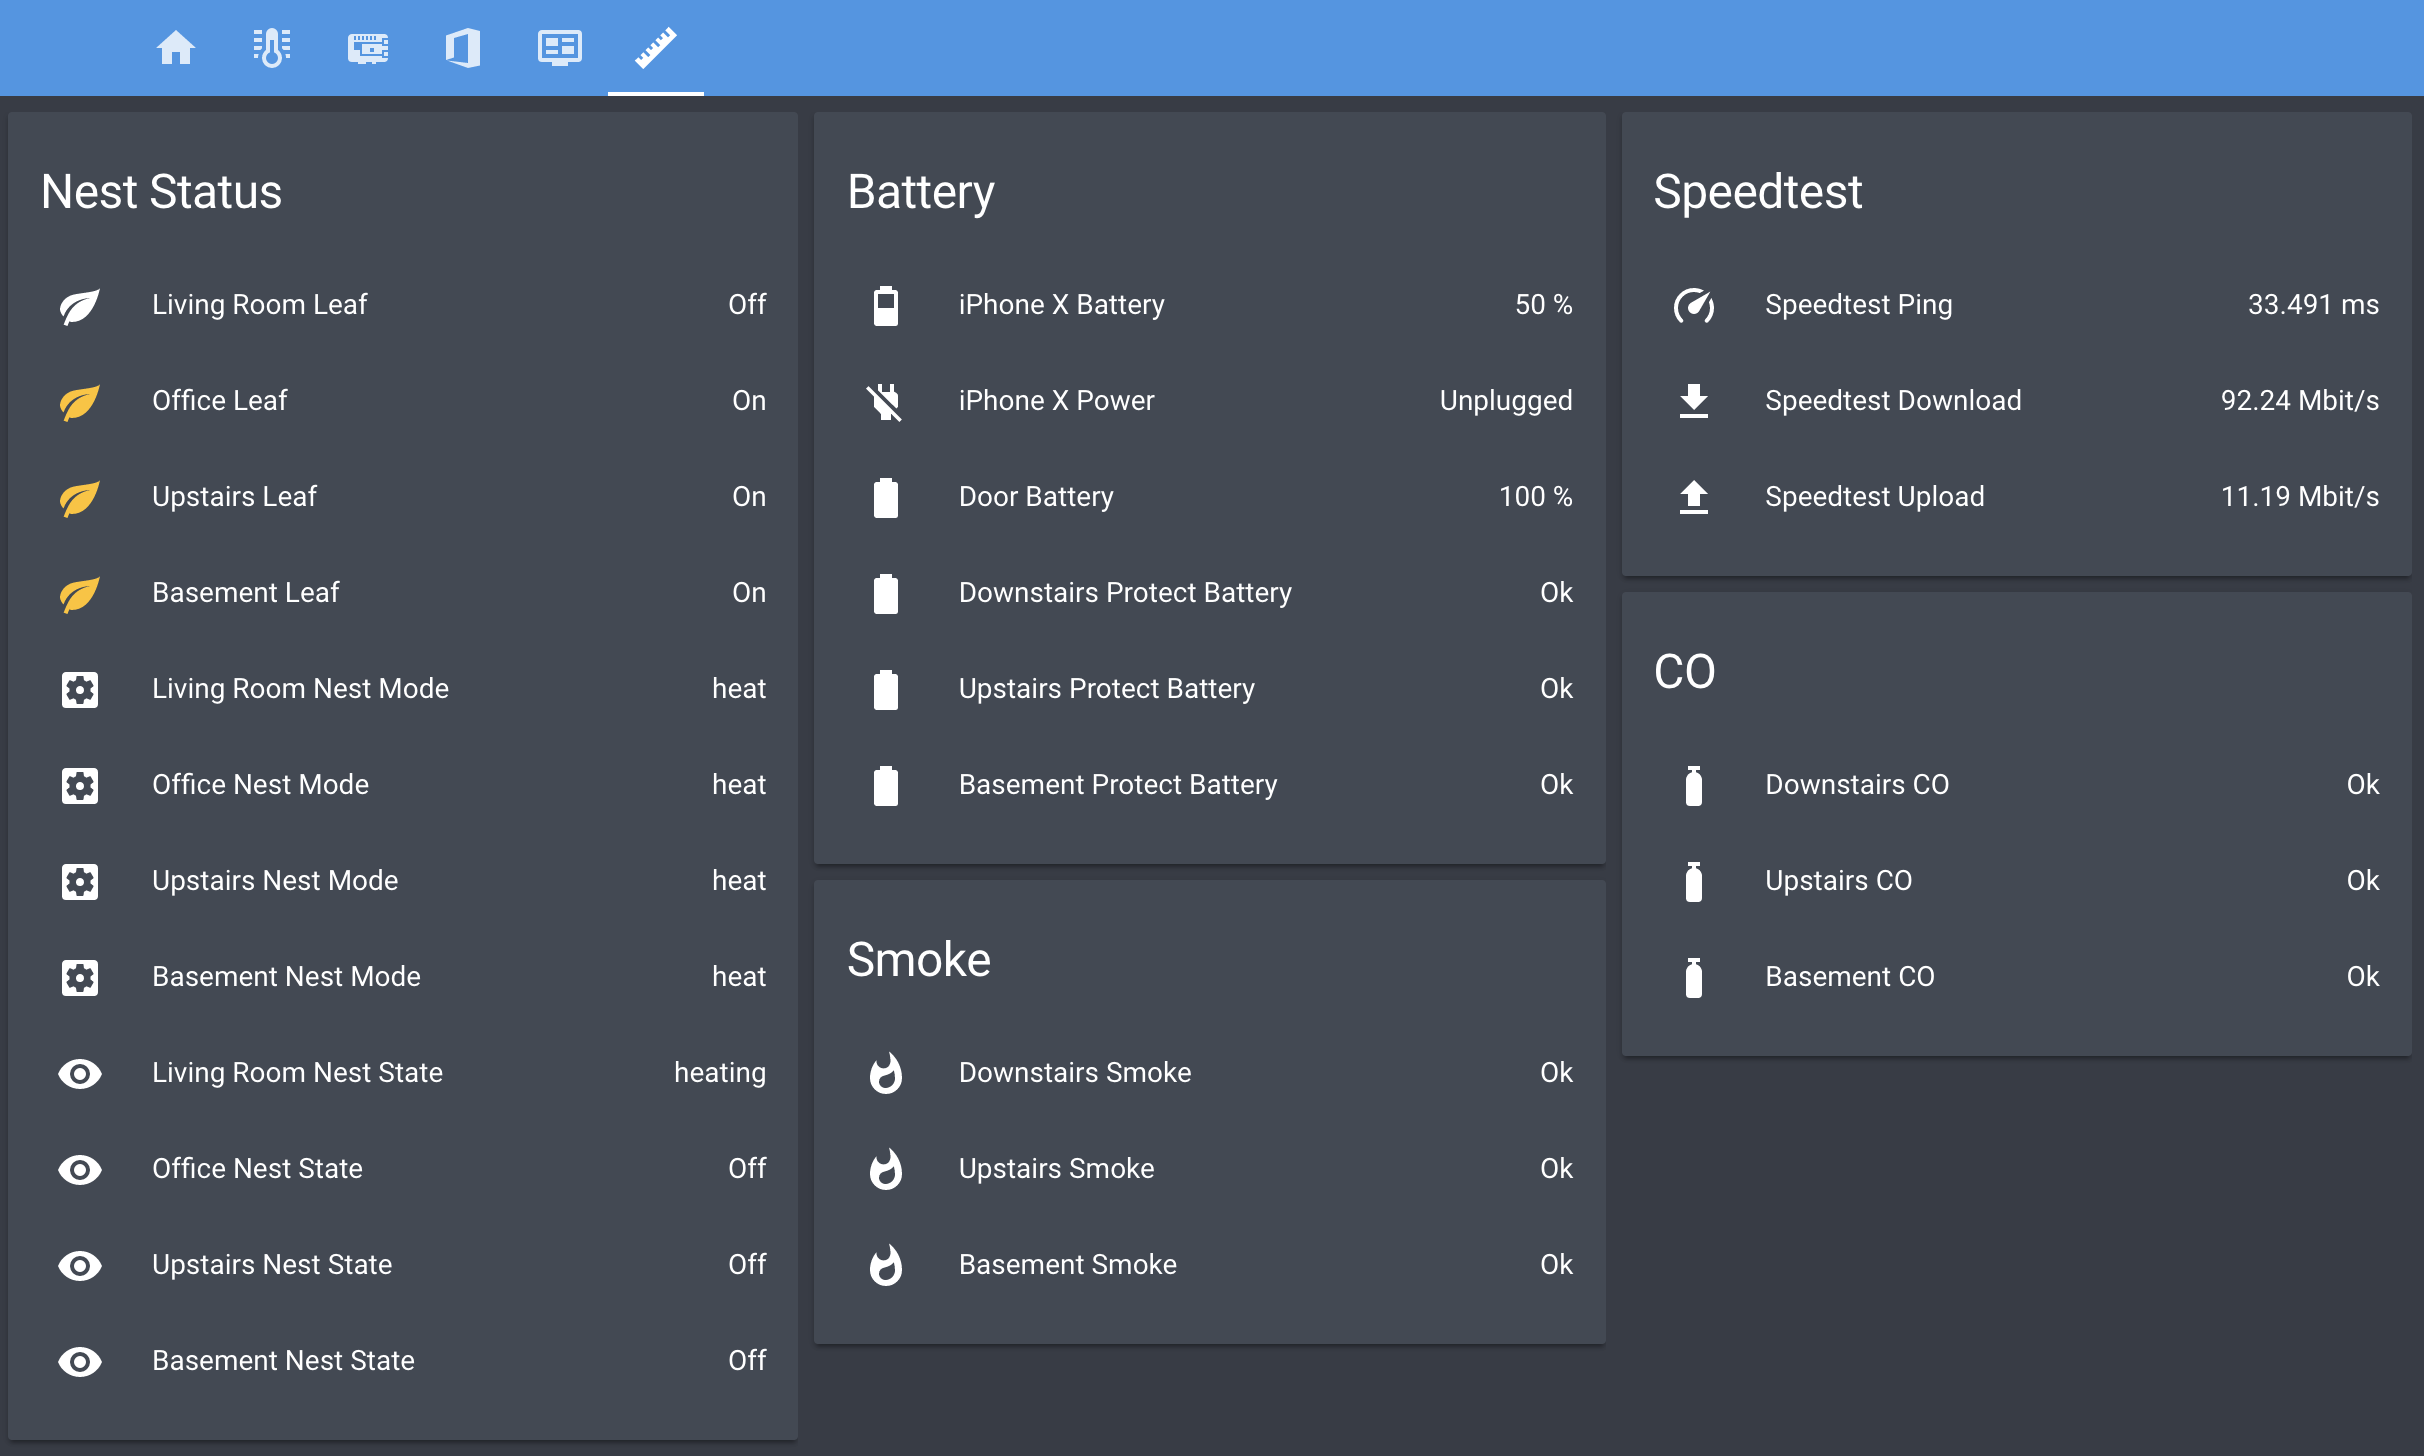
A catchall sensor screen with less frequently used info.
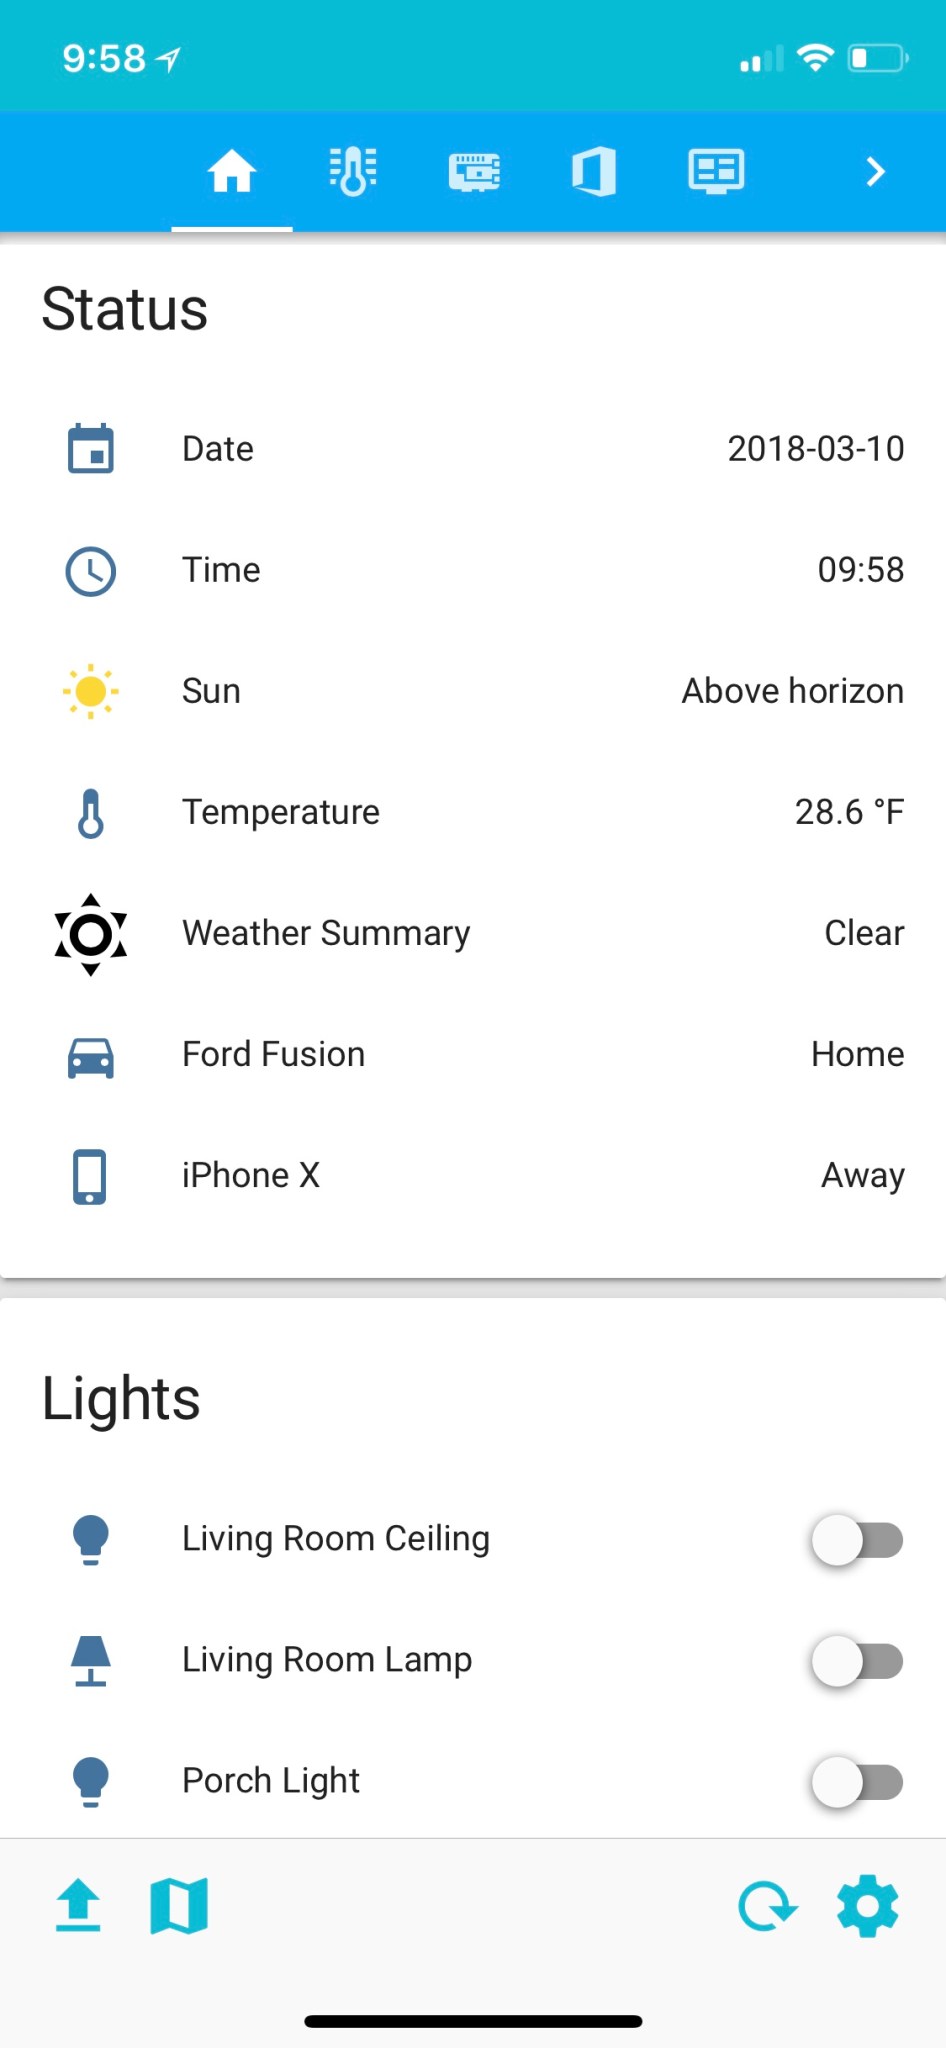
The iOS app gives access to everything and works the same way.
I keep all of my configuration (except the secrets file) in a GitHub repo in case I mess something up. I’ve learned a lot by looking at other examples, so my repo is public as well. Maybe my config will help out someone else. The repo is home-assistant-config. If you have any questions about anything you see in this post or in my configuration, let me know.
In the final post of this series, I’ll explain the cool part of this whole thing, the actual automations. I need to go through my ideas list and implement all of them though.
After the recent changes to my home network and Home Assistant server, I noticed the logs in Pi-Hole were being dominated by the domain I use for dynamic DNS on the box. Roughly 15,000 DNS requests a day out of 30,000 on my entire network. Really skews the ad blocking stats.
Why so many DNS requests? Because home-assistant-pi and home-assistant-temperature-monitor were both using the Home Assistant REST API to fetch data. That’s 15k requests/day with only two of my seven other Raspberry Pis turned on, so it would get worse when I put some of the other Pis into “production” around the house. The temperature project only runs on one box, but the first project in installed on every Pi.
I briefly tried to switch those two projects over to using the local IP address of the server and continue to use the REST API, but with SSL enabled it was complicated. MQTT was already running on the server and those projects publish updates to Home Assistant over MQTT, so it was an easy decision to use it for subscribing as well.
While I was at it, I took the opportunity to simplify a lot of the code and have the devices update more frequently. So far it seems to have solved a couple of lingering stability or connection issues I was having with home-assistant-pi. All of the code changes are available in the respective GitHub repos linked earlier.
Update: I forgot I had home-assistant-pi connecting to google.com in to help with determining the local IP address in Python. Another update to clear that up will eliminate over five thousand DNS requests per day.
My router had been flaking out, so I picked up a Eero with 1 beacon. Setup was smooth and painless. I decided to use a new Wi-Fi network name, which was not one of my best ideas; reconfiguring about 30 devices was a pain in the ass!
While I was working on my network I took the opportunity to do a fresh install of everything on the Raspberry Pi server running Home Assistant and Pi-Hole. Instead of installing Raspbian and all of the software myself, I took advantage of Hass.io, which is a preconfigured image and works well. When I first started using Home Assistant, the project was pretty immature so I didn’t use it.
Installing Pi-Hole as a Hass.io add-on is slick. Due to issues with my old router I’d been living without ad blocking for a few weeks and it was horrible. It’s hard going back to a web littered with ads when you’ve been living without them.
Figured I might as well keep going, so I also made a bunch of improvements to the Raspberry Pi Temperature Monitor I use in my garage. Seems to run much more stable, which may also have something to do with the fresh Home Assistant install. Changed a few things with home-assistant-pi as well.
Another big change I made to the server is connecting it to my network via ethernet instead of WiFi. It’s wired in through an AirPort Time Capsule, which is connected to the Eero via a really long cable running through the basement. I bet this has done more than anything to improve the stability and consistency of my system. A bonus of this connection change is the Speedtest reporting inside HA is much more accurate.
Now I need to make time to get more automating done in Home Assistant and publish part 2 and 3 of my home automation series. It’s coming up on a year since part 1, so long overdue.
I’m a big fan of Pi-hole. Due to my instance running on the same Raspberry Pi as Home Assistant I have it configured for a different port than the default 80. Each time I run an update for Pi-hole I manually edit the config file and restart the service, because the update scripts reset the port. I finally whipped up a script to take care of it.
The box came with a set of Hammer Headers, which I’ve been skeptical about since I first saw. I have no issues soldering, actually enjoy the task, and prefer it so I have solid connections to the pins. I figured I’d give the headers a try though. Plus it was good excuse to try out the garage sale hammer I bought. Take a look at the 8x speed time-lapse…
I appreciate the idea and can see that hammer headers would be a good option in schools where they can’t have soldering irons, but I’ll never use them again. It took me 6 minutes and I felt like I was destroying the Pi Zero.
The Adafruit Joy Bonnet is a cute little add-on for the Pi. The first thing I noticed when holding it was how cheap the thumbstick feels and sounds. I wouldn’t expect much out of such a small controller that’s only $15 and snaps on to a Raspberry Pi though.
When I get my 3D printer later this year I’ll make a case for this 7″ screen I bought a couple of years ago, maybe even with a way to clip in the Pi Zero. Or better yet, a Pi 3B, which is better suited for a retro gaming device.
This is now my 8th Raspberry Pi. The 7th was named grasshopper, but what type of pie should I use for the letter H? Comment with your suggestions because the Wikipedia list I usually reference has two “H” pies I’ve never heard of.
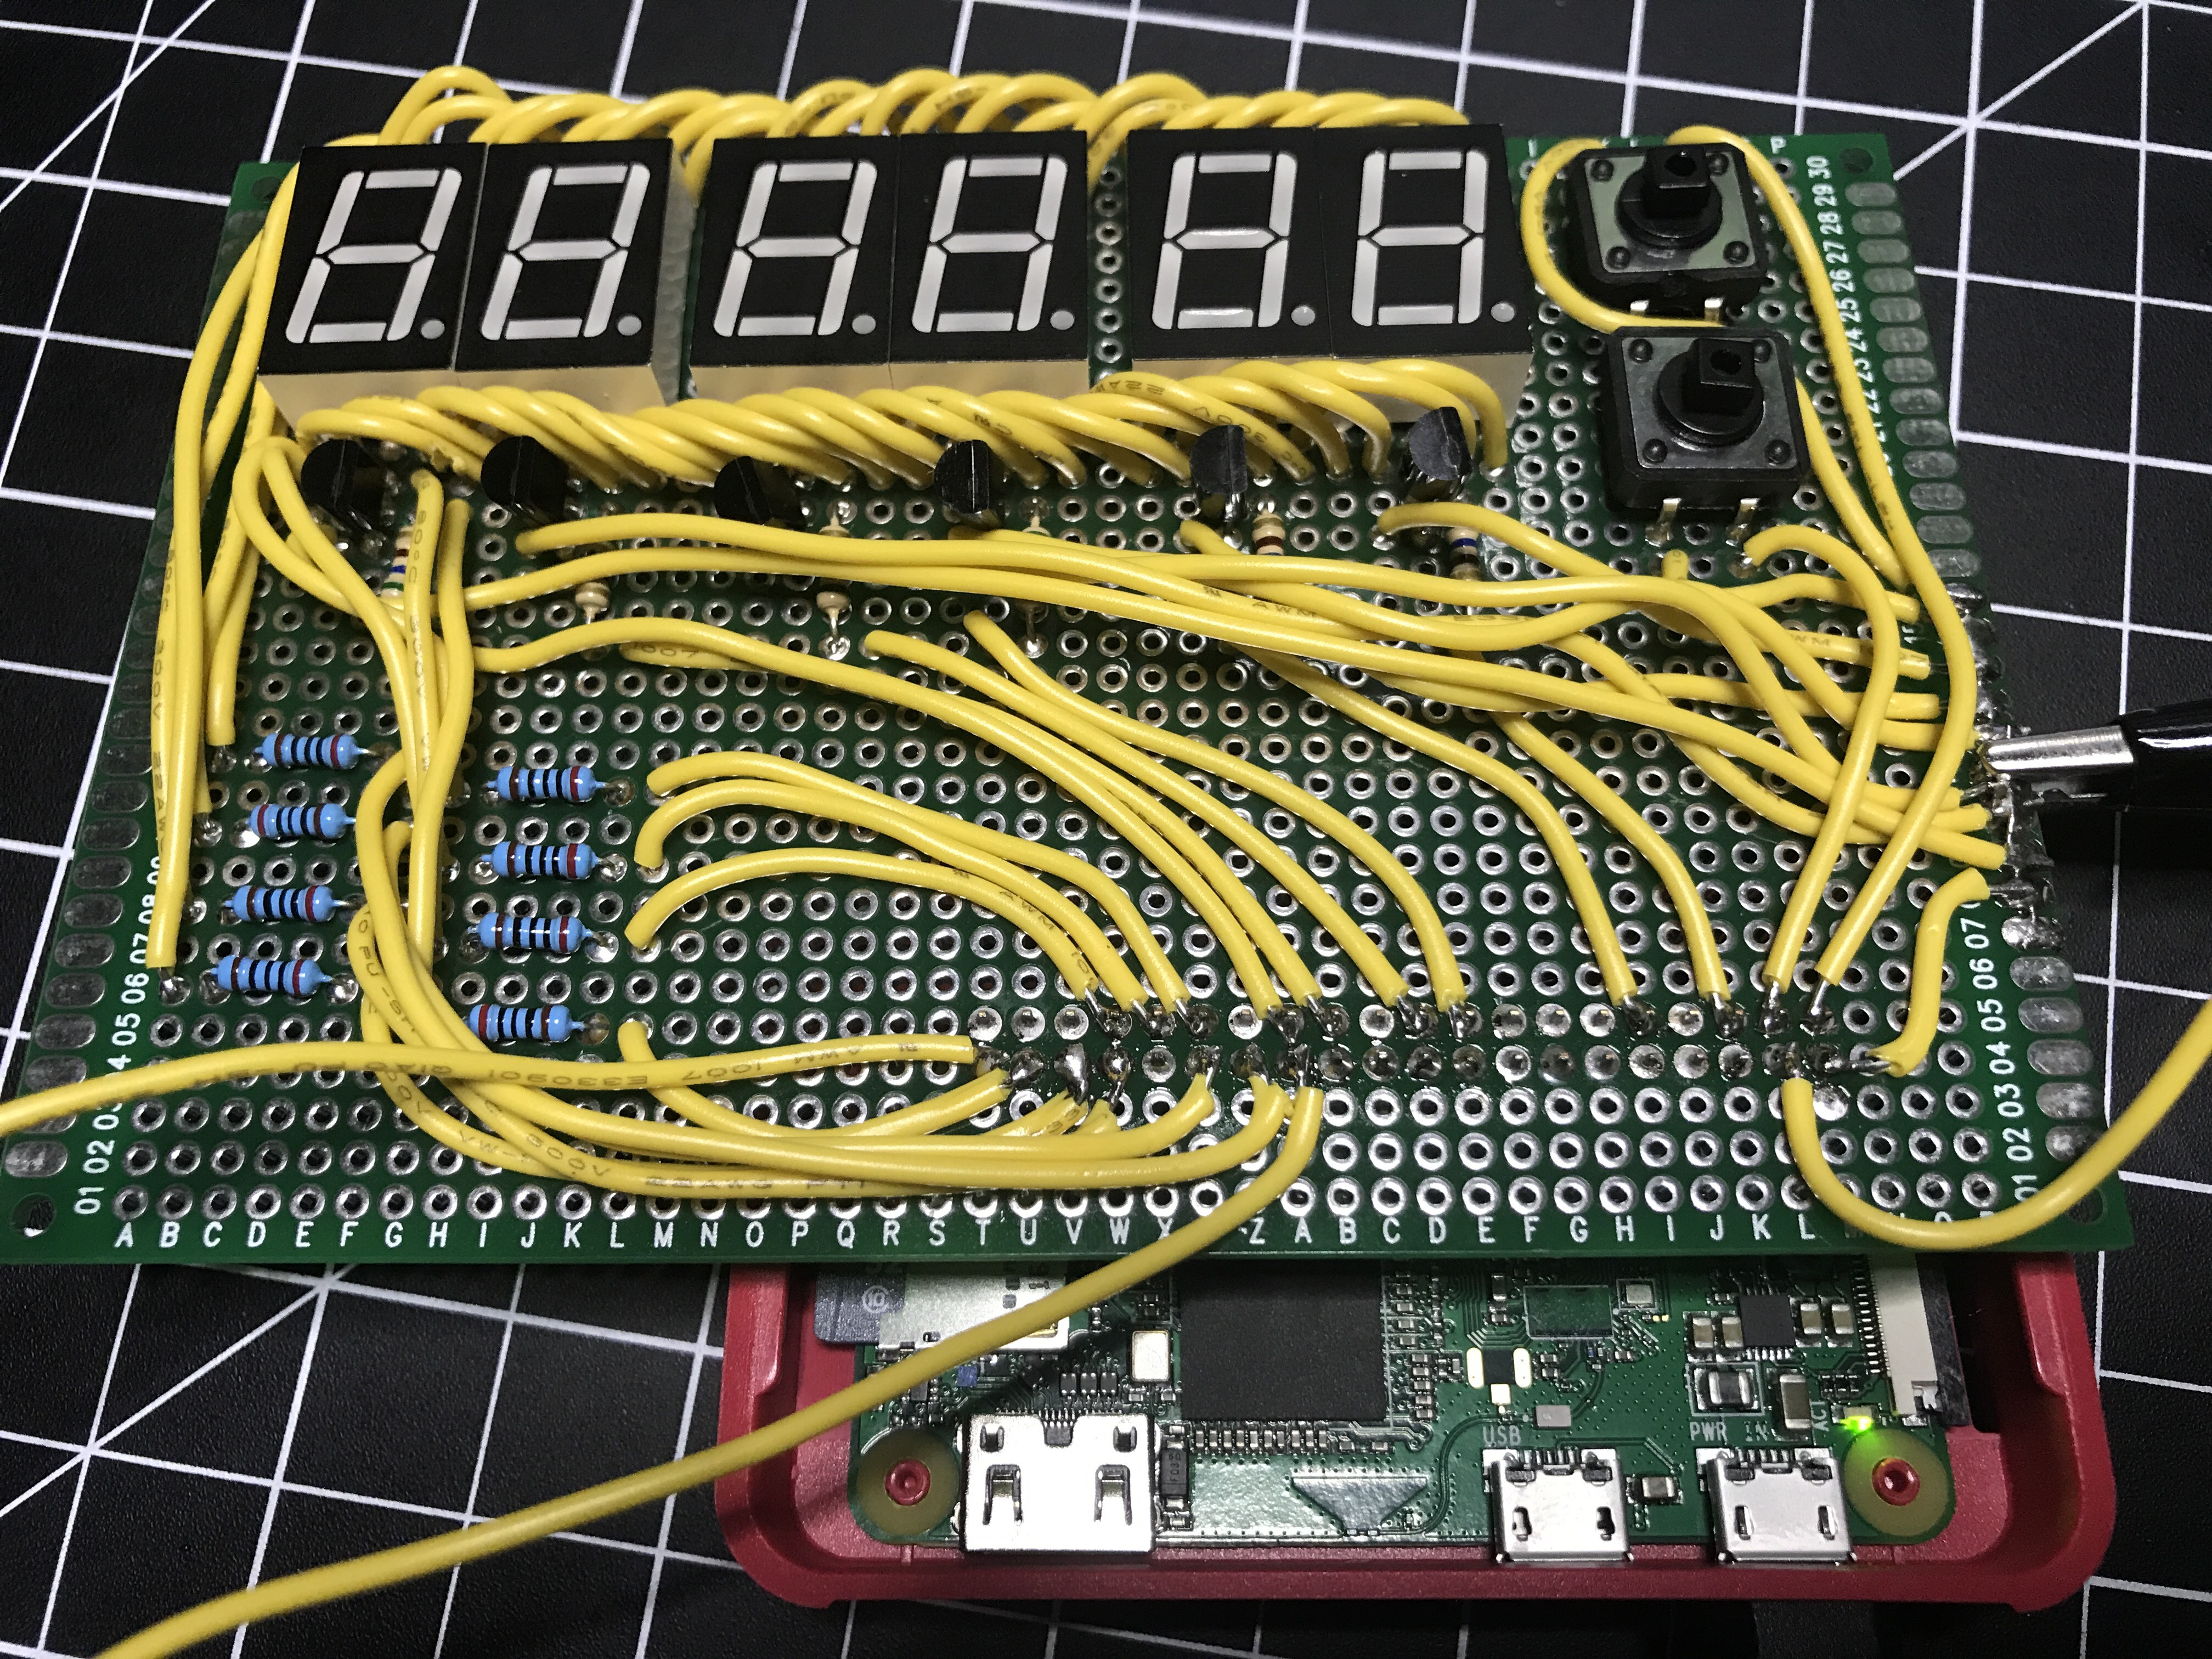
I successfully built the second piece to a large project I’m working on. I’ve essentially built my own XL Raspberry Pi HAT (Hardware Attached on Top). Since I’m not following the specs, I shouldn’t really call it a HAT.
I’m not sure how, but once again I correctly connected everything on the first try. Either I’m extremely lucky, my attention to detail is paying off, or a combination of the two. I’m just waiting for some catastrophic failure to happen soon when I solder things the wrong way one of these days. Every one of my solder bridges worked. I did run continuity tests on all of the early bridges, which I’m sure was a big factor to my success.
Any guesses on what this board does? Leave your best guess in the comments. It’ll be at least a month before I share more details because I need to finish the entire project first.
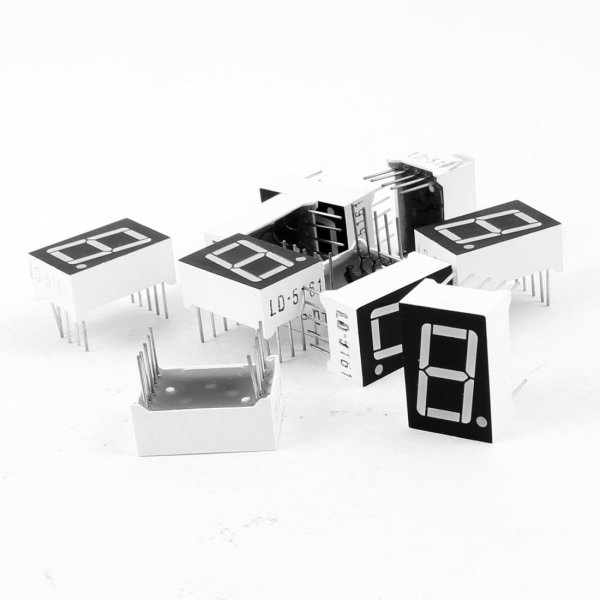
I picked up a 10 pack of these 7 segment red LED displays for less than $5. Since each display requires connecting to a minimum of 8 of the 10 pins (9 if using the decimal point), they aren’t exactly easy to work with. Sure, you can buy these where 2 or 4 displays are already connected in a nice package, controlled with the help of an integrated circuit, but where is the fun in that?
If you need to use more than 1 or 2 displays (at 8-9 pins per display), you’ll quickly run out of pins on your microcontroller or Raspberry Pi. The most common way to work with several of these displays is called multiplexing. It’s a method where you briefly turn on one display, turn it off, turn on the next one, and turn it off. You repeat this through all of your displays and then start over. If you do this fast enough, the human eye thinks all of the displays are on at once. It’s pretty slick!
The advantages of multiplexing are:
Fewer wires/pins needed to drive the displays.
Lower power consumption since the LEDs on only one display are lit.
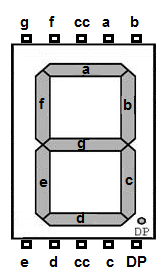
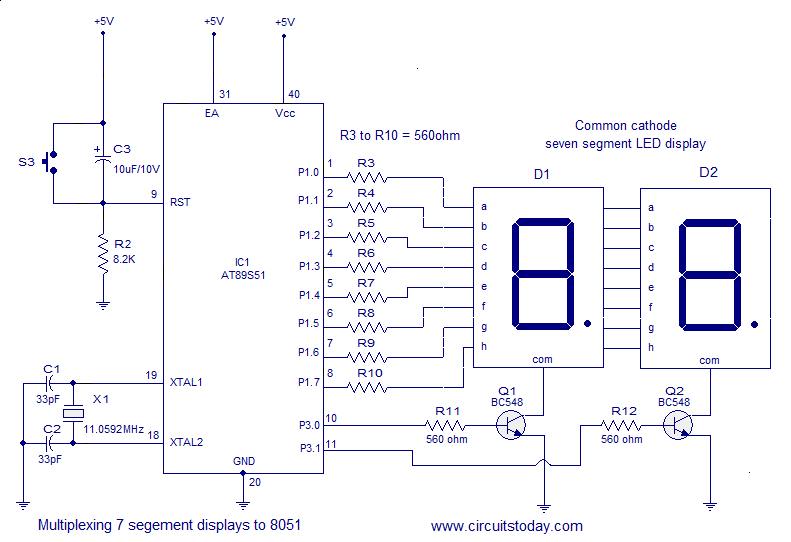
Seven of the pins on one of these displays match up to the 7 segments (labeled a through g), one pin is for the decimal point (DP), and the two remaining pins can be used for the common cathode (cc), though you only need to connect one or the other. Over to the right you can see how all of the pins and LED segments are arranged. Pretty straight forward.
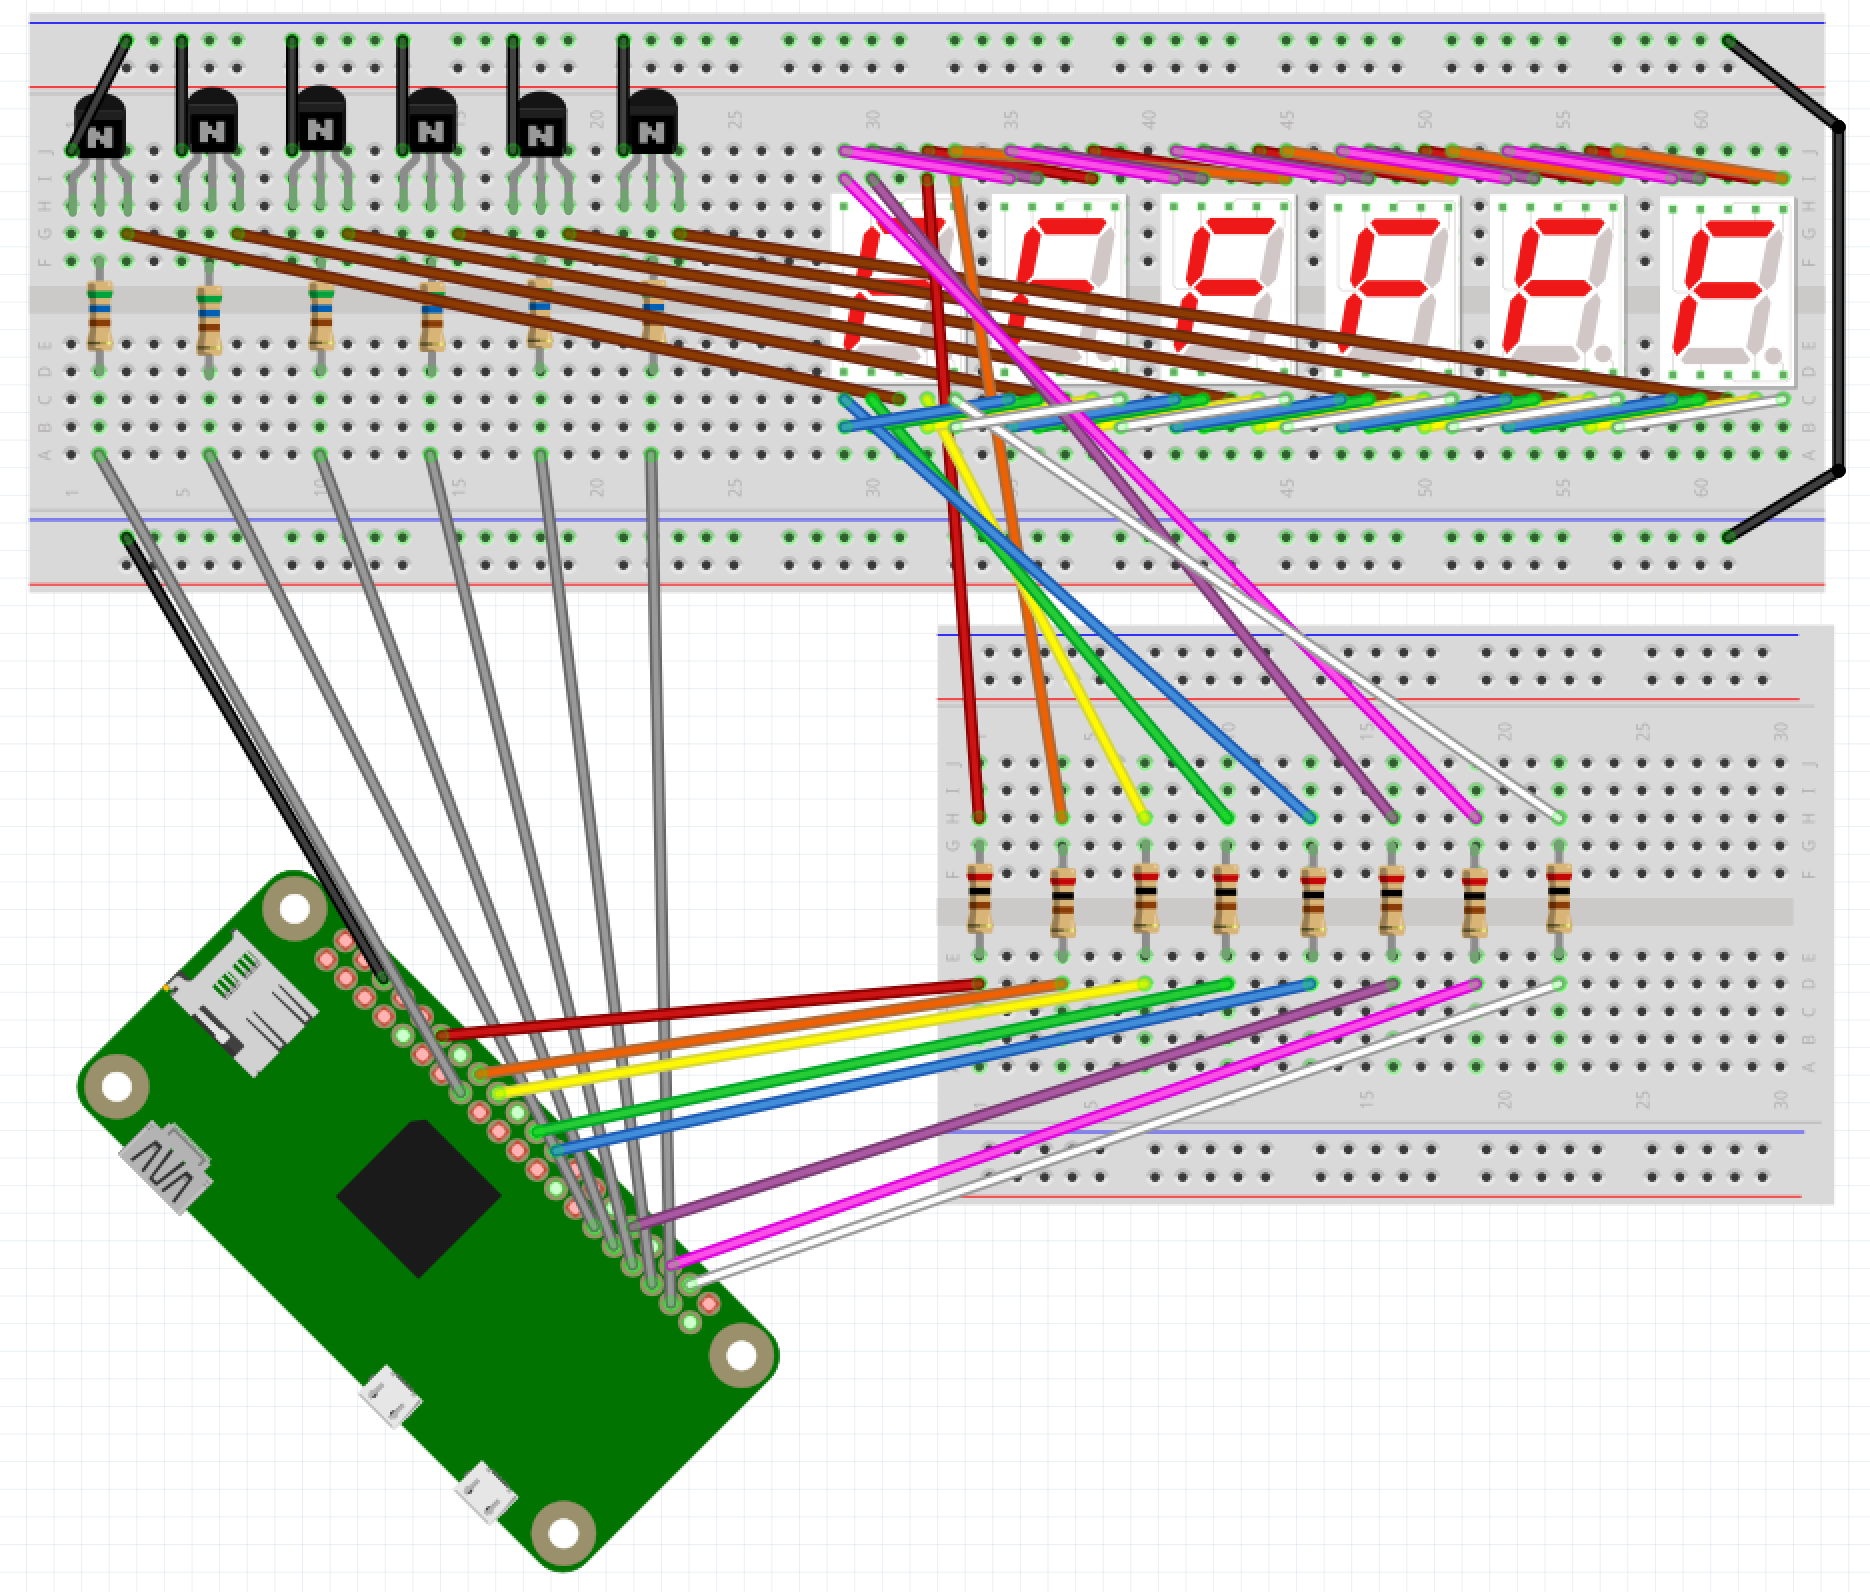
I’m using 6 of these displays in a project, so I needed a lot of wires. It got complex and tangled in a hurry, but amazingly, I connected all the wires without a single mistake on my first try. 🙂 For the most part, I based my circuit design off of this schematic…
Image source: circuitstoday.comThe end result is something like the Fritzing screenshot below. With so many wires overlapping, it’s not easy to see what’s really going on here. I suggest grabbing wiring.fzz from my GitHub repo and playing around with it in the Fritzing app.
When I went to write my proof of concept code, I decided to use the Gpiozero Python library to simplify working with the LEDs. The library allowed me to set up a couple of arrays for the LED segments and the 6 digits (displays)…
segment_leds = []
for i in range( len( segment_pins ) ) :
segment_leds.append( LED( segment_pins[i] ) )

digits = []
for i in range( len( digit_pins ) ) :
digits.append( LED( digit_pins[i] ) )
Then I could easily loop through and toggle the LEDs in a display as necessary…
for i in range( len( digits ) ) :
for j in range( 7 ) :
if ( numbers[ digit_values[i] ][j] ) :
segment_leds[j].on()
else :
segment_leds[j].off()
To make sure things worked I count up from 999000 and then start back at 000000 after hitting 999999. You can see the full code on GitHub.
Now for some visual proof that I actually got it all working! Here it is running when I keep one digit lit for 5/10,000th of a second before turning it off and lighting the next digit.
You’d never know that only one digit is turned on at a time, would you?
If I change from 0.0005 to 0.05 of a second you can start to see that only one display is on at any point in time.
You may also notice it’s counting up a low slower due to the way this code increments the counter. Don’t worry about that.
When I keep each digit turned on for half of a second you can really see how this works.
An issue I’m running into on a Pi Zero is when the processor gets busy doing other tasks, there is a bit of flicker across the displays. You can see this a couple of seconds in to the first video. I’m guessing the code would perform much better on a Raspberry Pi 3B. For my project it’s not a concern, but I want to mention it in case you follow this for your own project. You may also pick up what looks like random flickering of a single digit here and there but that’s due to video timing; the human eye doesn’t see any of that when it’s in front of you.
If necessary, you can take multiplexing a step further and only light up an individual LED on each display at a time, with a method called charlieplexing. It will use even less power, but due to the speed at which you need to switch from one LED to the next, especially across an array of multiple displays, you lose brightness to the human eye.