Boldport: PissOff

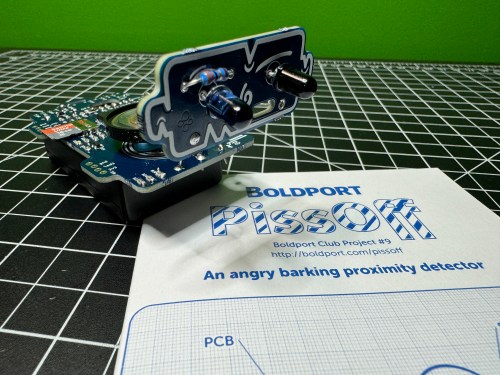
PissOff was project #9 of the Boldport Club, which was before my membership, but I bought it in December of 2018 with my credits when the club closed. I recorded an unboxing video on February 21, 2021 and I guess I ran out of time for the build. The project sat on my shelf for almost three more years before I finally assembled the circuit, which ended up being five years after ordering it!

The kit created a proximity sensor via IR and combined it with annoying noises. With so many surface mount components, this was one of my most challenging electronic soldering builds. I really struggle when an IC has a lot of pins. At one point I tried some other solder and realized what I’d been using was junk, so it went right in the trash.

I screwed up the placement of a couple of SMD capacitors, but caught myself soon enough to remember which ones needed to be exchanged. The other mistake I made was swapping locations between the IR phototransistor and diode, which I didn’t catch until testing. After putting them in the correct locations, everything worked!

Here’s a 8x speed run of the unboxing and some footage of Ninja’s testing.

Useful links:

RasP.iO Breadboard Pi Bridge

The Breadboard Pi Bridge is a neat way to connect the Raspberry Pi to a breadboard for prototyping. I preordered this kit in March of 2019 from RasP.iO after I’d seen Alex Eames release some cool kits there before. It shipped less than two months later, but it took me until February of 2021 to assemble it. Then it sat on the shelf until now when I finally did the testing and put together the video.

The build was simple with only having to solder some headers to a circuit board. I look forward to using this when I make some projects based on Pis.

Boldport: Pease-out

Pease-out was project #32 of the Boldport Club. This kit is kind of boring one, since it’s main purpose is a tribute to Bob Pease, an expert analogue designer. Adjustments to the potentiometer change the output frequency of the LM331, which can be observed by the flashing LED.

It was a simple build and removes another project from my todo list.

Boldport: Juice (FAIL)

I started this build a couple of weeks ago and “finished” it today. It is supposed to be a battery replacement kit for use in prototyping if you run out of batteries. It was project #12 in the Boldport Club.

Mine, did not turn out to be a useable device, because I shorted the connections in the USB connector, which I put on last and should have done first. If there’s one complaint about the Boldport Club kits it’s that the instructions are lacking. I messed around with different desoldering techniques to try and correct the problem, but I might have been fighting a losing battle depending on how deep in there the shorted connections were. I figured something was screwy when the LED never lit up. Then when I connected a 9V battery as the power source instead of USB I knew something was really wrong. With a multimeter I was only getting millivolt readings from the board. I felt the battery and it was really hot, so I disconnected to read the battery it was down to less than 9 volts already, when it had started close to 9.5! That’s when I called it quits.

I’m almost positive I thought this kit was something else when I ordered it with credits I had. I can’t see myself using this during a project if it had been a success, so I’m not too disappointed. Even though it was a failure I figured I’d still post the video. Since it was just over five minutes long at 20x speed with all of the footage I didn’t even bother to do any editing. The camera had filled up somewhere during the desoldering complications and I was too frustrated to bother with getting a new SD card. Enjoy! Or not.

Boldport: LIGEMDIO

A couple of weeks ago I assembled one of the BoldPort Club kits I had piled on my desk. This one was project #8, titled LIGEMDIO. It’s an LED tester and the name comes from the first letters of Light Emitting Diode, LED.

It was a cool little build after I swapped out to an old soldering iron and it’s a project I’ll actually get some use out of. Would have been nice to have when I tested all of the LEDs for the 8x8x8 cube.

AdaBox 012: PyGamer

I recently got the 12th AdaBox.

It’s a cool open source gaming platform, the Adafruit PyGamer, which can be used with CircuitPython, MakeCode Arcade, or Arduino games. I remember getting a GameBoy and staying up late to beat various levels of Super Mario Land when I had a sleepover at a friend’s house. I may have to try making my own game for this device.


AdaBox 011: PyPortal

Yesterday I received AdaBox 011: PyPortal.

adabox011-pyportal.jpg

Similar to AdaBox 010, there isn’t much here in terms of assembly or physical experimentation using different parts, but the PyPortal is a really cool new device from Adafruit. It’s built for IoT projects, with:

  • 3.2″ touchscreen to display info and interact with the device
  • ESP32 co-processor to handle Wi-Fi connections
  • Analog Devices ADT7410 temperature sensor
  • SAMD51 to handle all of the processing, compatible with CircuitPython, which makes it fun and easy to program
  • Laser cut acrylic enclosure/stand

They’ve also included a 1 year pass to adafruit.io. I’ll likely turn this into something that interfaces with my Home Assistant server to control different devices around my house.

img_2470.jpg
Took 5-10 minutes to remove the protective paper from the acrylic pieces and assemble the stand

I haven’t done much in terms of electronics, woodworking, or making in general for the last couple of months. I think I burned out a bit when I caught up on so many projects over November, December, and January. I’ll get back to making soon!

8x8x8 LED Cube

My last HackerBox, #0030: Lightforms, came with an 8x8x8 LED cube kit. I started building it in May, when I assembled the PCB and made a jig for assembling the grids.

I got busy over the summer and the thought of soldering 512 LEDs didn’t excite me. After catching up on all of my other kits, it was finally time to dive back in.

I thought I took some video of assembling the board, but I must have deleted it. So I didn’t bother with any video while assembling the grids either. The repetition would have been quite boring. I thought I’d do a gallery with captions for a change.

While assembling the 8×8 grids I settled on a pretty good system, so I recorded myself doing a couple of rows to show my method.

This is definitely my longest electronics kit in terms of hours spent and it had so much repetition. Pretty cool result. Here is someone’s demo showing what can be done with the cube.

I’ll need to upgrade the firmware so I can program the board with my own animations.