DIY Gate Sensor for Home Assistant

In our basement we have a baby gate, which surprisingly keeps our cat out of the gym and golf sim areas.

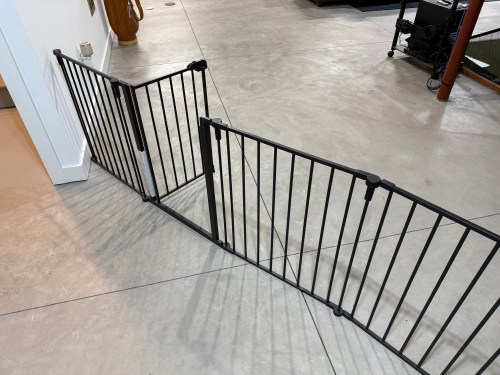
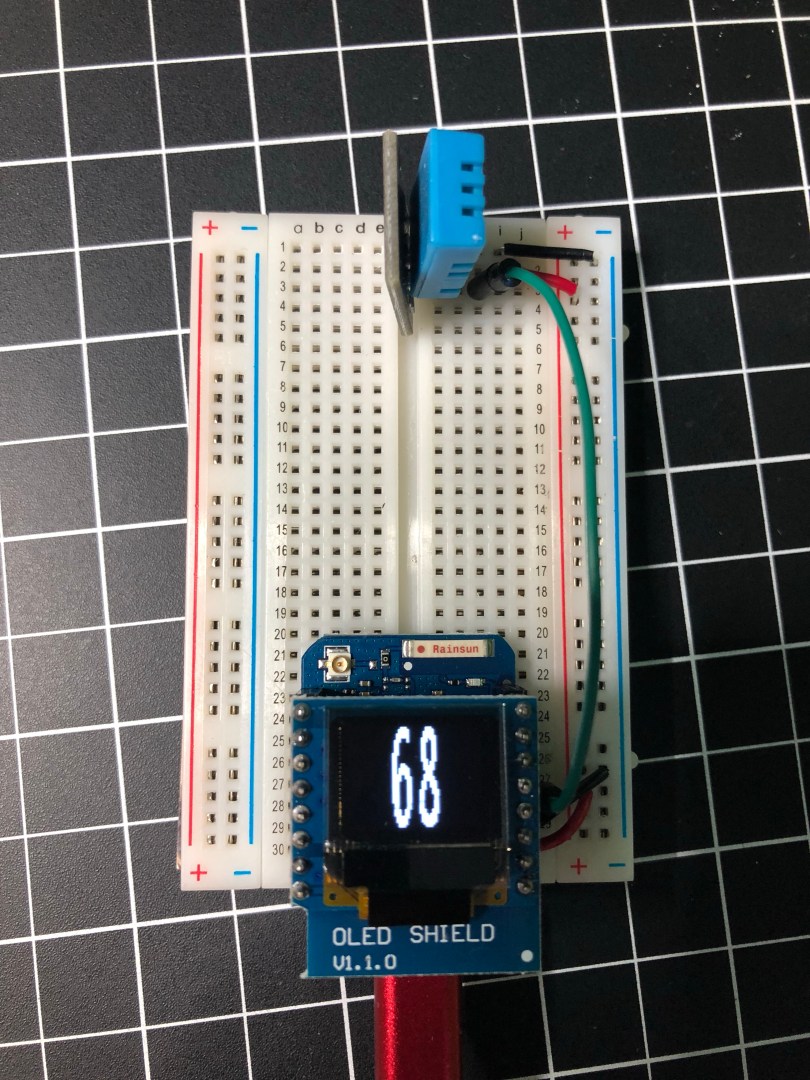
Sometimes we forget to close the gate, so I needed a sensor to monitor its state. I still had the breadboard from the air quality monitor project, so it was quick to add a magnetic door switch and test things out with the D1 Mini clone.

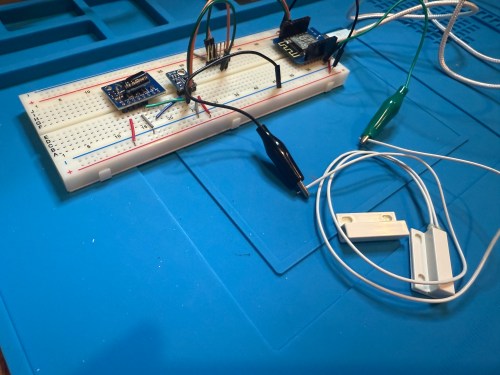
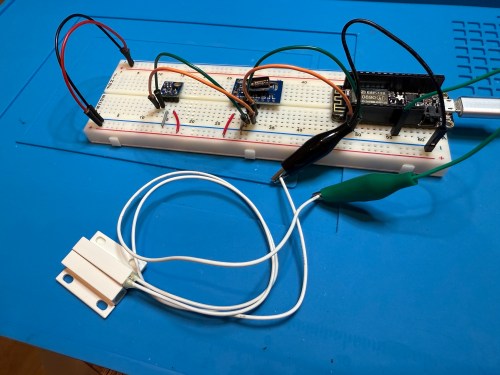
I have extra sensors, so those were kept in the project and allowed me to get rid of the shitty DHT22 I added to the golf remote. Everything worked, but I want to save my last two D1 minis and use them for something with the screens I have for them. So I swapped in an Adafruit Feather HUZZAH ESP8266, which I got with AdaBox 3 or 4 in 2017 and made minor changes to the code.

Parts:

References:

ESPHome YAML code:

substitutions:
  slug: gate
  friendly: Gate

esphome:
  name: ${slug}
  friendly_name: ${friendly}

esp8266:
  board: huzzah

logger:
  level: WARN

api:
  encryption:
    key: 'xxx'

ota:
  - platform: esphome
    password: "xxx"

wifi:
  ssid: !secret wifi_ssid
  password: !secret wifi_password
  manual_ip:
    static_ip: x.x.x.x
    gateway: x.x.x.x
    subnet: 255.255.255.0

i2c:

binary_sensor:
  - platform: gpio
    pin:
      number: GPIO14
      mode:
        input: true
        pullup: true
    name: ${friendly}
    device_class: door

sensor:
  - platform: htu21d
    model: SI7021
    temperature:
      name: Temperature
      id: ${slug}_temp
    humidity:
      name: Humidity
      id: ${slug}_humid

  - platform: aht10
    variant: AHT20
    temperature:
      name: AHT21 Temperature
      id: ${slug}_aht21_temp
    humidity:
      name: AHT21 Humidity
      id: ${slug}_aht21_humid

  - platform: ens160_i2c
    address: 0x53
    eco2:
      name: CO²
    tvoc:
      name: VOC
    aqi:
      id: demo_aqi
      name: AQI
    compensation:
      temperature: ${slug}_aht21_temp
      humidity: ${slug}_aht21_humid

text_sensor:
  - platform: template
    name: AQI Rating
    lambda: |-
      switch ( (int) ( id( ${slug}_aqi ).state ) ) {
        case 1: return {"Excellent"};
        case 2: return {"Good"};
        case 3: return {"Moderate"};
        case 4: return {"Poor"};
        case 5: return {"Unhealthy"};
        default: return {"N/A"};
      }

I also added this to my configuration.yaml because I wanted a gate icon instead of the door, due to the device class of the binary sensor:

template:
 - binary_sensor:
    - name: Gate
      unique_id: gate_template
      device_class: door
      state: "{{ is_state( 'binary_sensor.basementgate_gate', 'on' ) }}"
      icon: |
        {% if is_state( 'binary_sensor.basementgate_gate', 'on' ) %}
        mdi:gate-open
        {% else %}
        mdi:gate
        {% endif %}

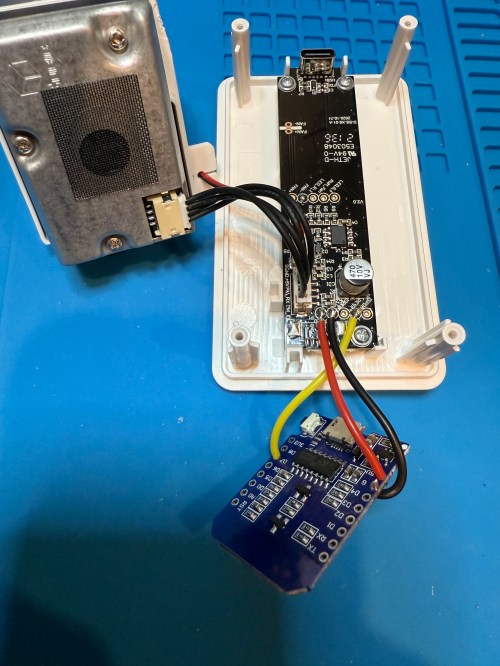
I figured I might as well use one of the fancy Adafruit Perma-Proto boards I had, which makes soldering all of the connections much easier. As a bonus it was nearly a perfect fit for the case.

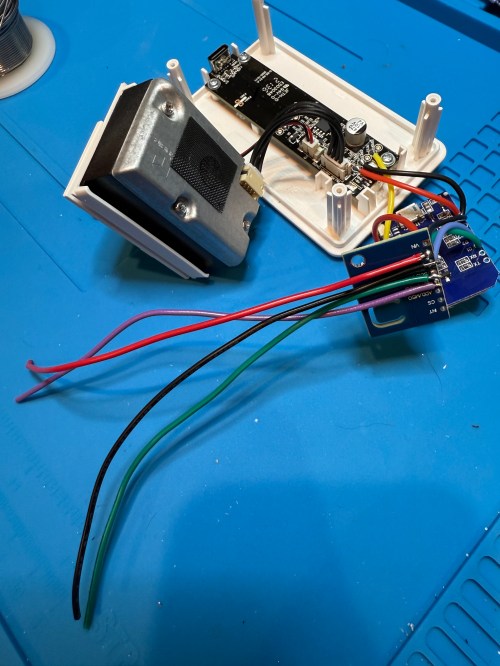
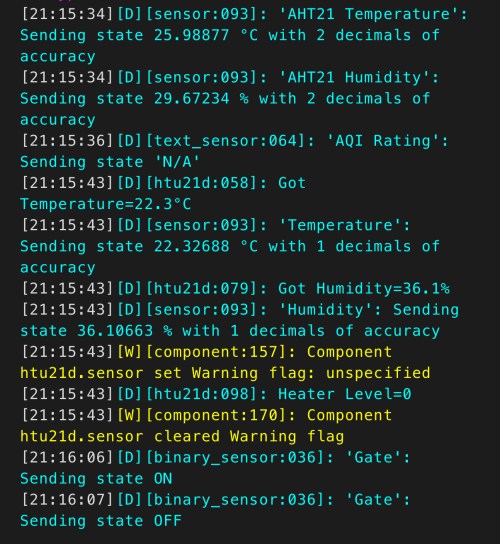
The magnetic switch and Si7021 will live outside the box, so those couldn’t get soldered yet. After connecting power I checked the ESPHome logs to make sure everything was working.

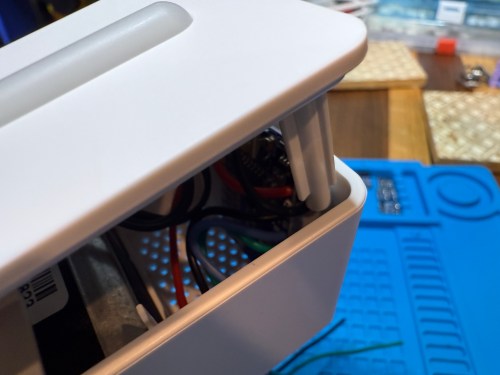
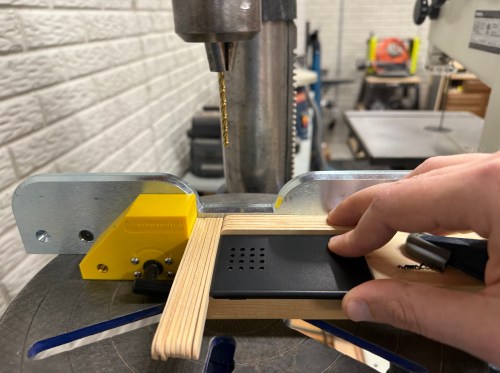
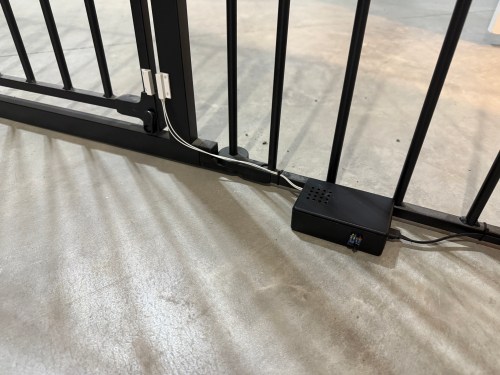
I cut holes in a project box, finished soldering, and used hot glue to secure the board..

I reversed the swing of the gate, placed my device, and attached the two sides of the magnetic switch to the gate.

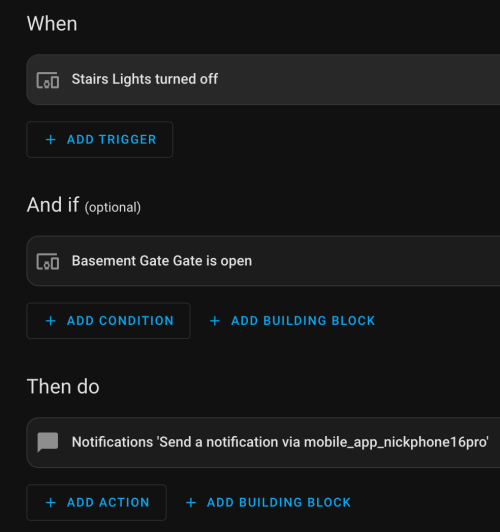
In Home Assistant an automation runs whenever the stairs light is turned off to check the state of the gate. If it’s open, a notification is sent to our phones.

I’m enjoying these little electronics projects, and it feels good to finally put various parts to use.

Home Assistant Air Quality Monitors from IKEA Vindriktning

IKEA recently discontinued Vindriktning, their older air quality monitor.

Inside the device, they put a cubic PM1006K particle sensor. I bought three for $16.95 each last year, because I’d seen people hack them by adding sensors and a Wi-Fi microcontroller to send all of the data to Home Assistant. For my modding I bought:

The YouTube video linked above is a great guide to follow. I didn’t connect wires to the fan or the light sensor since I had no use for them. I also didn’t stack my sensors because I wanted the BME280 to be outside of the enclosure, where it would be less affected by the heat produced by the ENS160 and D1.

Even with the sensor outside of the case, the BME280 still reads high, because it heats itself up. I actually tested different lengths of wires and placements of the sensor before realizing I was still going to have to adjust the data. An ESPHome filter made the adjustment easy, which I did individually for each unit after comparing to a mobile Ecobee thermostat sensor. This is the code from the unit for my shop.

substitutions:
  slug: shop
  friendly: Shop

esphome:
  name: ${slug}-air-quality
  friendly_name: ${friendly} Air Quality

esp8266:
  board: d1_mini

logger:
  level: WARN

api:
  encryption:
    key: 'xxx'

ota:
  - platform: esphome
    password: 'xxx'

wifi:
  ssid: !secret wifi_ssid
  password: !secret wifi_password
  manual_ip:
    static_ip: xxx
    gateway: xxx
    subnet: 255.255.255.0

i2c:
  frequency: 100kHz

uart:
  - rx_pin: D7
    baud_rate: 9600

sensor:
  - platform: pm1006
    pm_2_5:
      name: PM 2.5µm

  - platform: bme280_i2c
    address: 0x76
    temperature:
      name: Temperature
      id: ${slug}_temp
      filters:
        - offset: -3.38
    humidity:
      name: Humidity
      id: ${slug}_humid
      filters:
        - offset: 7.63
    iir_filter: 16x

  - platform: aht10
    variant: AHT20
    temperature:
      name: AHT21 Temperature
      id: ${slug}_aht21_temp
    humidity:
      name: AHT21 Humidity
      id: ${slug}_aht21_humid

  - platform: ens160_i2c
    address: 0x53
    eco2:
      name: CO²
    tvoc:
      name: VOC
    aqi:
      id: ${slug}_aqi
      name: AQI
    compensation:
      temperature: ${slug}_aht21_temp
      humidity: ${slug}_aht21_humid

text_sensor:
  - platform: template
    name: AQI Rating
    lambda: |-
      switch ( (int) ( id( ${slug}_aqi ).state ) ) {
        case 1: return {"Excellent"};
        case 2: return {"Good"};
        case 3: return {"Moderate"};
        case 4: return {"Poor"};
        case 5: return {"Unhealthy"};
        default: return {"N/A"};
      }

These resources were a huge help when I wired everything up and made changes to the YAML code:

Here is how I’m displaying the data on one of my Home Assistant dashboards.

As I was working on this project I knew I wanted a couple more air quality monitors around the house, which will be finished soon.

Update: I’ve had to make a small update by adding a 47uF capacitor to each ENS160 board, because they have power issues, causing the reading to stop for periods of time. My boards matched up with the right ones in the picture at that link. Here’s a picture of another ENS160 I modified, since it was a tight squeeze to made the modification on the devices I posted about here with everything already wired up. I also realized I was powering these through the 3V3 pin instead of VIN, so I fixed that.

I’ve also improved the display of the data on my dashboard by using mini-graph-card.

Why Are Thermostats Still on the Wall?

A couple of weeks ago I noticed the heat was staying on in my office pretty much all day. I have a boiler heating system with 4 zones and the thermostat that controls the front of my house is right there in the office. I wasn’t cold in there, but the thermostat wasn’t reporting that the temperature ever reached what I had set.

I pulled the Nest off of its mounting bracket, put my hand near the hole in the wall, and I could feel cold air. So I grabbed an instant read meat thermometer and stuck it through the hole. The reading inside the wall was 10° lower than a foot away from the wall.

For a simple fix, I stuffed a bunch of insulation through the hole and covered it with foil tape.

In order to monitor the effectiveness of the fix, I put together a quick temperature sensor instead of having to turn the meat thermometer on and off.

It worked!

Two or three years ago I had the opposite problem with this heating zone; it was always cold in the office. By feeling the wall I came to the conclusion that the thermostat had been installed right next to one of the pipes sending hot water to the upstairs registers. Brilliant! The fix that time was moving the thermostat over between the next set of studs.

After these two issues with the placement of a thermostat, I starting thinking. Why are we still basing our heating on measurements taken from a set position on the wall? With the Internet of Things we can do this much smarter.

Imagine each zone in the house having one or more mobile temperature sensors. Like the simple circuit pictured above, but in a small case. These could be battery-powered or plug-in. Windows, wind, and location of the sun can all affect the heating of different areas of a house. Being able to move the temperature sensor with you as you make dinner in the kitchen or watch a movie from your recliner would be awesome.

These temperature sensors would wirelessly report the temperature back to the home automation system. I use Home Assistant, which would make it easy to set the heating schedules for each zone. If a zone needed to go on or off based on the sensor’s reported temperature and the schedule’s target temperature, it would wirelessly trigger a relay module at the furnace or boiler. The relay would wire in to the furnace/boiler system in place of the wires that come from each thermostat and it would never know the difference. None of these pieces are hard to build and the parts are cheap.

This is all just something that ran through my mind as I was fixing my heating issue. I don’t have plans to build such a system, but if I did I could ditch my 4 Nest thermostats. For someone who works at home, often at random times of the day, I think Nest thermostats are overrated anyway because the learning and auto scheduling system doesn’t do much for me.

HC-SR04 as a Motion Sensor

The HC-SR04 ultrasonic sensor uses sonar to determine distance to an object like bats do. It offers excellent non-contact range detection with high accuracy and stable readings in an easy-to-use package. From 2cm to 400 cm or 1” to 13 feet. Its operation is not affected by sunlight or black material like Sharp rangefinders are (although acoustically soft materials like cloth can be difficult to detect). It comes complete with ultrasonic transmitter and receiver module.
Complete Guide for Ultrasonic Sensor HC-SR04

You can get the HC-SR04 from Amazon or various electronics shops for $3-5 or even under $2 if you buy packs of them. I got 2 of them in a parts kit I bought on Amazon and used one for Blog in a Box Paparazzi.

I was using the sensor to sort of detect motion, or more specifically when someone walked into a room. My prototype was set on a desk at about chest height about 1-2 feet after the doorway. While working on the project I ran into several challenges:

  • Accuracy of readings.
  • Other activity on the Raspberry Pi.
  • Sampling over multiple readings.
  • Rogue readings vs actual motion.
  • Timing between readings.
  • Bailing if an echo takes too long.

I wrote my code in Python and heavily based it on ModMyPi’s blog post HC-SR04 Ultrasonic Range Sensor on the Raspberry Pi. Here are the important pieces…

def read_ultrasonic() :
	# Make sure the trigger pin is clean
	GPIO.output( ULTRASONIC_TRIG_PIN, GPIO.LOW )
	# Recommended resample time is 50ms
	time.sleep( 0.05 )
	# The trigger pin needs to be HIGH for at least 10ms
	GPIO.output( ULTRASONIC_TRIG_PIN, GPIO.HIGH )
	time.sleep( 0.02 )
	GPIO.output( ULTRASONIC_TRIG_PIN, GPIO.LOW )

	# Read the sensor
	while ( True ) :
		start = time.clock()
		if ( GPIO.input( ULTRASONIC_ECHO_PIN ) == GPIO.HIGH ) :
			break
	while ( True ) :
		diff = time.clock() - start
		if ( GPIO.input( ULTRASONIC_ECHO_PIN ) == GPIO.LOW ) :
			break
		if ( diff > 0.02 ) :
			return -1

	return int( round( diff * 17150 ) )

def is_ultrasonic_triggered() :
	global prev_ultrasonic

	# Take 6 readings
	for i in range( 6 ):
		ultrasonic = read_ultrasonic()
		#Shift readings
		prev_ultrasonic = ( prev_ultrasonic[1], prev_ultrasonic[2], prev_ultrasonic[3], prev_ultrasonic[4], prev_ultrasonic[5], ultrasonic )

		if ( is_light_enough()
				and prev_ultrasonic[0] != -1
				and prev_ultrasonic[3] < ULTRASONIC_DIST and prev_ultrasonic[4] < ULTRASONIC_DIST and prev_ultrasonic[5]  ULTRASONIC_DIST and prev_ultrasonic[1] > ULTRASONIC_DIST and prev_ultrasonic[2] > ULTRASONIC_DIST ) :
			#print 'Ultrasonic: {0}'.format( prev_ultrasonic )
			return True

	return False

while ( True ) :
	if ( is_ultrasonic_triggered() ) :
		take_picture()

It worked alright, but triggered a little too often. About a week later I came across the Python package gpiozero, which makes it easy to work with a bunch of common Raspberry Pi GPIO components. I wrote an alternate version of BIAB Paparazzi using this package, which worked a bit better. It was so much simpler with gpiozero because it has built-in support for the HC-SR04. All I had to do was initialize the sensor and tell it what code to run when something in range was detected.

ultrasonic = DistanceSensor(
	echo = ULTRASONIC_ECHO_PIN,
	trigger = ULTRASONIC_TRIG_PIN,
	max_distance = ULTRASONIC_MAX,
	threshold_distance = ULTRASONIC_DIST )

ultrasonic.when_in_range = take_picture

The neat thing about the gpiozero package is when you initialize a sensor it automatically starts taking readings, keeps the values in a queue, and does comparisons against an average. My code attempted to do something along those lines, but was much more rudimentary. As nice as this version sounds, it still triggered too often. You can find the complete code for both versions in the BIAB Paparazzi repo on GitHub.

I think I was pushing the limits of what the HC-SR04 is meant for. Most of the examples I’ve seen are people using these to detect approaching walls on a robot. The biggest issue I ran into was the inaccurate readings. For example I’d be getting readings of about 160cm and then out of nowhere it would return a distance of 80-90 cm, even several in a row at times.

At the end of the day there are reasons it’s such a cheap sensor. 😉 For a couple of dollars, what do you expect? I’m curious to try my code on a more powerful Raspberry Pi 3 and see if it works any better. Was the less powerful Pi Zero causing problems?

Garage Monitor Updates

I made some updates to the Garage Temperature Sensor & Monitor. I didn’t like how the desired temperature was set via the app’s configuration file, so I moved it to a slider control in Home Assistant and updated the LCD to always show the value. Only being able to enable/disable monitoring via the device’s button also wasn’t great. I converted the binary sensor I was using to flag monitor mode in HA to a switch control and moved the actual monitoring logic from the Python app to HA automation. Everyhing is updated on GitHub.

updated-garage-monitor-ha.png
Info and controls in Home Assistant

img_8761
Custom temperature and humidity monitor