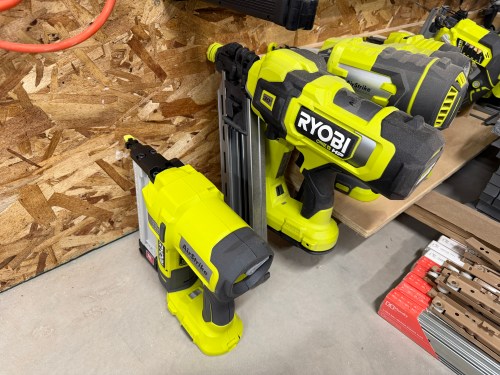
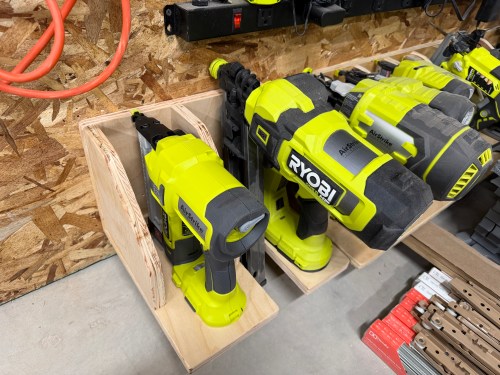
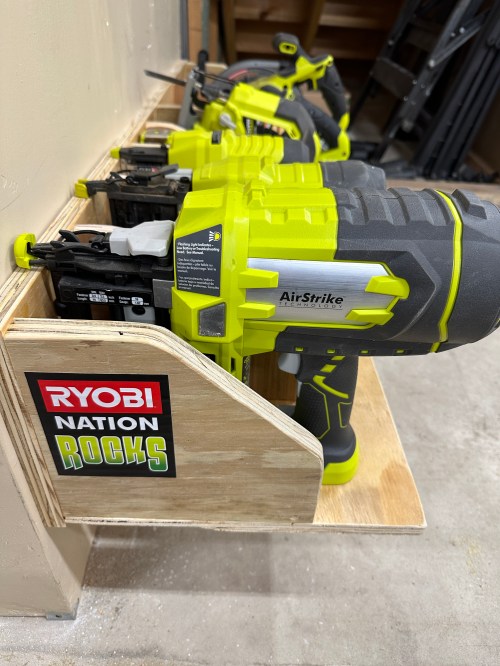
Quick build this weekend to expand my Ryobi tool storage wall (which moved to the new workshop) with spots for the framing nailer I got last year to build the shop wall and a narrow crown stapler I recently bought on sale.
As I’m writing this and seeing the pictures, I butt jointed the back and bottom incorrectly, which is why it’s too tall and not deep enough to match up with the old spots. Oh well!
It’s great to be back in the shop again and getting it more organized.
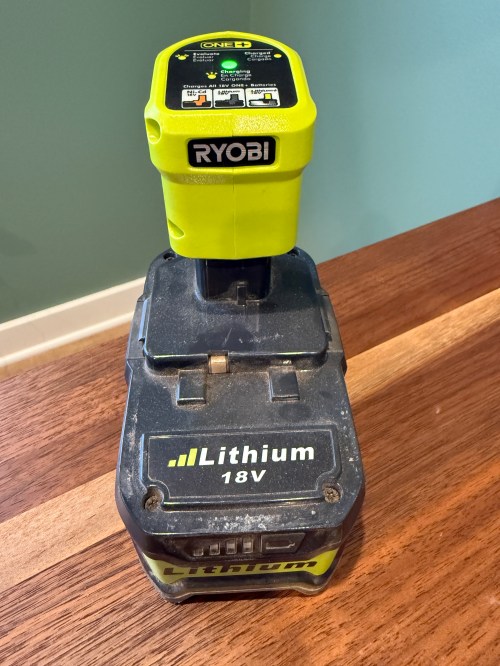
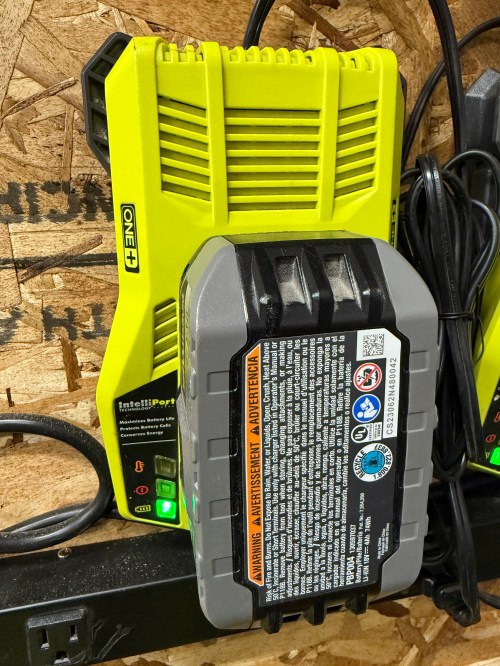
I have a couple of 5 Ah batteries and both of them stopped charging. They knockoffs from Amazon, with a brand name of Biswaye on them.
One was completely dead and wouldn’t even register on a usual charger. The other showed a defective status. When I put the multimeter on, it read about 15 volts.
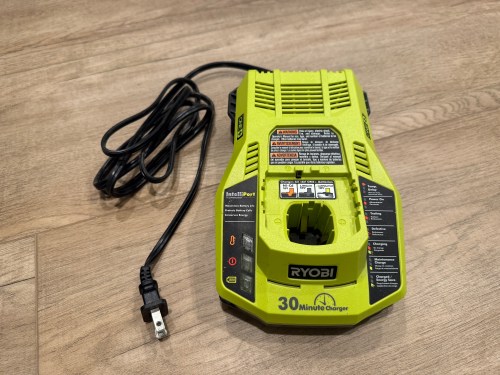
This often means some of the individual cells are bad. Before opening it up, I threw it on a Ryobi P119 slow charger, which can sometimes revive cells that are too low for the more complex battery chargers.
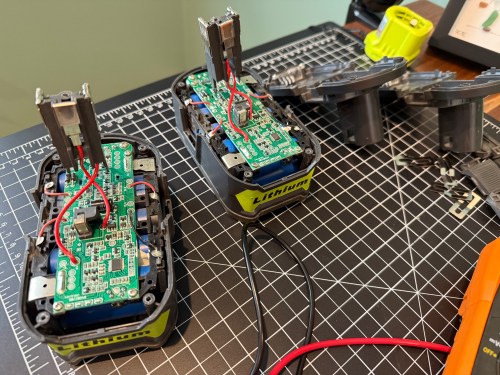
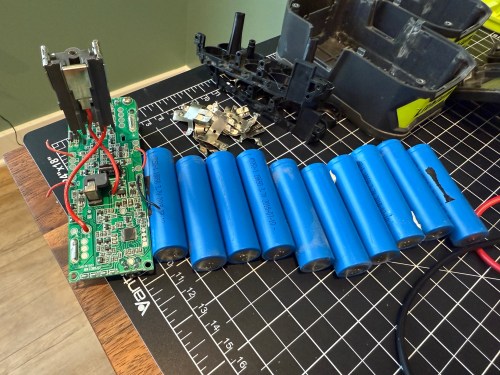
After a couple of hours I tried the battery on a regular charger again, but it still showed as defective. So I tore into both batteries, hoping I might be able to get one working battery out of the two.
On the dead battery all 10 cells read zero volts on the multimeter. I wouldn’t be swapping any of those in to the other battery. It’s not safe to try pumping anything into cells depleted that much, so I recycled them at Batteries Plus.
Two of the cells on the defective battery read very low voltages. I don’t have any spare 18650 lithium ion cells and it’s not worth it to buy some since I have enough working Ryobi batteries in my rotation. As a last resort, I put the battery on the little charger to see if it would slowly charge the depleted cells. I had nothing to lose.
I let it go over 6 hours and unfortunately the voltage didn’t jump up on those bad cells, so I still can’t use the battery pack.
Attempts like this don’t always end in success, but it’s a fun opportunity to learn. This battery pack has plenty of good cells, so I’ll save it in case another battery needs replacement cells.
Last week while cutting some walnut with my Ryobi track saw, it kept stalling on me. Turns out the battery was nearly dead because the charger stopped working and the status LEDs weren’t lighting up at all when plugged in.
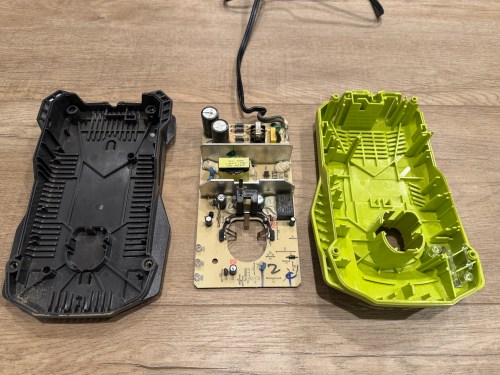
I opened up the charger and didn’t see burn marks or swollen capacitors anywhere.
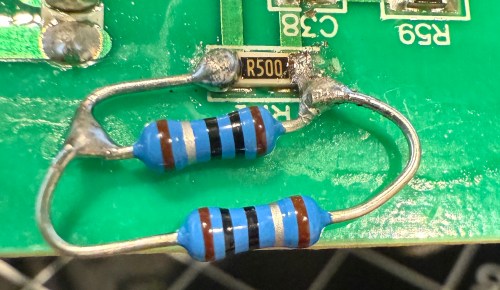
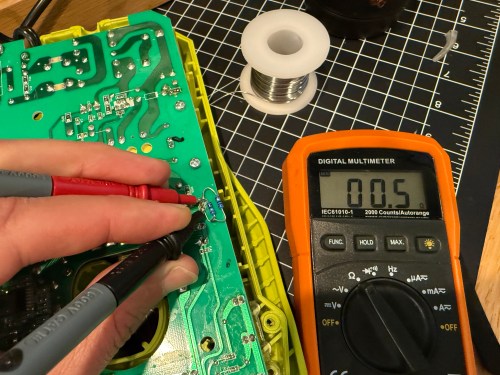
Then I found a video on YouTube and sure enough, the resistor at R71 was wide open, reading 152 kΩ on the multimeter.
It’s a surface mount resistor labeled R500, which means 0.5 Ω. I don’t have any resistors that size, so I soldered in a couple of 1 Ω resistors in parallel.
It’s not pretty, but it properly read 0.5 Ω on the multimeter.
I put it back together, plugged it in, and the red LED lit up. Took it down to the shop, put a battery in, and the charger is back in the rotation!
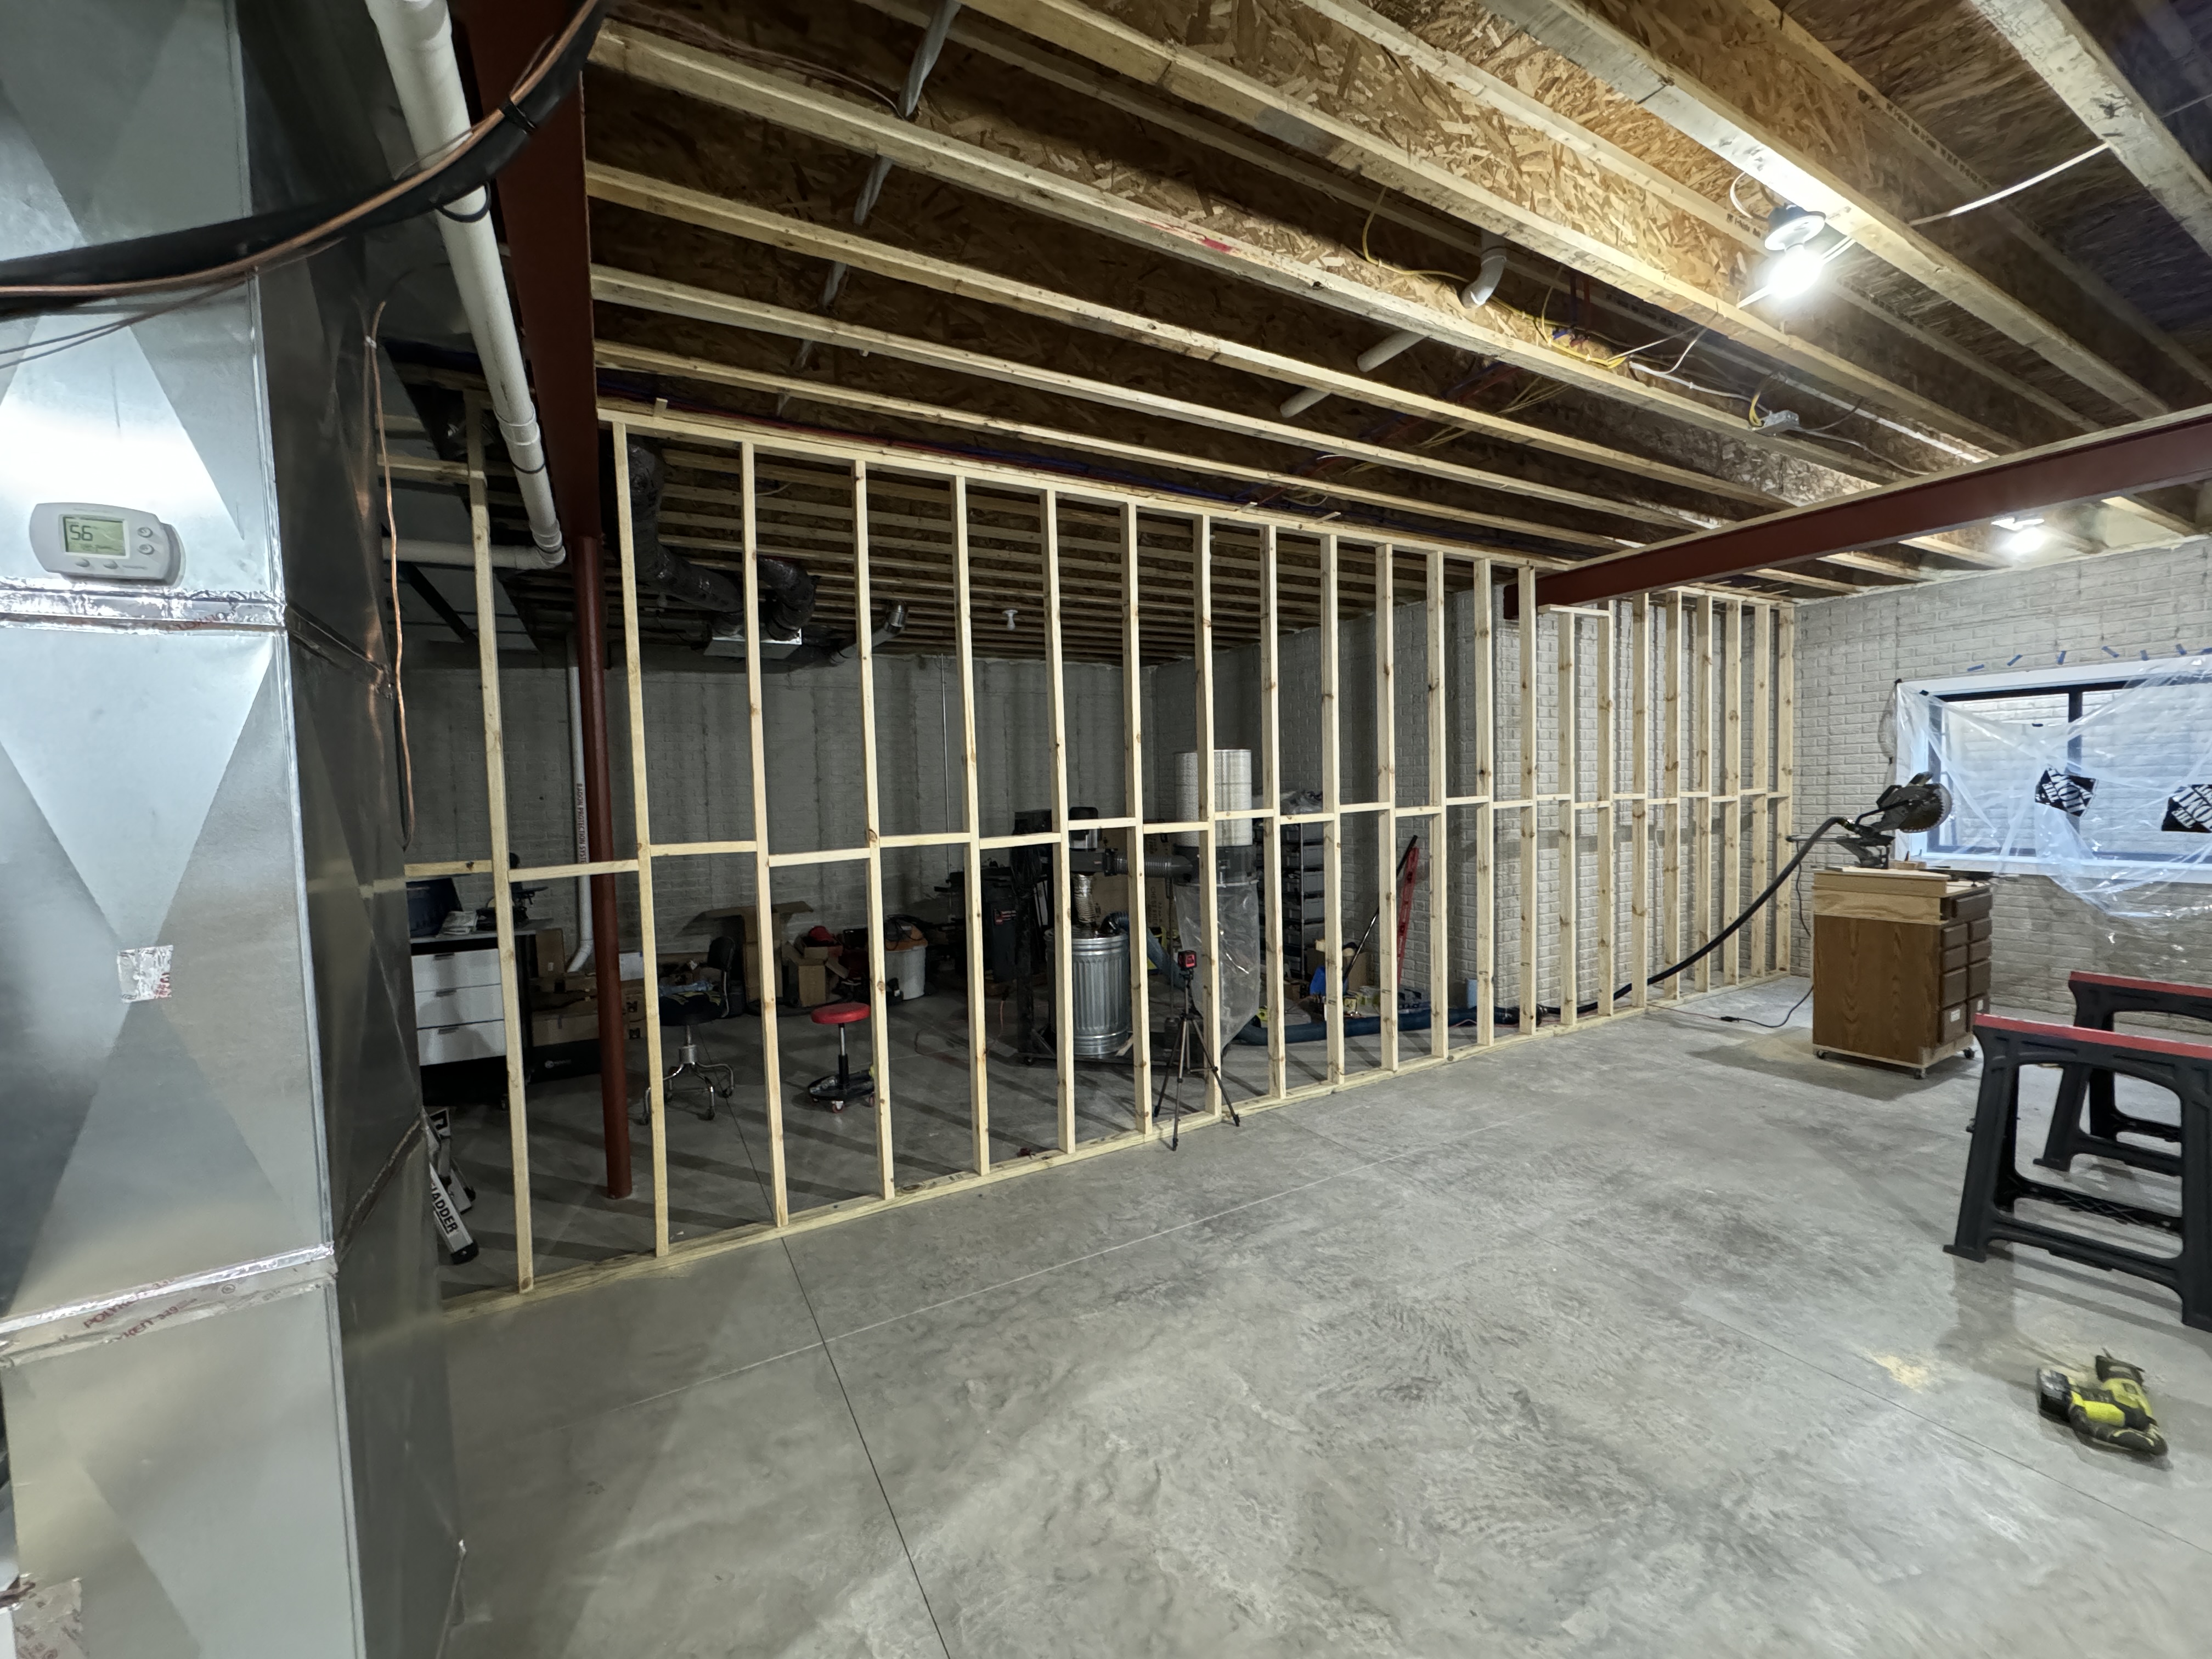
It’s been a busy few weeks packing and moving to the new house. Actually, it’s been a busy year! Building a 40 foot wall before being fully unpacked is a great idea, right? My dad was up for it, so of course I was. I’d never build a wall before, so framing was a fun challenge. This new project meant buying a couple of new tools, which I always love.
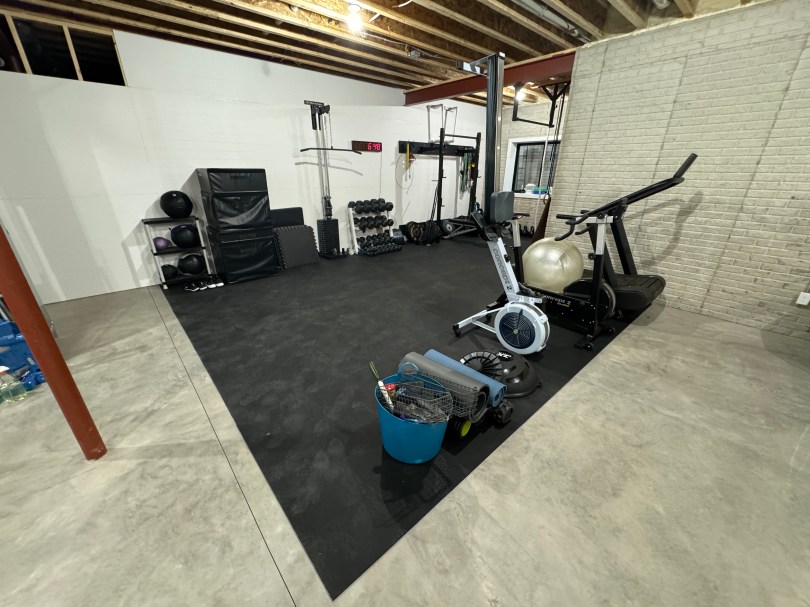
We’re very excited about this new gym area inside the house. No more garage gym for us, which was brutal in the Michigan summers and winters. There is still some organizing to do as we figure out how we use space. The wall isn’t actually finished yet either.
After I finish paneling this area I can get started on the other side of the wall. I picked up 1/2″ OSB for the shop’s wall material, to make it easy to screw small items in anywhere I want. You can’t beat $16 a sheet. Check out this cool storage space for sheet goods I gained by having the wall follow the floor joist.
I’m excited to get this mess of a shop organized, especially with all of my wood and large clamps at the other side of the basement for temporary storage. It’s going to be awesome.
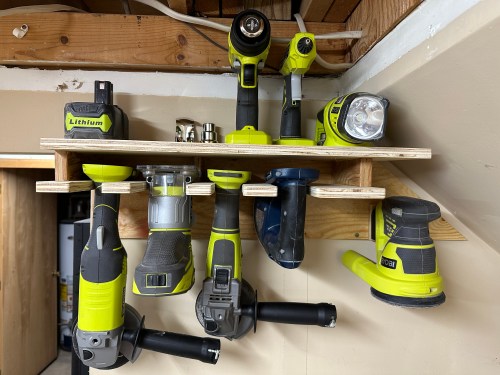
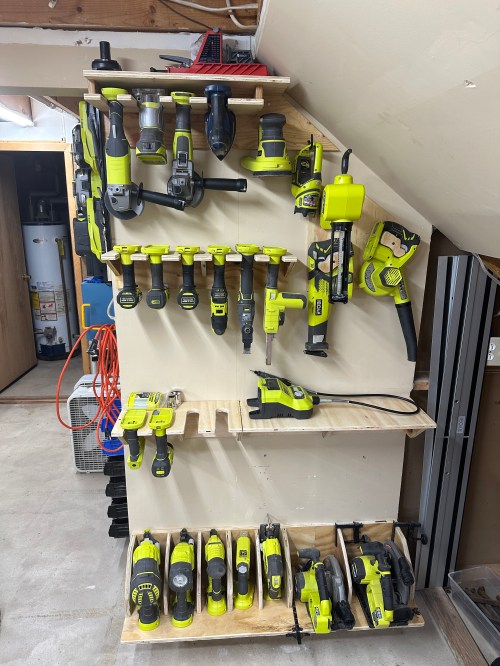
I’ve been keeping my Ryobi cordless 18v tools on some shelves on a wall next to a drain pipe.
As you can see, I outgrew the area. I also had several sanders in the drawers of my sanding cart and even more tools in a box on the floor.
Look at that picture again. Wouldn’t that wall be a great place for cordless tool storage? It’s not in a weird location, is further away from the big tools that make all the dust, and in reach while working at the assembly table.
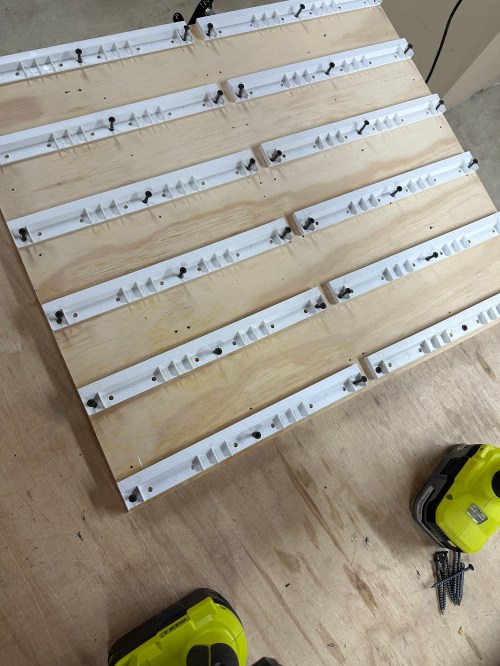
I took down the vise shelf, chopped and cleaned the plywood, and installed it on the wall entering the shop.
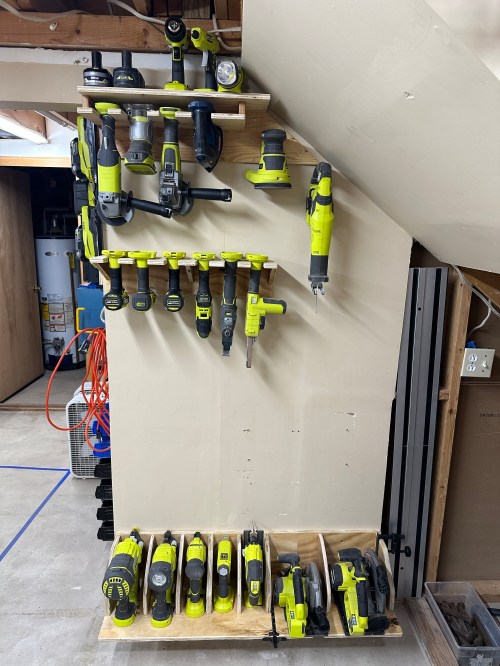
After taking down the nail bins I took the opportunity to spread them out on the backer board since I have more vertical space in the new location. Then I moved the nail bins around the corner, under the rest of my bin storage.
I had a blank canvas.
Before building anything I had to figure out tool arrangement, so I marked out space on the floor to match the area of the wall.
After gathering all of my tools I messed around with layouts and tool groupings.
When I had something I liked, I started making shelves one row at a time.
As you may have noticed from the photos, I kept changing things as I went, and there were a lot of iterations I didn’t get pictures of. When I was about 80% done with everything I remembered I had the rotary tool and my Armor Tool Auto-Jig Pocket Hole System stored in the drill press press cabinet. I definitely wanted both tools out in the open where I’ll be more likely to use them. All of the changes were worth it; every tool has a place and I love it. I’ve been wanting something like this for years.
As I was building, it was so handy to turn around and grab a tool or a battery that was already in its place. No more walking over to the other area and reaching around the corner. Little things like the magnetic strip for bits and accessories make a big difference too. Another bonus is this project used a bunch of odd scraps I had in my wood collection.
Are you a Ryobi fan? What are your favorite tools?
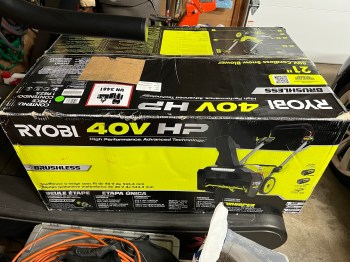
Last month I was messaging my brother, who said he loved his 40V Ryobi snow blower and lawn mower. I’ve had an Ariens 520 two stage snow blower for over a decade, but haven’t used it much the last few years. It used up a lot of space in the garage, took a long time to get started for the winter season, was slow to use, and left me smelling like exhaust. The thought of getting away from gas yard tools was exciting and I have a large collection of Ryobi’s 18V power tools, so they’re a brand I trust.
The only steps involved in assembly were to twist on the chute, secure it with a screw, and tighten the handle. I immediately loved how compact it folded up.
We got snow the next day, so I put it to a test.
The snow blower was easy to start with the push of a button. It was very quiet, light, easy to maneuver, and has a bright LED light. Right away I noticed it didn’t have the power to throw the snow very far as you can see in the video. I would be throwing the snow right in to an upcoming path, so would be moving the same snow 2-3 times! Not a good start.
The triggers on the handle that need to be held in order to keep it running were awkward to use and I accidentally let go multiple times. Then after less than 10 minutes of use, I let go and the motor wouldn’t start again. Both batteries had about 75% charge left and the LED headlight was coming on without a problem. I could hear a bit of a clicking sound from the motor.
I loaded it in my car and returned it to Home Depot the next morning.
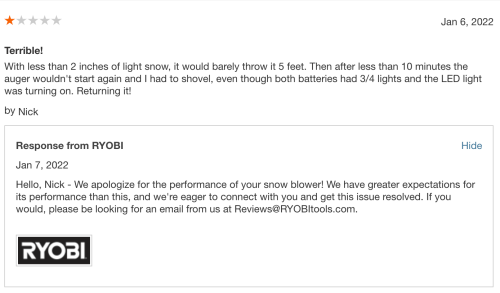
I was extremely disappointed in the machine and due to my positive experience with other Ryobi products, I felt the need to leave an online review, which I almost never do. To my surprise, I got a response the next day.
I also received the following email.
My name is Christian, and I am the Product Development Coordinator for RYOBI Snow Blowers.
We received your online review on the RYOBI 40V HP 21” Snow Blower. We understand you have had an issue with your RYOBI Snow Blower. It is our policy to make absolutely sure that 100% of our customers are pleased with their experience with RYOBI. Could you please call me at 864-642-8094? I would like to investigate this issue with you and make sure that your experience with our products moving forward is a positive experience and that you walk away understanding that our customer service is unmatched.
If you prefer you can reply to this email, and we can discuss your experience to find a solution that meets your needs.
I emailed back…
I returned it to Home Depot two days after it was delivered (the night after trying it). We had less than 2 inches of light snow and the unit was pretty terrible. It barely threw the snow 5-6 feet, so I would end up going over the same snow multiple times to do the driveway. Then after maybe 10 minutes of use, the auger wouldn’t start again. The LED light was on and both batteries had 3/4 charge. Maybe there was something wrong with the motor on this unit, but it seemed very under powered and I wasn’t confident it would be able to handle any real storm. It was quite disappointing because I have a lot of Ryobi hand tools and they all work great. I was hoping to replace my gas snow blower and lawn mower with Ryobi units for ease of use, space saving, and not having to deal with gas, but I’ll be sticking with them now.
Their next reply…
This issue your snow blower experienced has become know and we have since corrected the issue with our units in inventory!
I would like to offer to upgrade you to our brand new RYOBI 40V HP 21″ Whisper Series Snow Blower as I see you were not impressed with the previous models performance. This kit has an upgraded controller and 2x 7.5Ah batteries for increased power and runtime.
Would this be something you are interested in? I want to make sure you are taken care of.
The unit had some damage to the knob used to adjust the auger speed so I asked if they could send me a replacement part and I would fix it myself.
Apparently it’s not an easy fix, so they sent me another snow blower. FREE! Same model, fully complete with the batteries and charger. I was floored!
This new model is better in every way.
Build quality of the machine feels much sturdier.
Larger batteries provide more power and runtime.
The handle folds away in one step instead of two.
Triggers to keep it running were replaced with the more traditional bar you find on lawn mowers.
I’ve had the chance to use this snow blower during a few different sized Michigan snow storms and it did a great job. It throws the snow much better than the other model and it didn’t miss a beat. The machine maneuvers so much better than a heavy gas snow blower and is actually fun to use. There’s no worry about it starting up, so I can just throw in the batteries, push start, and be good to go.
I quickly sold my Ariens gas snow blower, gave the “broken” Ryobi to my brother, and am enjoying the extra space in the garage. Isaac had an older Ryobi model and said this one is awesome.
One minor negative is the snow blower doesn’t come with any kind of shovel tool to clear snow out of the chute or auger. I came up with my own solution though.
Before I purchase a lawn mower I’m waiting to see if Ryobi releases one in their Whisper series before spring. If they don’t, I’ll buy one of their current models. The mowers fold up better to save even more space, which will be great.
This whole experience with Ryobi’s customer service makes me happy I switched to Ryobi a few years ago. It even pushed me to buy their cordless nail guns to replace my pneumatic ones last week. One of my shop projects after the kitchen is finished will be to build a system to better organize and store all of my cordless tools, so I’ll share my Ryobi collection then.
I’ve been able to revive a dead power tool battery before, but Ryobi has some extra protection so you can’t trickle charge them from the contact points on the outside of their batteries. I was able to use a method I found on YouTube to trickle charge from the inside and the battery is working again.
When I say “dead battery” I mean the charger status shows the battery is defective. It can do this if the battery completely loses all of its power or the cells become imbalanced. The charger has built-in safety measures that prevent it from charging batteries in this state.
Be aware that opening the battery like this will void the warranty. Due to the special screws (T10 with a hole) I bought a security bit set from Menards for $5.
Update: A second battery went dead the day this was published. This method resurrected that one as well.
I haven’t seen a cordless system with the variety of cordless tools available from Ryobi. They’re also really affordable and Home Depot runs a lot of specials on them. I found a great deal on a used set of six tools, so I’m making the switch.
Judging by the saw dust on this shelf I think it’s time to clean my entire shop and get some kind of air filtration system.