Milwaukee M12 Heated Jacket Failures

B got a Milwaukee M12 heated jacket over Thanksgiving to wear in the coolers when she’s at work.

The pocket where you connect the batter is on the back left, which is an awkward position. In less than two months the wire frayed by the barrel jack.

The exposed wires caused a short in the M12 Power Source, which is the red plastic shell that connects the battery.

The part was dead in the water and gives an error status. What terrible designs in the jacket’s wiring and the power source. Luckily, the battery does have fault protection and still worked. I checked the item on Milwaukee’s web site and other people had the same problems. After leaving a review, it looked like Milwaukee reached out to them. So I left my own review with a picture of the wire…

My partner got the jacket less than 2 months ago. The wire frayed by the connector causing a short, which appears to have killed the power source. I read 12.5v out of the battery just fine, but nothing from the power source. Terrible design in the jacket and with no protection in the power source. I can fix the connection and barrel jack on the jacket without an issue, but not much we can do about the power source.

Their social media team sent me an email the next day…

We are sorry to hear you are experiencing some issue with your M12™ Power Source! As a one-time courtesy, our team would like to assist with a replacement!

About a week later they emailed me again, with a return label to send them both the battery and the power source and they sent us replacements. Kudos to Milwaukee for sending the new version of the power source and a 3.0 Ah battery when the previous one was 2.0 Ah. B will be happy about the extra battery life.

By the time we got both items it was exactly three weeks after I had left my review. I isolated the wires with some cardboard between them so I could make sure the jacket worked with the replacements. It was a success, so I separated the two sides of the wire, tested which side came from which part of the jack, and then cut it off.

I stripped back insulation, put shrink tube around each wire, connected a new jack, put shrink tube around both wires, and gave it a couple wraps of electrical tape.

I might end up getting a right angle jack to help with the strain relief. We’ll see how this holds up.

Simple Kitchen Storage Improvements

I needed a few easy things to tackle over the weekend and since we’ll be losing a little bit of storage space (though gaining some new space) as part of the kitchen remodel, I wanted to make better use of wasted space in some areas.

First up was a small cabinet between the range and dishwasher where we store our baking sheets, cutting boards, and other similar size items. The top 1/3 or so of it was dead space, so I added a couple of shelves made from scrap wood.

Now we have a spot for aluminum foil, wax paper, plastic wrap, parchment paper, and ziplock bags. This freed up two entire drawers in the island.

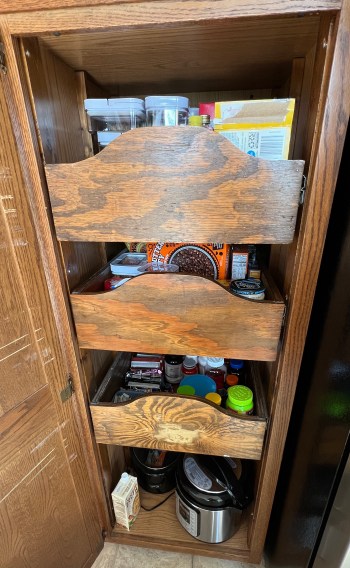
The second task has been on my ideas list for at least six months. The pantry cabinet in our kitchen had three large drawers, spaced way too far apart. There simply are not that many tall food items, at least not the stuff we buy.

With the cabinet being so tall it’s hard to get a feel for the space in this picture, but you can see the top drawer, with our tallest items, had quite a bit of wasted space above it. I decided to leave it where it was for flexibility and because it’s already hard to see what’s in there. I moved the second drawer up 2-1/4 inches and the third drawer up 7-1/8 inches.

This gave me plenty of space to add a fourth drawer. I still had this one with slides sitting in the basement after taking apart a tower of drawers four years ago.

Unfortunately it was too wide, so I had to take it apart and make it narrower. I decided to make it shorter as well to match the others. By chance it was already the same depth.

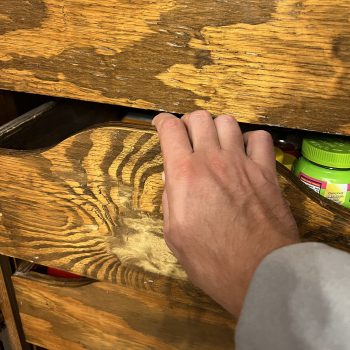
Something I wasn’t thinking about when I moved the drawers was the areas meant to be handles were now really close to the bottom of the drawer above, begging for smashed fingers and an F-bomb.

I always thought it was an odd design for a drawer pull to be honest. I made a template for the drawer fronts and cut the other drawers to match. I also used a roundover bit on those front edges.

I measured out the placement, installed the drawer slides, and slid in the “new” drawer. Who doesn’t love more storage space? Especially for food!

I’ll paint the drawer fronts when all of the cupboards get painted. A third bonus improvement was a quick fix for this utensils drawer, which has been busted for years. I’m surprised it hadn’t fallen apart completely.

I cut a piece of wood for the corner, added glue and brad nails, and called it good.

All fairly quick and easy projects that improved our kitchen organization.

Unclog a Bissell Carpet Cleaner

If you have a Bissell carpet cleaner that won’t spray, the heater core might be clogged up. Start removing screws and parts (you can probably find a video on YouTube for your model) until you find a rectangular metal part with wires and hoses connected. For this model it turned out I didn’t need to take the handle pieces apart.

After you remove the wires and hoses, you should be able to pull the heater core out.

Then you can pop off the cover and clean out the inside. I should have taken a picture of the junk that was caked in the channels, but this is what it looked like after I did a quick cleaning.

Then comes the fun part of trying to fit everything back together. 🙂 I had to do it twice because I didn’t route some of the hoses properly. The unit works again though!

Learning From a Retractable Extension Cord Reel Restoration

My brother gave me this reel, which I think he got from an estate sale.

My garage only has an outlet on the wall by the house and one in the ceiling by the garage door opener, so this will come in handy as a quick way to get power anywhere in the garage. There really wasn’t much to restoring it. I cleaned it up, gave it some paint, and put a new grounding cord outlet on it.

PIC

I love bringing things like this back to life because we’ve become too quick to discard things. Taking stuff apart also allows me to learn. I’ve often wondered how the wiring worked in a retractable mechanism like this. It’s pretty cool. I bet if I took apart my small wet/dry floor vacuum, the retractable cord in there would be built similar to this. Now I’m curious how retractable air hoses work!

There’s always a risk of breaking something when taking it apart though and that’s exactly what happened to me. The spring snapped when I would it up in the wrong direction. I was able to fix it by cutting the spring, drilling a new hole, and using a nail as a rivet. Hopefully it lasts.

I put everything back together and hung it in the garage.

Improved Dumbbell Storage

I have a 3-tier dumbbell rack, which works well, except for one key piece of the design. The lips that hold the top of each dumbbell aren’t really tall enough for the heavier dumbbells. Here’s a rough video showing the problem.

A 50 pound dumbbell only has to slip once or twice smashing your fingers on the bottom bracket before it’s time to come up with a fix. My solution was to cut a couple strips of plywood, notch them out to mate up with the the current lip, drill some holes, and bolt it together.

Didn’t need much extra height really. Here’s another rough video showing the improvement.

I also added a shelf for the smaller dumbbells because all of my sets don’t fit on the rack. I left space for two remaining pairs; the eights to match everything in my set from five to 40 pounds and some 60s (ordered today).

For a final touch, I created labels similar to what I made for the pulley weight stack.

DIY Trash Bin Wheel

Back in April, a wheel fell off my trash bin and someone ran it over. Without the wheel, the bin easily tips over and it’s been a pain in the ass getting it out to the road on trash day. So I finally made time to make a new wheel.

img_1715

I glued and screwed two pieces of 3/4″ plywood together. Then I found the center of the block, center punched it to make drilling easy later, and drew a circle to match the size of the working wheel.

img_1716

On the band saw I cut close to the line.

img_1717

Then I took it over to the disc sander and sanded right up to the line.

img_1718

On the drill press I made a hole the center with a bit slightly larger than the trash bin’s shaft.

img_1719

Time for a test fit. It was perfect!

img_1720

Back over to the sander, where I added a chamfer to the edges.

img_1721

Sprayed a couple of coats of paint.

img_1722

Then I used epoxy to attach a washer to each side of my wheel, which would sort of act as bearings.

img_1725

The final step was to find something to hold the wheel on the shaft. In one of my junk boxes I found a plastic piece, which fit on the shaft after using a file to make the hole a little larger. I used more epoxy to attach this to the shaft.

img_1726

I’m not sure how the plywood will hold up to the rain and snow, but I’m sure I’ll find out over the next few months.

DIY Dust Collector Chute for a Craftsman 351.233831 Planer

My Dad got an old Craftsman 351.233831 Planer (manual) from one of his friends for $75 after it stopped working.

When turning it on the motor would hum for a second and then the breaker (or power strip) would trip. He left the machine with me to fix. The motor shaft wouldn’t turn at all so I had to take a bunch of the machine apart (and cut the belt off) to get the motor out. I ended up using a screwdriver and hammer against the fan to free up the motor. It didn’t want to move, but slowly some hardened gunk broke up and the shaft was spinning. Since I had it in pieces I cleaned out the gear box and applied new grease to the gears.

That’s not what the title of this post is about. Since I had the machine I thought it would be nice to build some dust collection for it; these machines create one hell of a mess. Here’s a step by step of the dust collection build.


img_0897
Murdered Out!

I think it turned out pretty good and the paint is a nice touch. I might have to paint the one on my Delta dust collector.

After putting the new belt on and testing it out I noticed the feed rollers were in really bad shape so ordered a new set. The machine is an absolute beast, so I mounted it on one of the Harbor Freight stands, made a plywood base for the bottom, and put on some castors.

craftsman-planer-stand-wheels.jpeg

I still need to figure out how to replace the feed rollers and will swap out some of the knives that are nicked up. Then it should be running like a brand new planer! It’s cool to see my Dad getting excited about a new hobby; he already has a bunch of pallets collected to tear apart.

Lamp Repair: Replace Touch Control with a Switch

My Mom’s bedroom lamp was malfunctioning so I told her to send it down with my Dad and I’d take a look at it.

The lamp uses a very common TA-306A touch control unit and the BT134 thyristor on the board often gets fried. I think this might have been my bedroom lamp when I lived with my parents 20 years ago, so there is no sense buying parts for it. I replaced the touch controls with a switch I salvaged from a different lamp.