
Yesterday I installed a folding power rack in my garage, which completes my garage gym reorganization. Since I now have a truck and a car, I didn’t want to dedicate half of my garage to the gym; I wanted to park both vehicles inside all year. I needed to significantly compress my garage gym space.
If you’ve been following my blog, you may remember posts where I created custom dumbbell storage, made a barbell accessory organizer, and figured out a way to store mats against the wall. I’m not sure if I talked about it in previous posts, but I removed the lifting platforms and sold my large Rogue R3 power rack, which took up a lot of floor space.
I wanted to get a wall-mounted folding rack. Rogue’s small one is $495, with another $163 for spotter arms, and doesn’t have free shipping. I found the Titan Fitness 21.5″ Fold Back Wall Mounted T-3 Power Rack, paid $284 for it, another $74 for spotter arms, and it shipped free. About half the price of Rogue’s option! It even comes with an extra set of J-hooks.
Let me explain how I did a solo install of the rack.
Unfortunately there weren’t any instructions in any of the boxes. There was a card showing a URL to download a manual, but it was a broken link. I emailed Titan Fitness in case anyone was working on the weekend. I got a general idea of the install from a couple of YouTube videos, but mostly came up with my own method, which worked out really well.
The first step was a shopping trip to Home Depot.
- 2″ x 10″ x 8′ boards (2 @ $10.36)
- 8″ composite shims (12 pack – $1.97)
- 1/4″ x 5″ lag screws (16 @ $0.54)
- 1/4″ washers (16 @ $0.12)
- 1/2″ x 2.5″ lag screws (8 @ $0.63)
- 1/2″ washers (8 @ $0.22)
Total before tax: $40.05
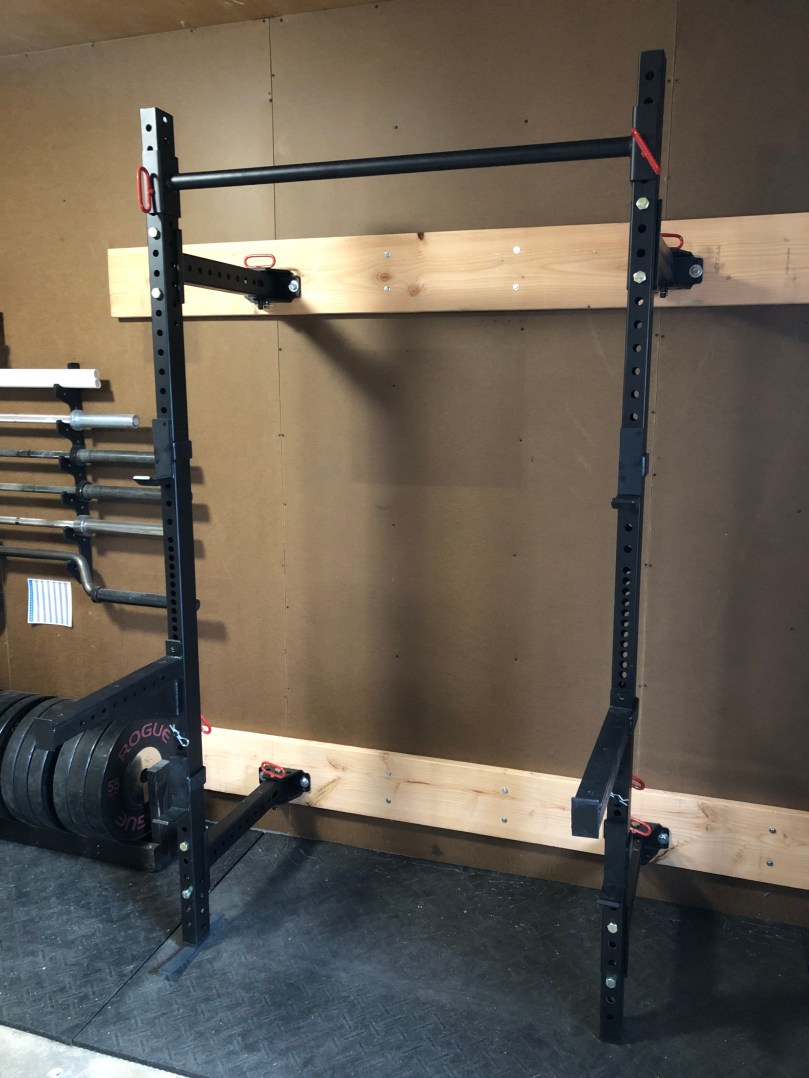
With the rack parts on the ground I bolted the swing arms to the uprights and connected the cross-bar. I stood it up against the wall to get a feel for how everything would go. I figured out the middle of the top stringer could go about 6’5″of the floor and the middle of the bottom could be 11″. With eight foot boards I could span six studs on the wall and screw in to four of them. I measured out the 16″ spacing on the boards and drilled eight holes.
Perhaps the trickiest part of the install to do by myself was figuring out how to get the heavy stringer on the wall make it level. With a stud finder I found the right most stud at 6’8″ from the floor and drilled a hole. Then I put a 1/4″ x 5″ lag screw in about 2/3 of the way to temporarily attach the stringer to the wall. The other end of the board was on the ground while I did this, so I didn’t have to support its weight.
With the one screw only in part way, I was able to swing the opposite end of the board up and put a level on it. When I was happy with the position I drilled through one of the holes in the board to make a mark on the wall. Then I could swing the board back down to the floor and completely drill out the hole in the wall. Swung the board back up, and partially put in another lag screw where I had fully drilled the hole in the wall. With the board held in place I drilled through the other six holes to make marks in the wall. Then I unscrewed the two screws, took the board down, and drilled the holes in the wall. Everything lined up great and I was able to completely put in all eight lag screws.

I repeated the same process for the bottom stringer, which was easier since it was so close to the ground.

I had to think about the next step a bit. Other people seemed to prop the entire rack up against the wall to figure out where to attach everything. With my floor sloping from right to left (back to front of the garage), I knew I’d have to shim up the left upright when the rack was open. I decided to do the right upright on its own first.
I had measured the width of the cross-bar, telling me the middle of the mounting brackets would line up pretty close to the studs I hadn’t attached the stringers to. I propped the upright up against the stringers and used a framing square to line it up. I also used a level to make sure the uprights were straight up and down. Some 1.5″ drywall screws temporarily attached the brackets to the stringer. I wanted to be sure it would swing against the wall before drilling holes for the lag screws. Since the rubber foot was solid against the ground, I had to give it a good push, but once it was free, it swung great. I drilled through the big holes in the brackets and used 1/2″ x 2.5# lag screws to solidly attach the brackets to the stringer.
With that first upright in place I propped up the left upright and attached the cross-bar. I once again used the square to line up the arms with the stringer and a level to get it straight up and down. Now I had to make the uprights sit level with each other, so I placed a long level across the support arms of each upright. I kept adding shims until the bubble showed level. Rechecked square and upright level before I attached with drywall screws again. I removed the cross-bar and shims to make sure this one could swing up against the wall too. All was good so I drilled and put in the lag screws.
In the picture above you can see some shims under the left upright. According to Home Depot’s product page…
Can easily withstand up to 16,000 lbs. of pressure
Should be sufficient!

Everything easily folds out of the way.

With a bunch of extra space on the side of the stringer, I used screw hooks (free from Menards) to hang bands, jump ropes, belts, etc.

After finishing with the install I used the rack for shoulder presses and everything felt solid. I’m really happy with it and glad I found Titan Fitness instead of spending twice as much at Rogue Fitness.
Designating the rack as 21.5″ in the product title is misleading because that is the length of the swing arms. With the stringers, mounting brackets/hinges, and depth of the upright, the end of the rack is about 26″ from the wall. Also of note is that the diameter of the cross-bar is 2″, which is in between a normal pull-up bar and a fat bar. This will give me another option because I have a ceiling mounted pull-up and a set of Fat Gripz.
Later in the evening Titan responded to my email and sent the manual, so I’ll include a download link here for anyone who wants it. After seeing their instructions, I like the installation method I came up better because pretty much all garage floors are sloped and I installed everything by myself. It took me about 3 hours of work time, which was a lot of measuring and remeasuring.
Here is a 2013 photo of the garage gym, which was still pretty close to what it looked like a few months ago.

Now it looks like this.

I still have the pull-up bar hanging in front of the back door as well as a Ski Erg, Airdyne, and treadmill on the other side of the garage.

Can you provide more info for the shims?
LikeLike
https://www.homedepot.com/p/8-in-Composite-Shim-Bundle-of-12-SHM1-12-TW/202807695
LikeLike
What kind of power tools did you use?
LikeLike
I have all Ryobi now.
LikeLike
Hi, Nick and thanks for a very helpful post. I am planning to build out a similar setup in my 1-car garage with a similarly sloping floor.
I understand you leveled the rack with shims, but how did you level the workout flooring itself (if you did)? I am looking at a ~ 1″ drop across 4′, seems like would be noticeable when squatting unless leveled…
Thanks again,
-nikita
LikeLike
I didn’t do anything to the floor but my drop is probably only 1/2″ so it’s not too bad.
LikeLike
Hey Nick, do you think I can use the same manual for the Titan X-3 Series folding power rack? The instructions they have now are non existant
LikeLike
I really have no idea
LikeLike
Nick, have this same rig that I’m going to install this week. I’ve read from other reviews that the width of the rig doesn’t leave much clearance when racking the bar. How’s the spacing? Do you recommend shortening the top crossbar an inch or so for better/easier racking when fully loaded?
LikeLike
Yeah it’s tight, but ok. Forces you to be more controlled with things like bench press.
LikeLike
Just wanted to say I used your guide today and it was a life saver. The Titan instructions are terrible and I used your breakdown for each step. Came out great. Much Respect. Thanks for sharing.
LikeLiked by 1 person
Hi I know this is an old post, but hope you still get this. I found your instructions to install my new Titan rack, and they are by far the most detailed and easiest to follow that I’ve found. The one question I have is, once the stringers are up, and anchored to the six studs, does the rack also need to be anchored to the stringer at studs? Or can it be attached anywhere along the stringers? Thanks
LikeLike
Attach anywhere along the stringers.
LikeLike
Love your set up. Thank you for the detailed instructions. My husband is going to use them to hang up his rack this weekend. Where did you get your floor mats?
LikeLike
They are stall mats from Tractor Supply. Any horse supply store should have something similar. I wish I had some that don’t have the bumps on top, but they work well.
LikeLike
Thanks!
LikeLike
1/2″ x 2.5# lag screws – couldn’t find these. Are they supposed to be 1/2” x 2.5”?
Excellent guide btw! Just waiting for my rack to come in and going to use your instructions as reference
LikeLike
Oh yes!
LikeLike
Thanks for your instructions , I got my stringers up but surprise surprise … my floor is not leveled :(. About an inch of slope ! Really struggling but saw you got shims … hoping tomorrow I can get them and see how I can level it … also how tight did you for the screw that helps you turn the arms in? Is it supposed to have doom room to be able to move or lift the legs?
Thanks in advance!
LikeLike
Nick, your post is great. Thank you for sharing. Can’t wait to report back on the install!!
LikeLike
I’m installing the x3 folding on a carpeted floor and the first upright will not swing due to friction. Thoughts? Remove rubber endcap or will that compromise integrity? Install with shims then remove for collapsing?
LikeLike
Hey Nick, for the shims, how did you get them level with the bottom of the bar, since the bottom is horizontal and the shim taper off? Or is there a small gap between the lowest point of the shim and the upright bar? Thanks!
LikeLike
I leave mine with a gap and haven’t had any issues. You could put a another shim from the opposite direction as well.
LikeLike